| Informational Websites | ChronoMaddox -- the legacy of Chuck Maddox | OnTheDash -- vintage Heuer website | Zowie -- Omega information |
| Discussion Forums | ChronoMaddox Forum | Heuer Forum | Omega Forum |
| Counterfeit Watchers | ChronoTools Forum | ChronoTrader Forum |
|
|
The largest independent, non-commercial, consumer-oriented resource on the Internet for owners, collectors and enthusiasts of fine wristwatches. Online since 1998. | |||||||
|
||||||||
|
||||||||
Vintage Heuer Discussion Forum
The place for discussing 1930-1985 Heuer wristwatches, chronographs and dash-mounted timepieces. Online since May 2003. | |||||||
| |||||||
| |||||||
Hi Gianluca-that is great work-many thanks. Even just to have an idea on the ins and outs of the movement and how it comes apart/goes together is fantastic...whether or not it is actually put into practise! ;-)
Thanks and Good work!
Steve
: Hi all,
: some time ago I started to service some of my watches (the cheapest
: one like this Monza, surely not the Monacos ;-) ) and I
: documented, for myself, all the dismounting procedure...until
: now I don't think a similar post has ever been posted so I hope
: to please you all showing how an Heuer Cal15 (but is the same
: for a Cal11 or Cal12, chrono module apart) is made, part after
: part...
: I only recommend, if you want to service one, to do it at your own
: risk, is easier to damage it rather than make a good job if you
: don't have a bit of experience and don't know some tricks (I
: started with a movement bought on Ebay and had the help of an
: exceptional person..thanks again mate).. but is neither so
: impossible...
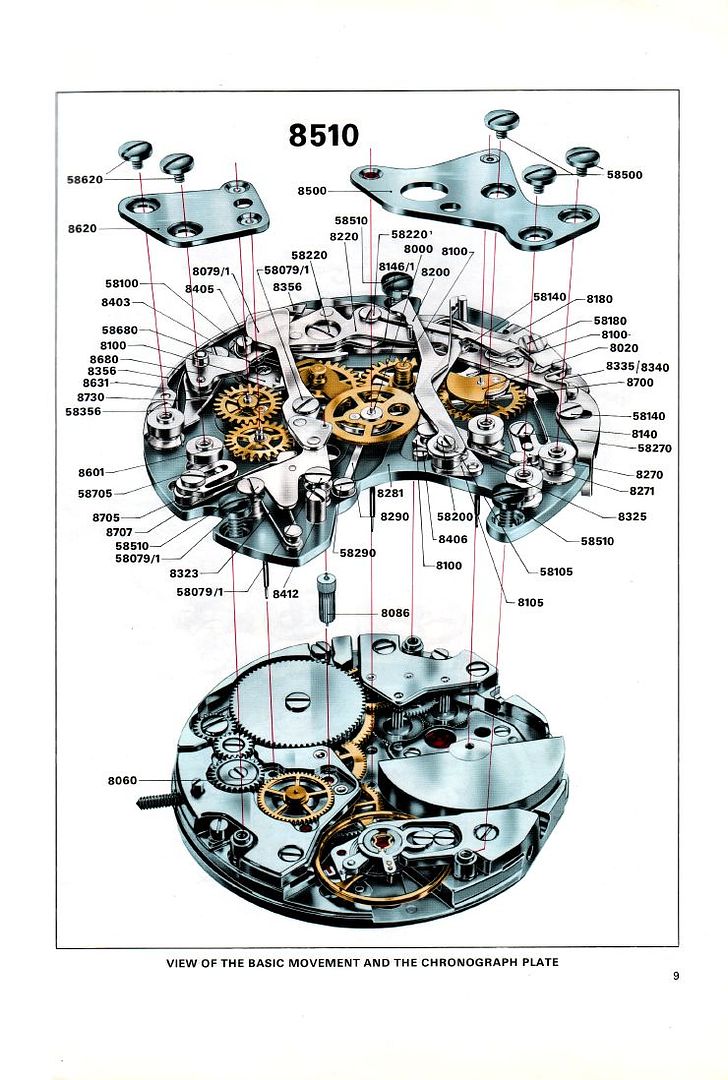
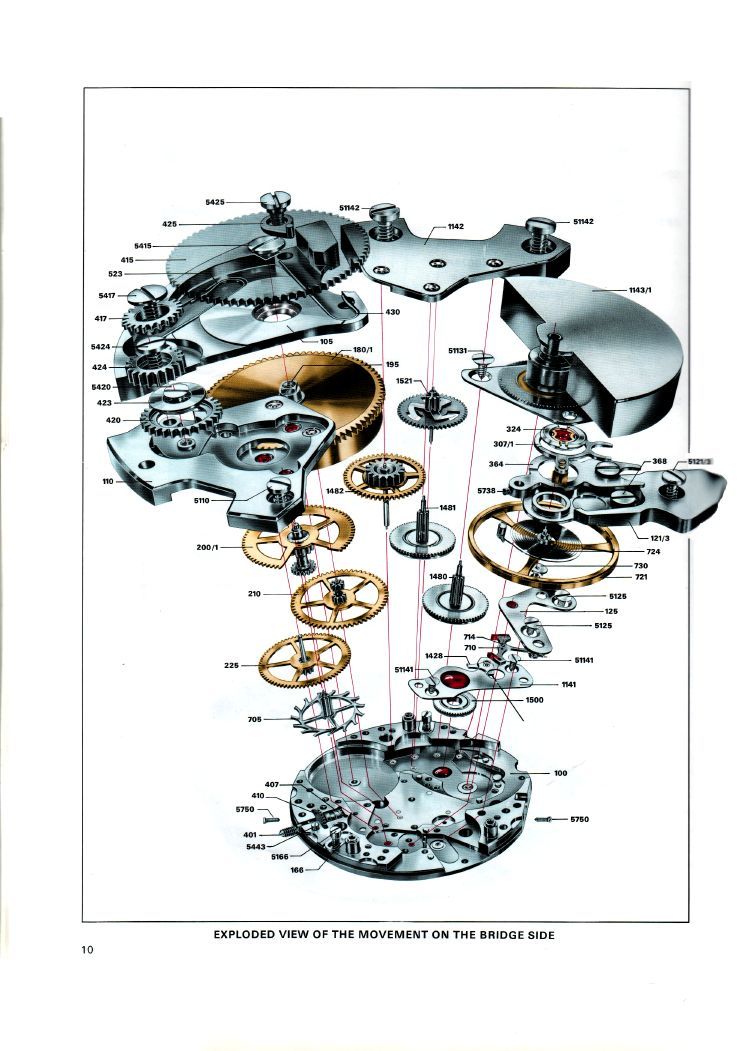
: This images are taken from the service manual and contain an
: exploded of the main parts (the chrono module and the basic
: movement):
:
: 
:
: 
:
: 
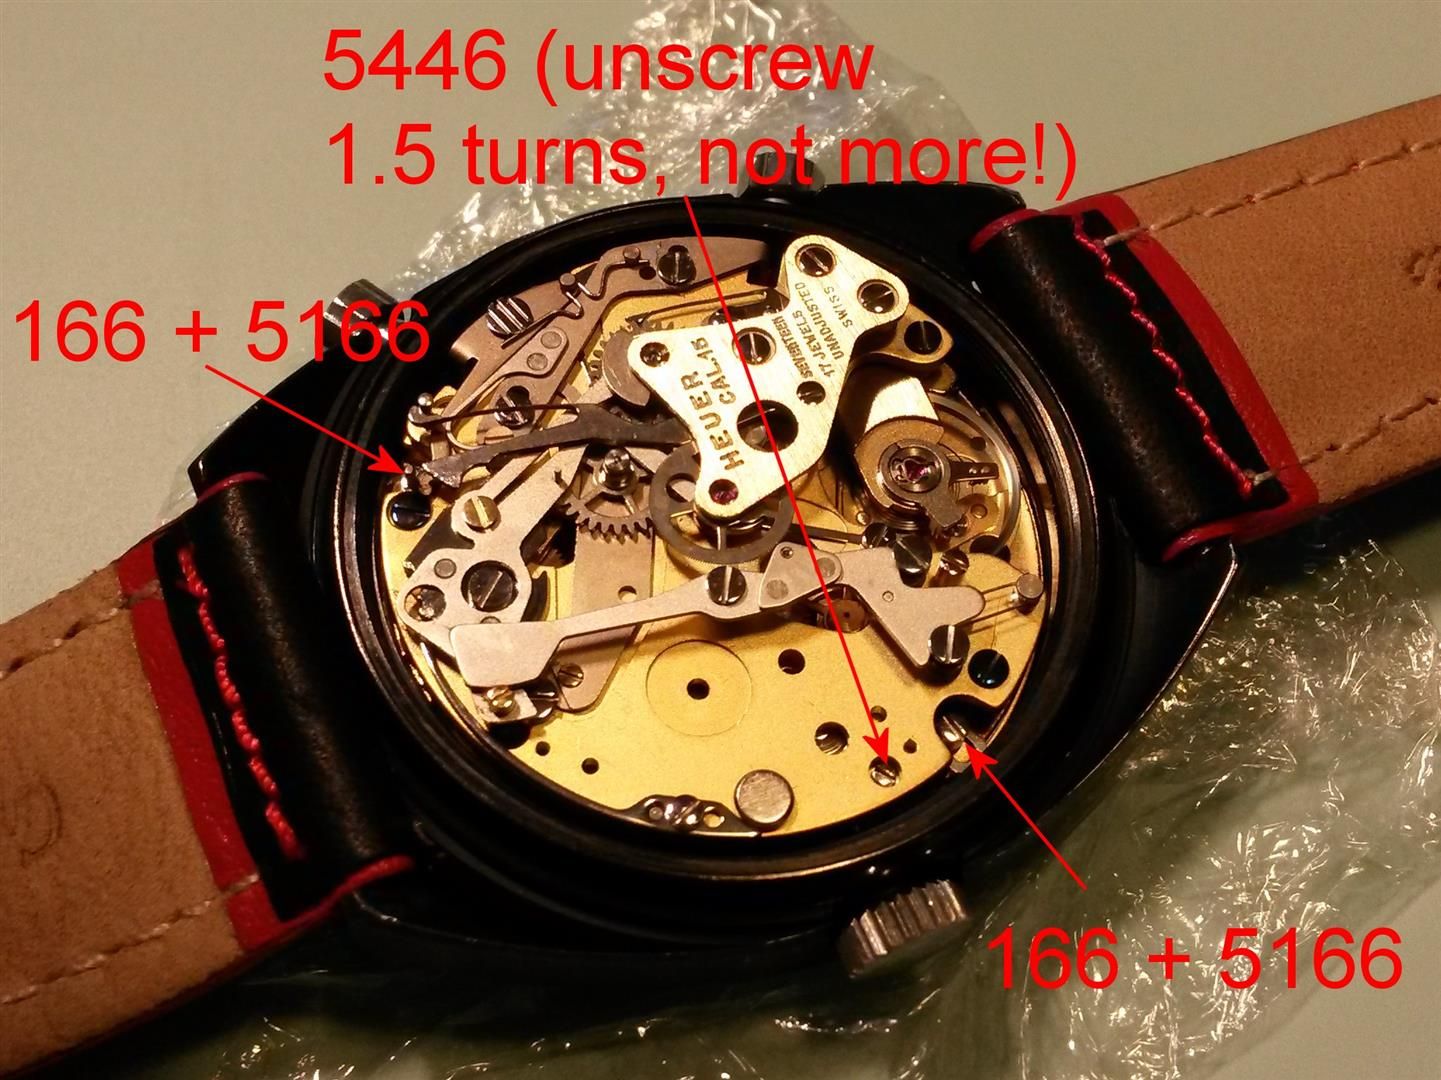
: First of all you have to uncase the movement from the case,
: assuming you have already opened the caseback start unscrewing
: the 5443 (sorry the image is wrong, is not 5446) setting lever
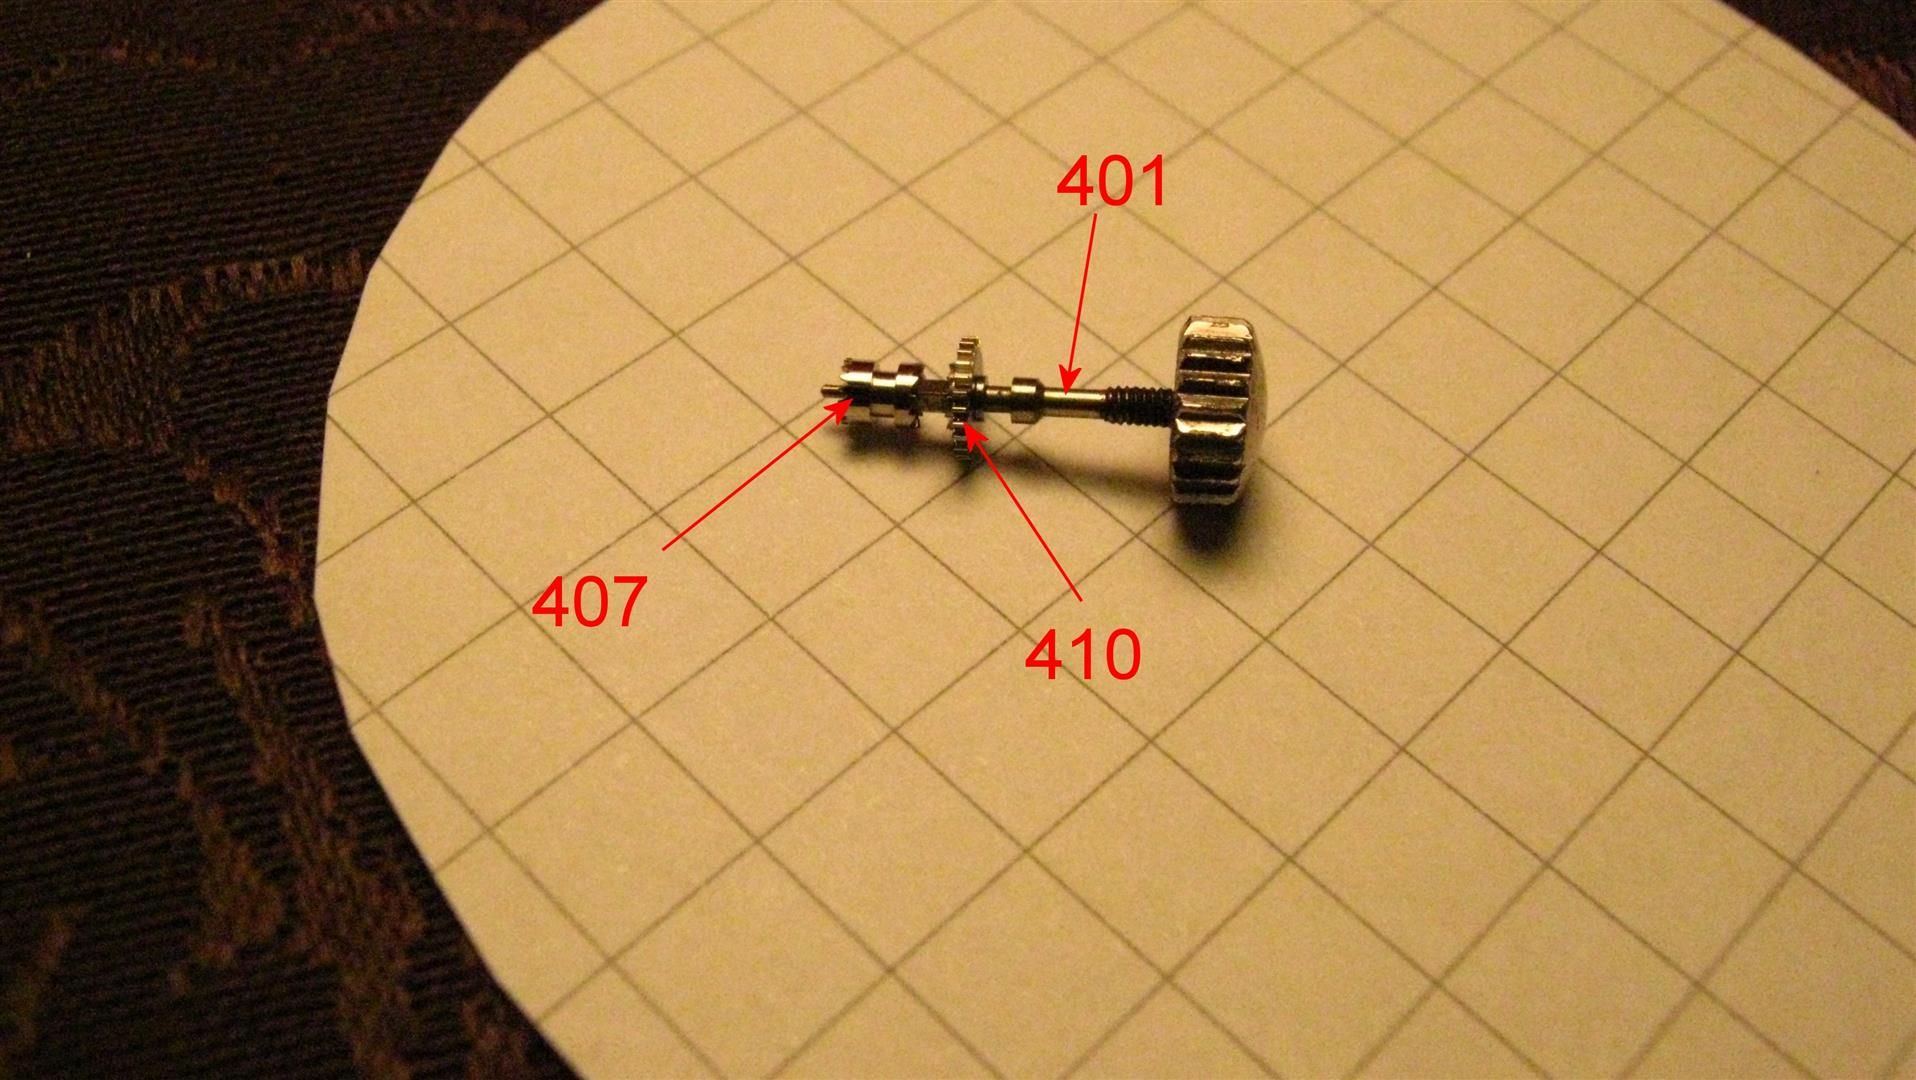
: screw (1.5 turns, not more !!) and pull outward the stem 401
: with the crown, then unscrew the two 5166 casing clamp screws
: and remove (or simply push inward) the two 166 casing clamps:
:
: 
: Then take the watchmaker's cushion and put it upside-down on the
: movement, turn the watch together with the cushion and the
: movement should remain on the cushion while you lift the case.
: Next step is removing the hands (you need specific tools to do it
: and can risk to bent or damage them, I always have a bit of fear
: every time I have to do it, anyway is a mandatory step and not
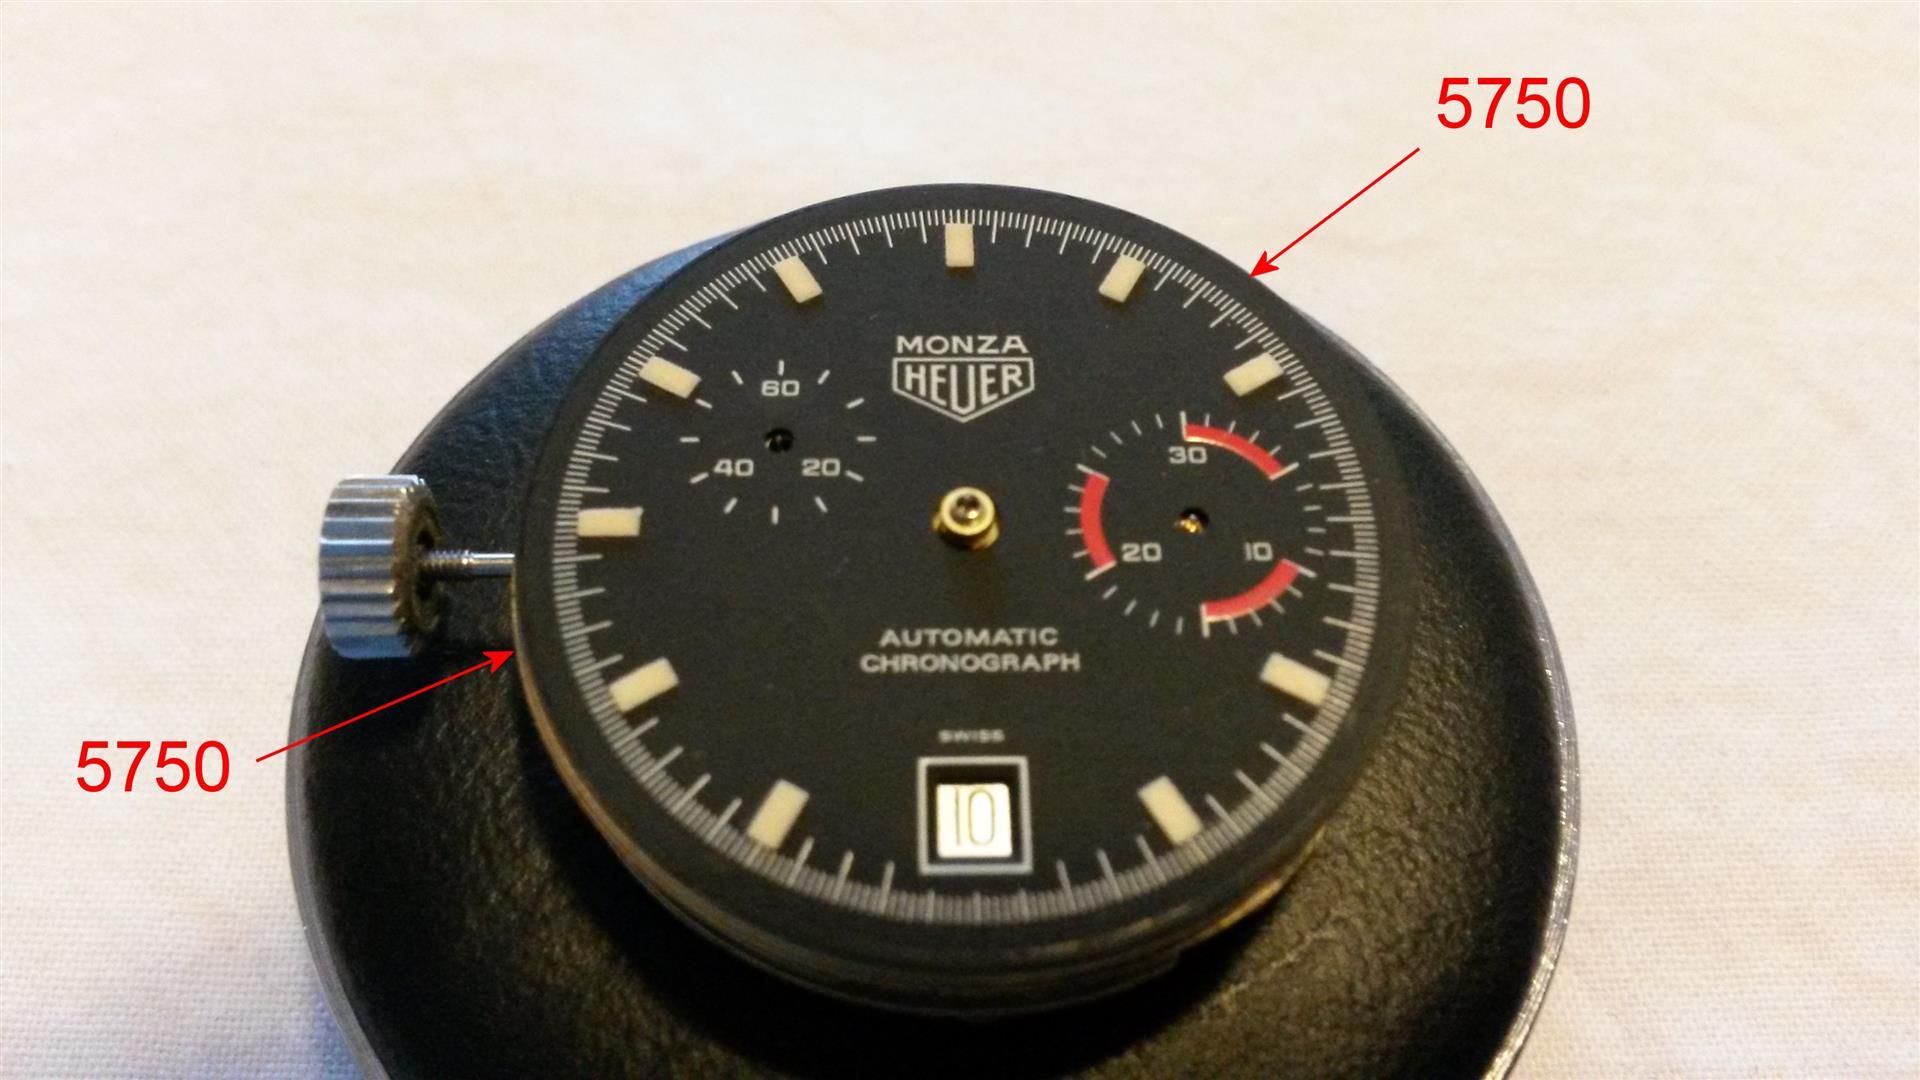
: the argument of this post) and the dial: to do this unscrew the
: two 5750 dial screws (are located on the movement's sides at
: 1.30 and 8.30):
:
: 
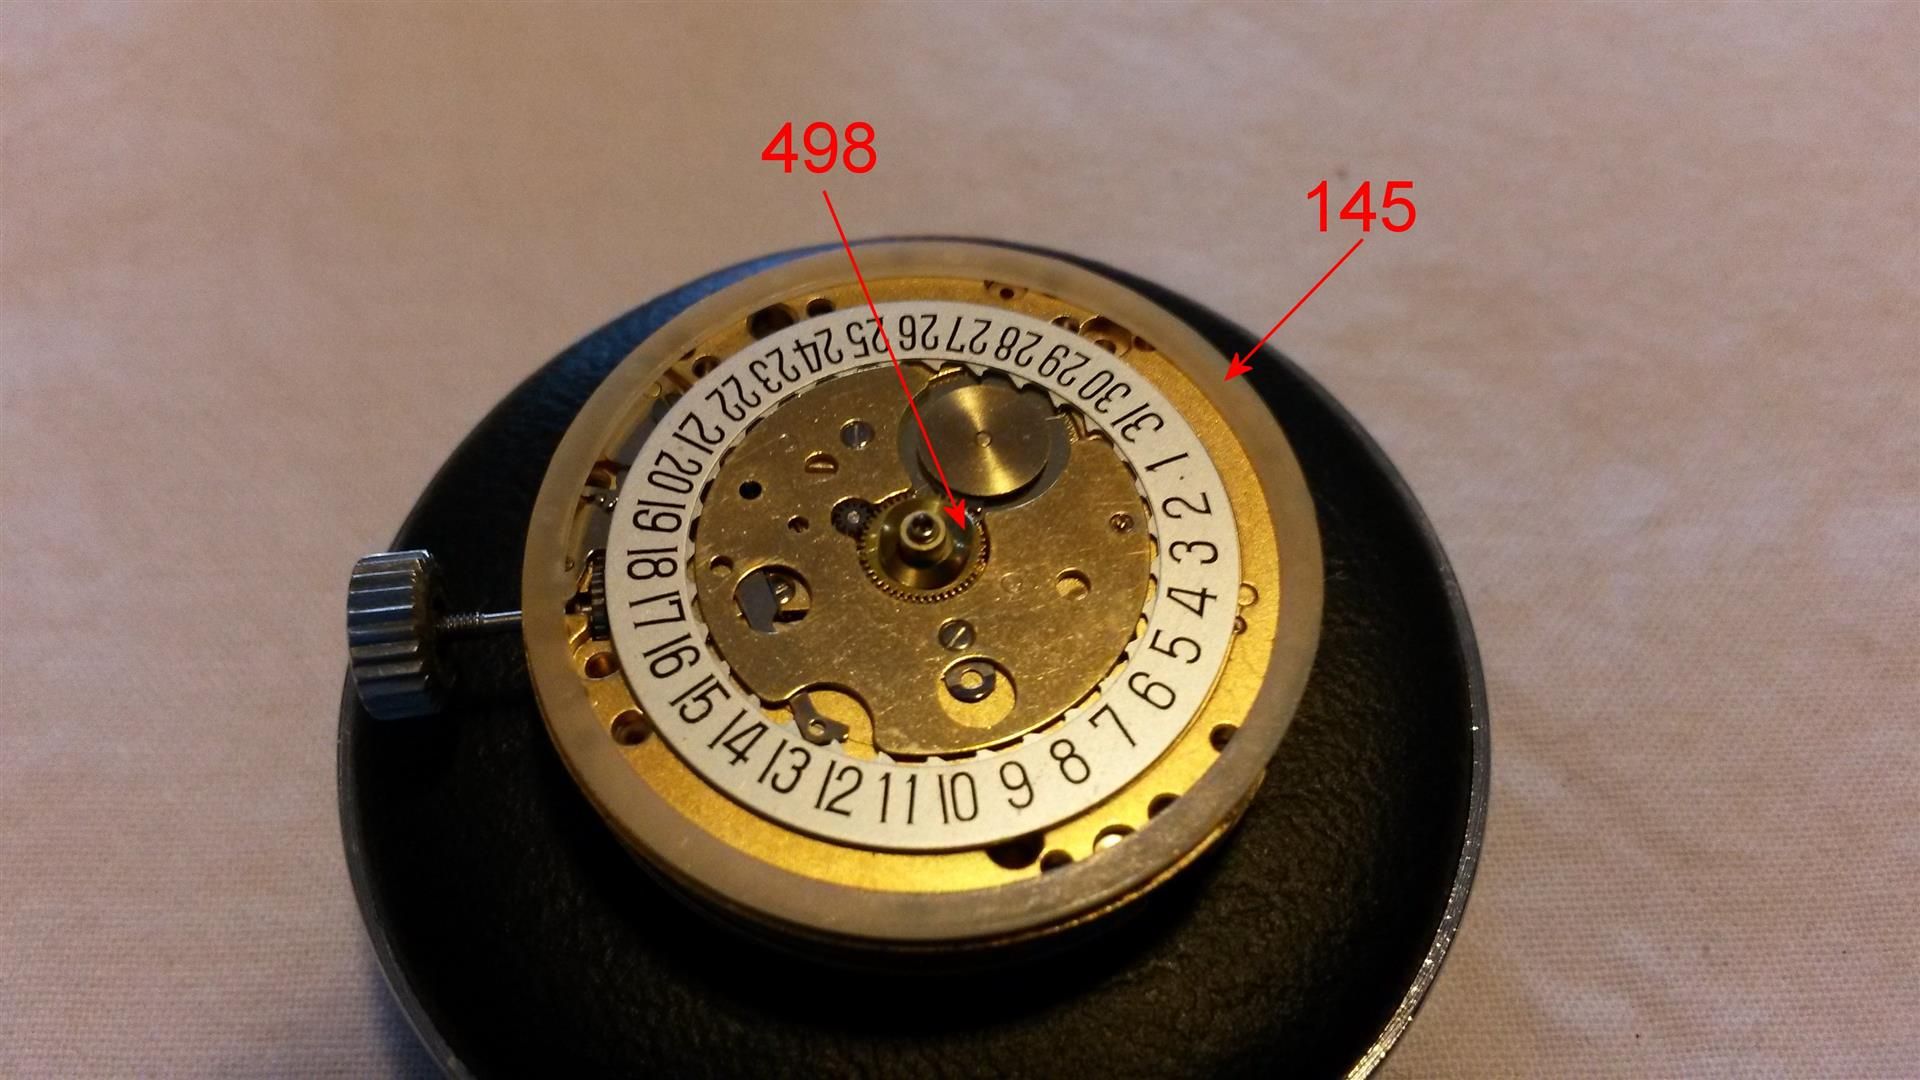
: Then take apart the 498 washer (very thin, take care) and the 145
: dial rest:
:
: 
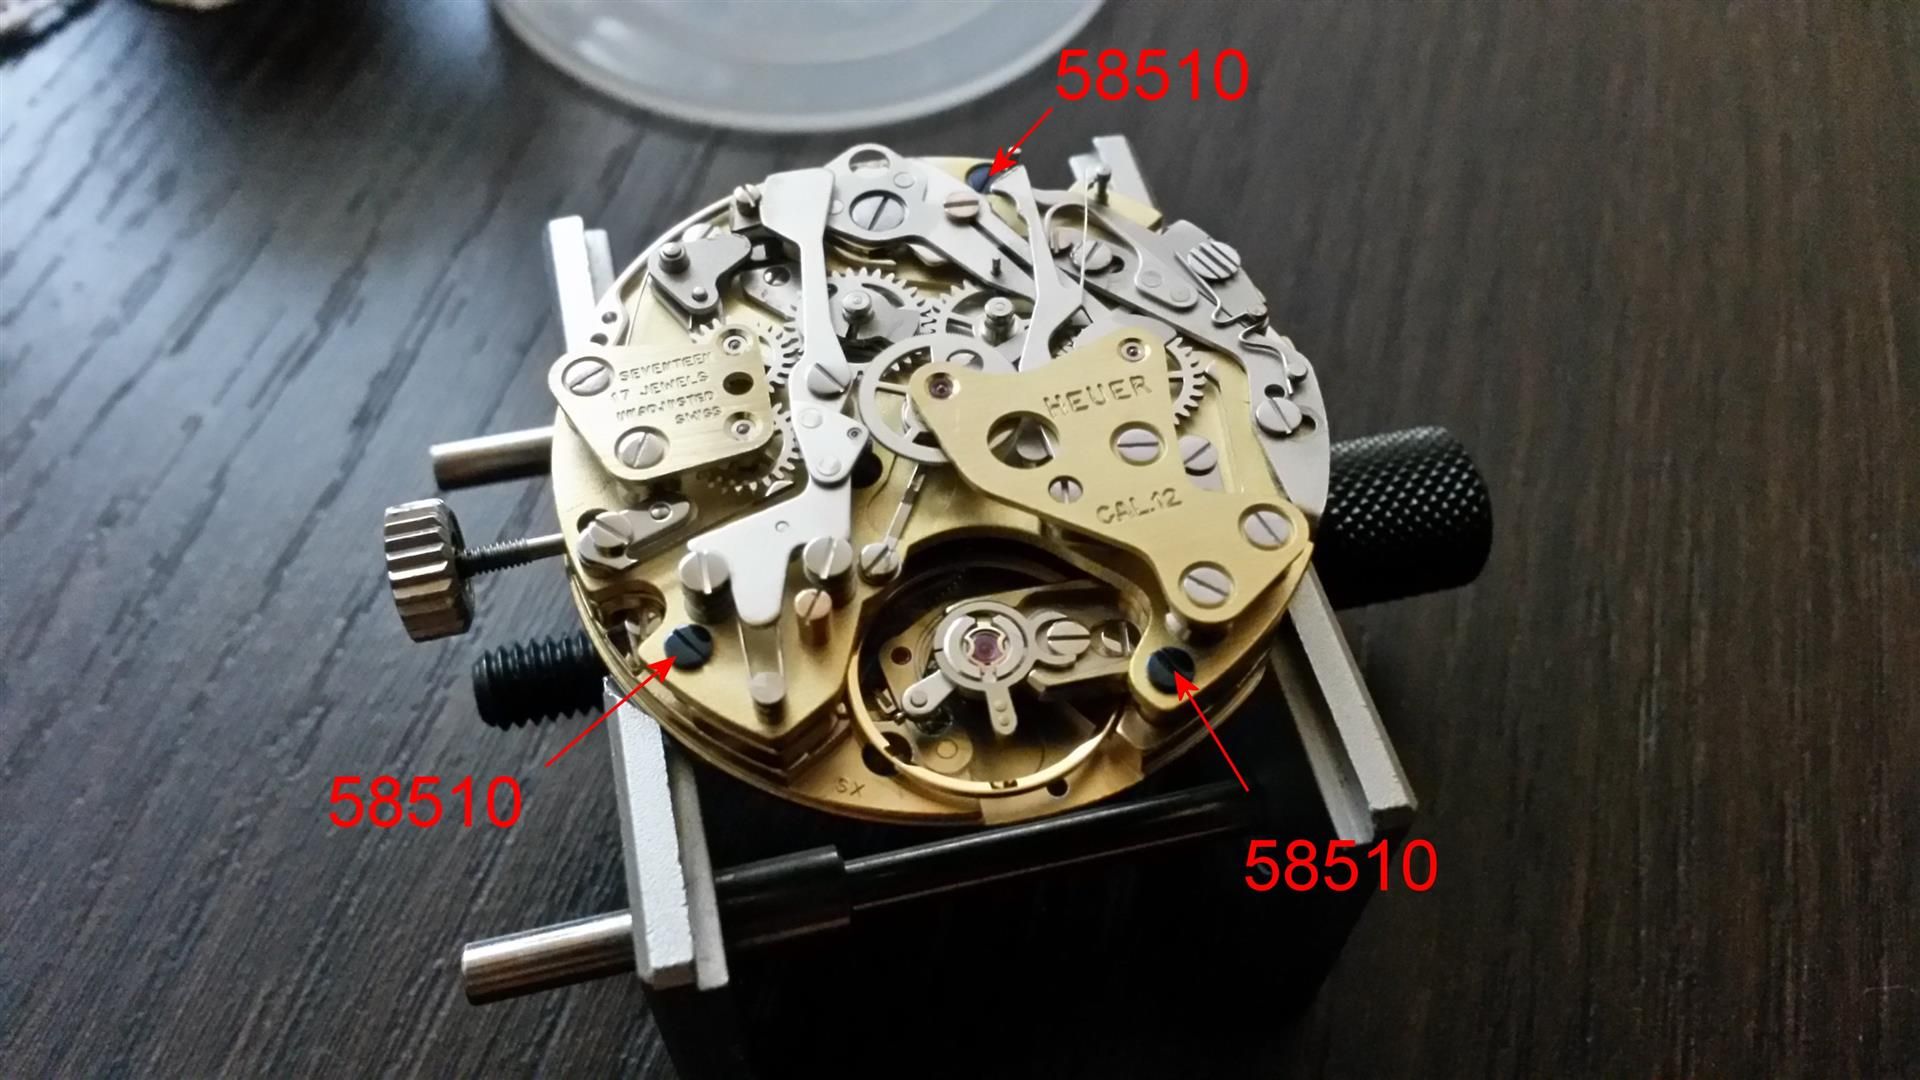
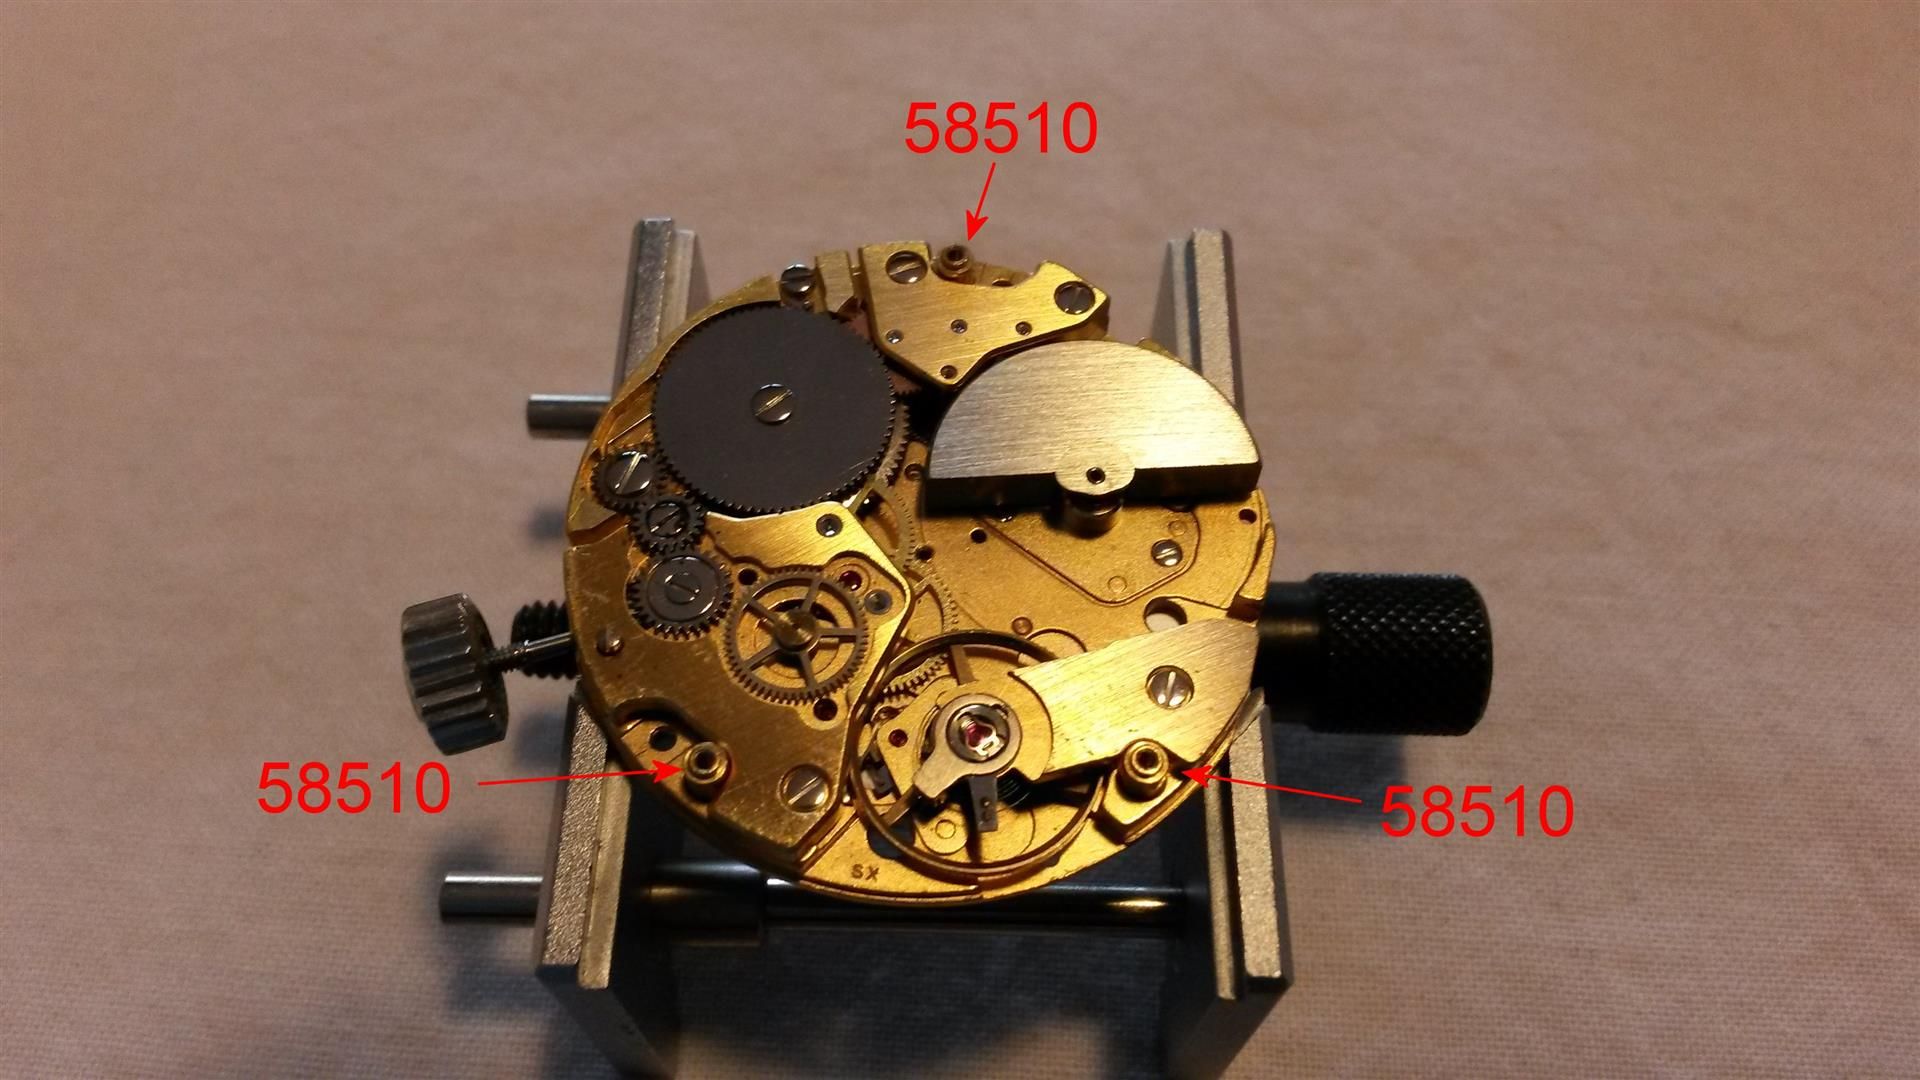
: Now put the movement on the clamp and remove the chrono module
: unscrewing the three blue 58510 screws (the following image is
: of a Cal12 movement, not 15, but screws are located in same
: place):
:
: 
:
: 
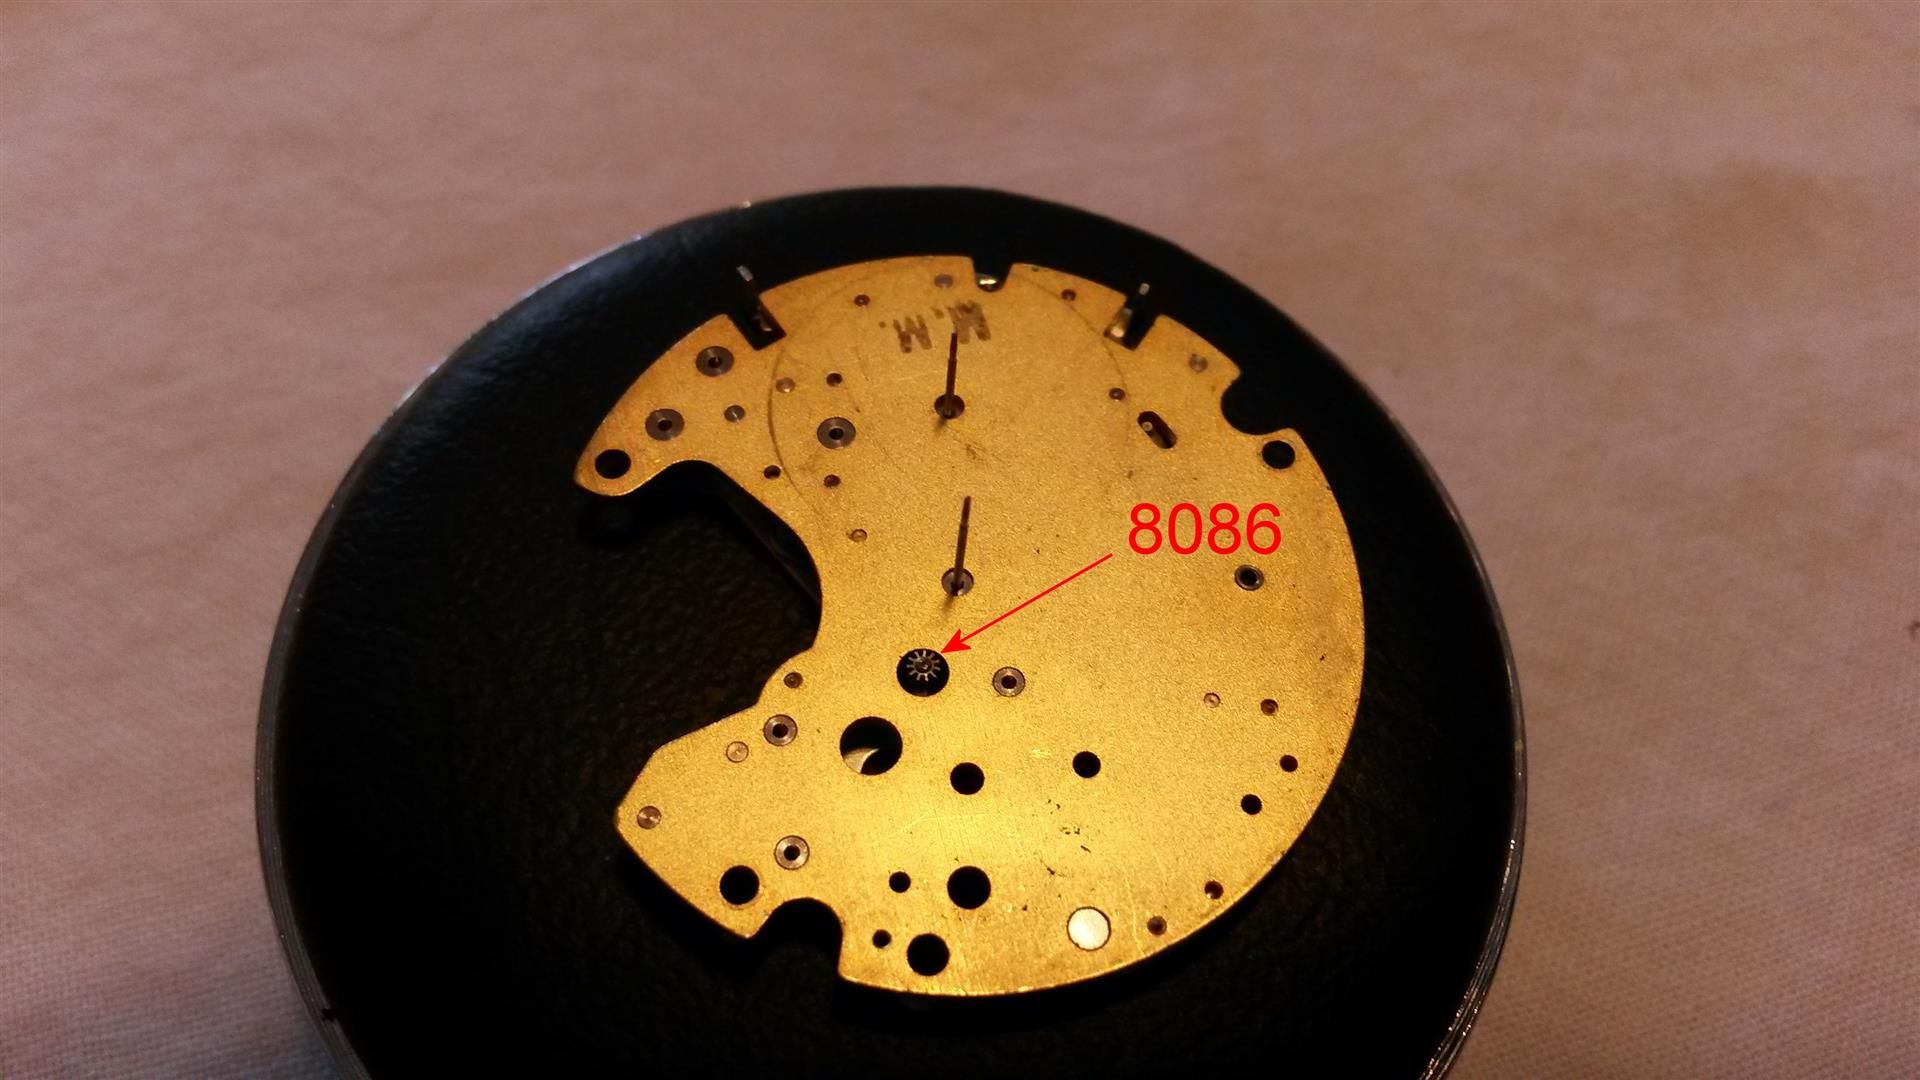
: Take care because probably the 8086 oscillating pinion will remain
: attached to the chrono module, so remove it gently (avoid
: damaging with the plier its small teeth):
:
: 
: Take apart and store the chrono module as isn't necessary to
: dismount it, simply wash it with the ultrasonic bath, just some
: parts like the chrono bridges will be removed after washing for
: oiling some parts.
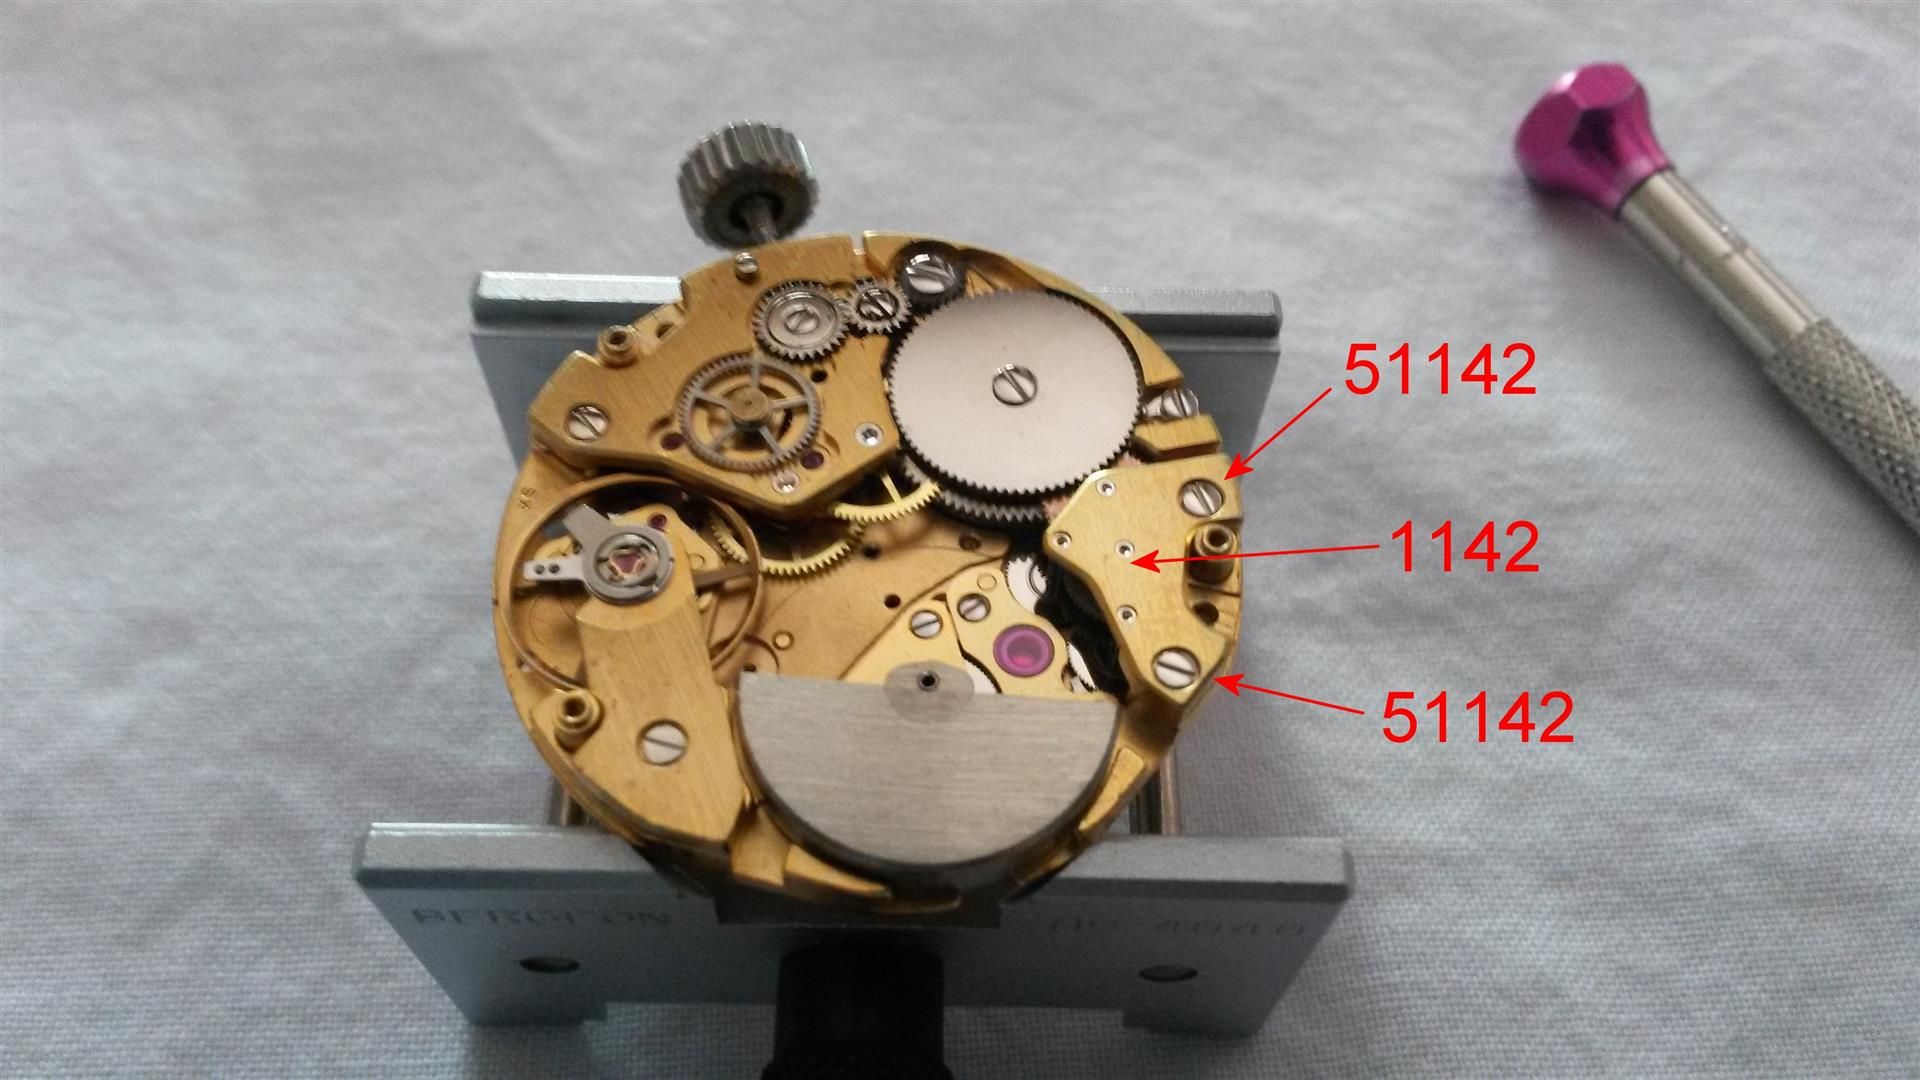
: Now let's start to dismount the main module: remove the 1142 upper
: bridge for automatic device unscrewing the 51142 screws:
:
: 
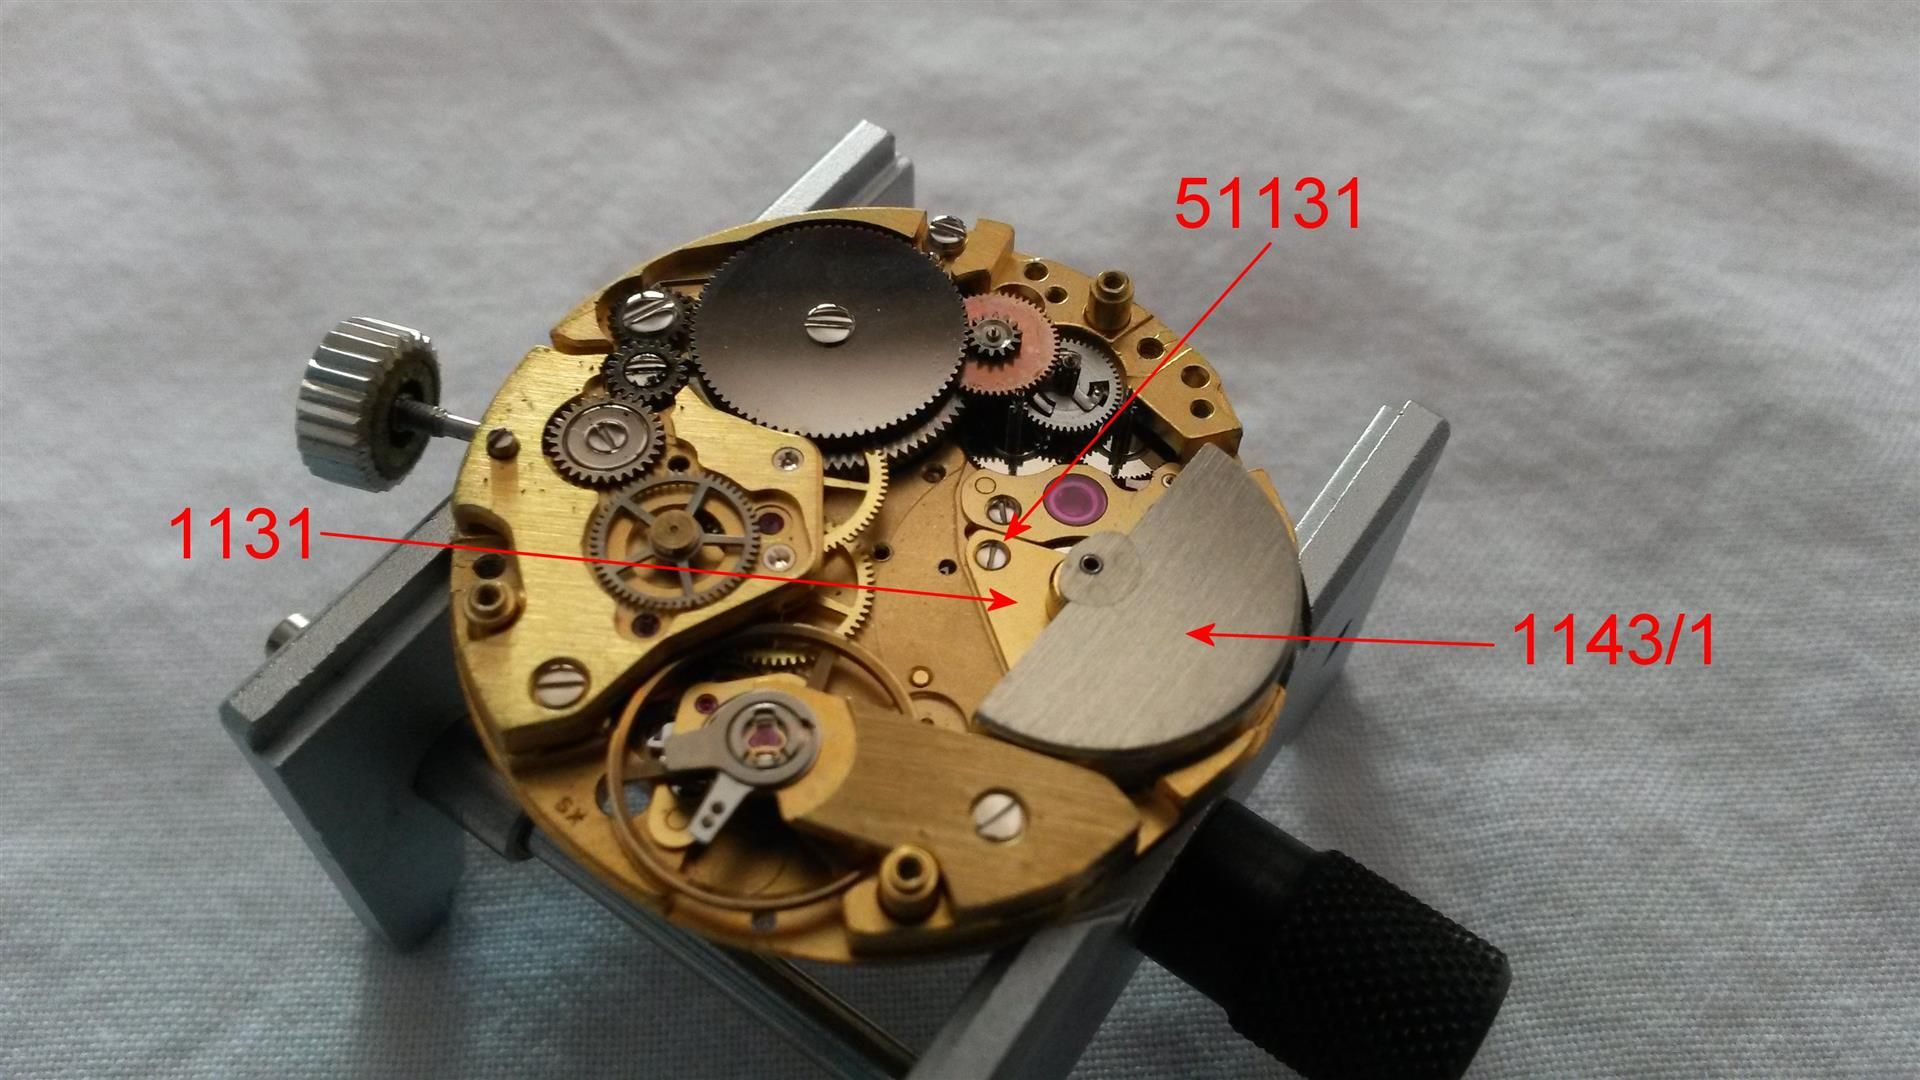
: Then remove the 1143/1 oscillating weight (the famous
: "microrotor") unscrewing its two 51131 screws (the
: second one is under the rotor):
:
: 
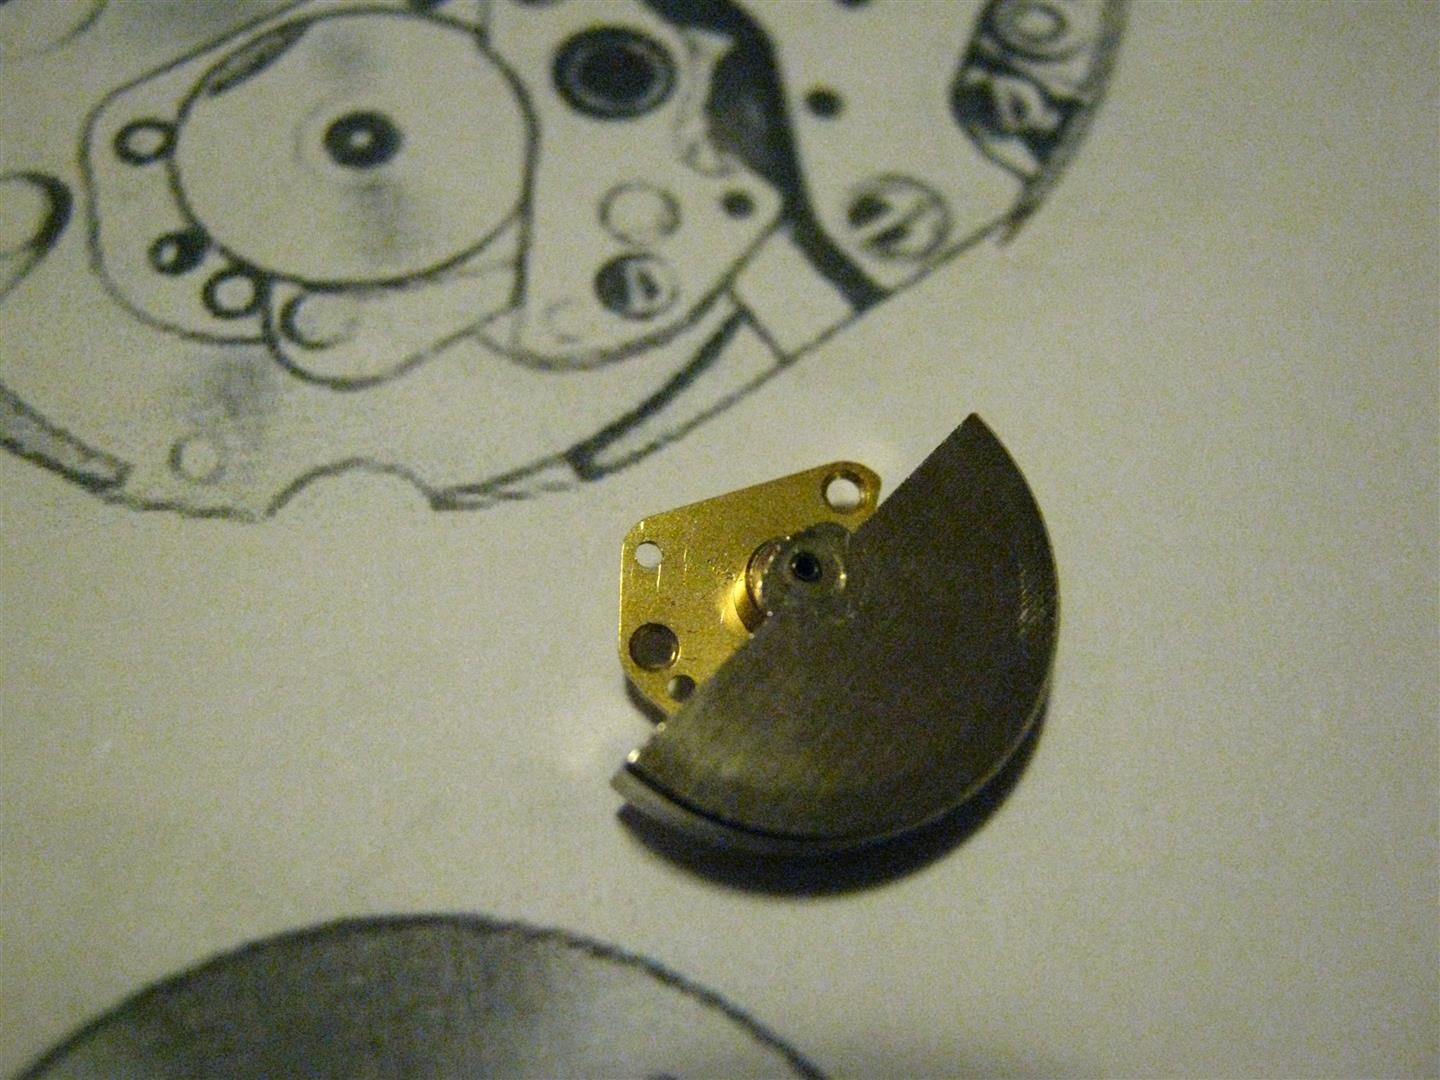
: The microrotor with its bridge 1131 will appear like this (under
: the golden bridge there is the gear that allows the recharge):
:
: 
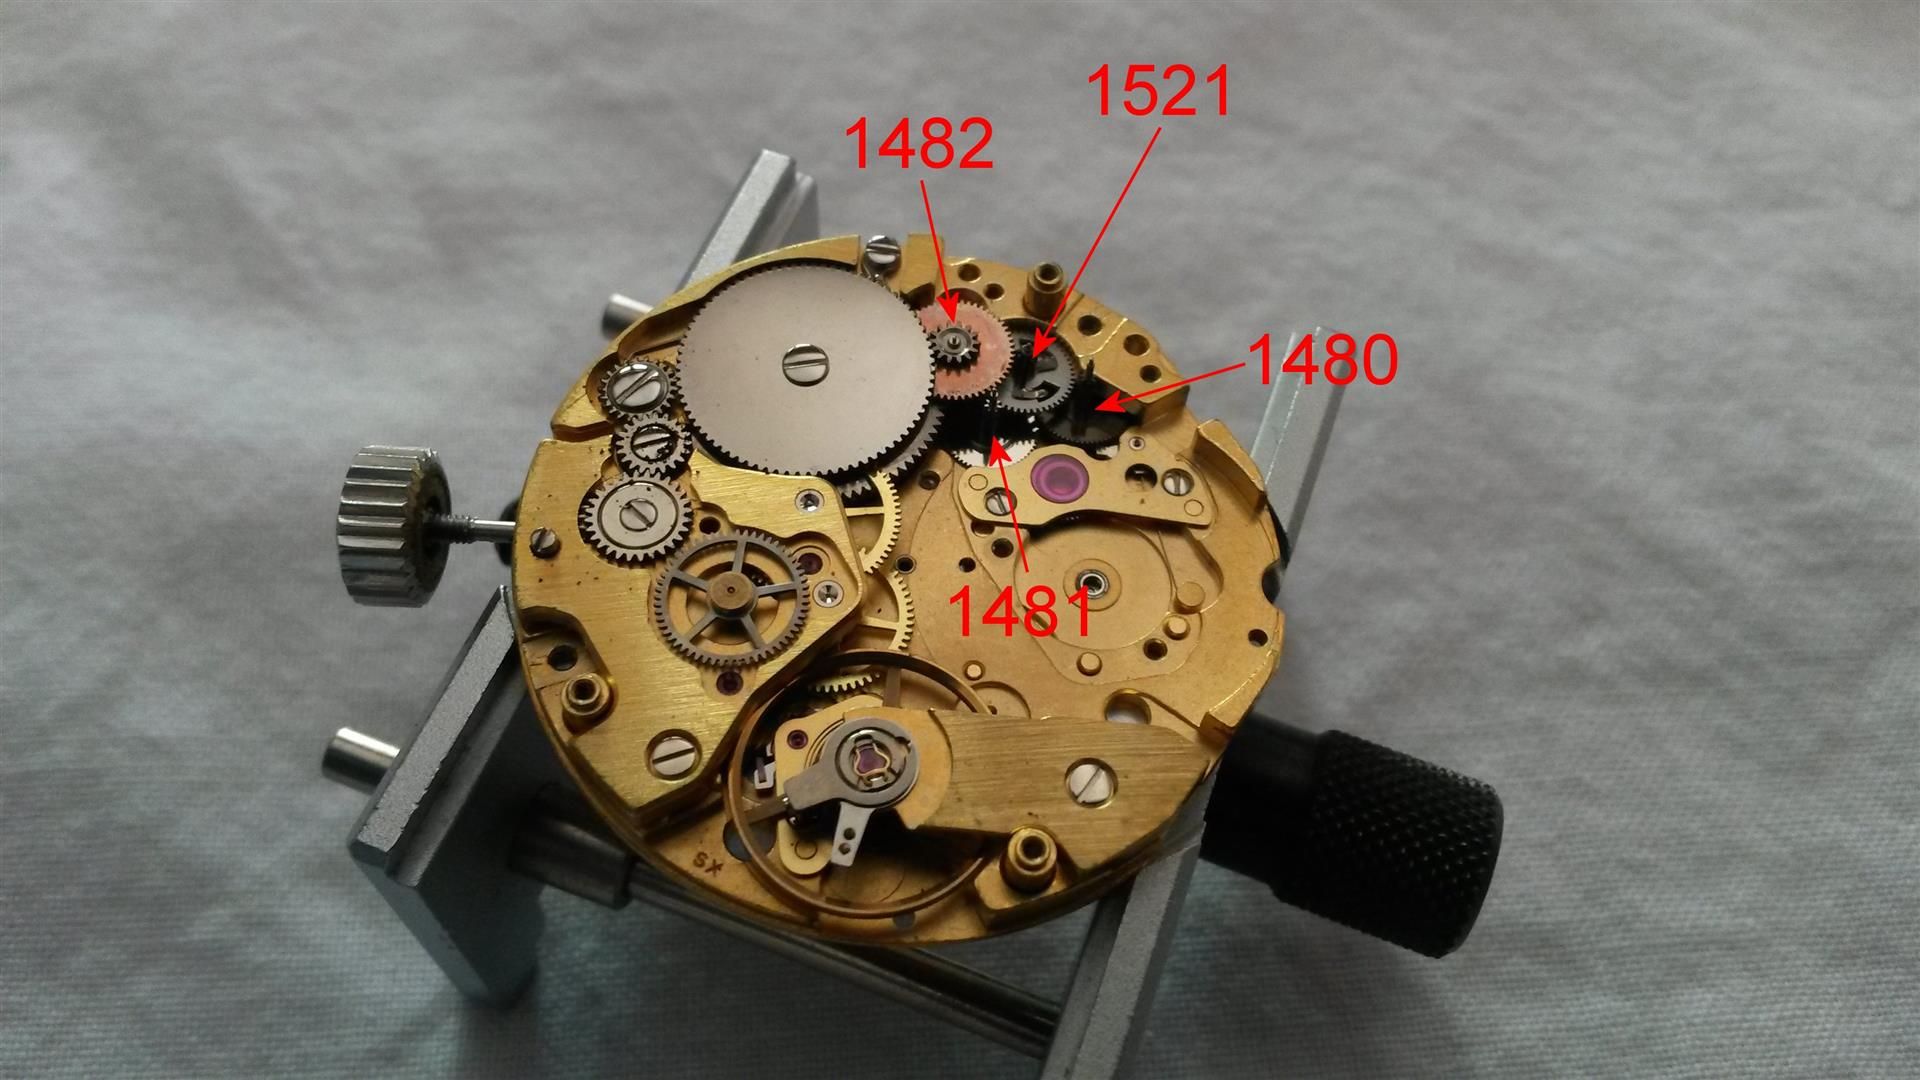
: Now remove the four wheels starting from the 1521 coupling wheel,
: then the 1482 driving gear for ratchet wheel, then the 1480
: winding up wheel and 1481 reduction gear (the last two are
: identical, no problem to store them together):
:
: 
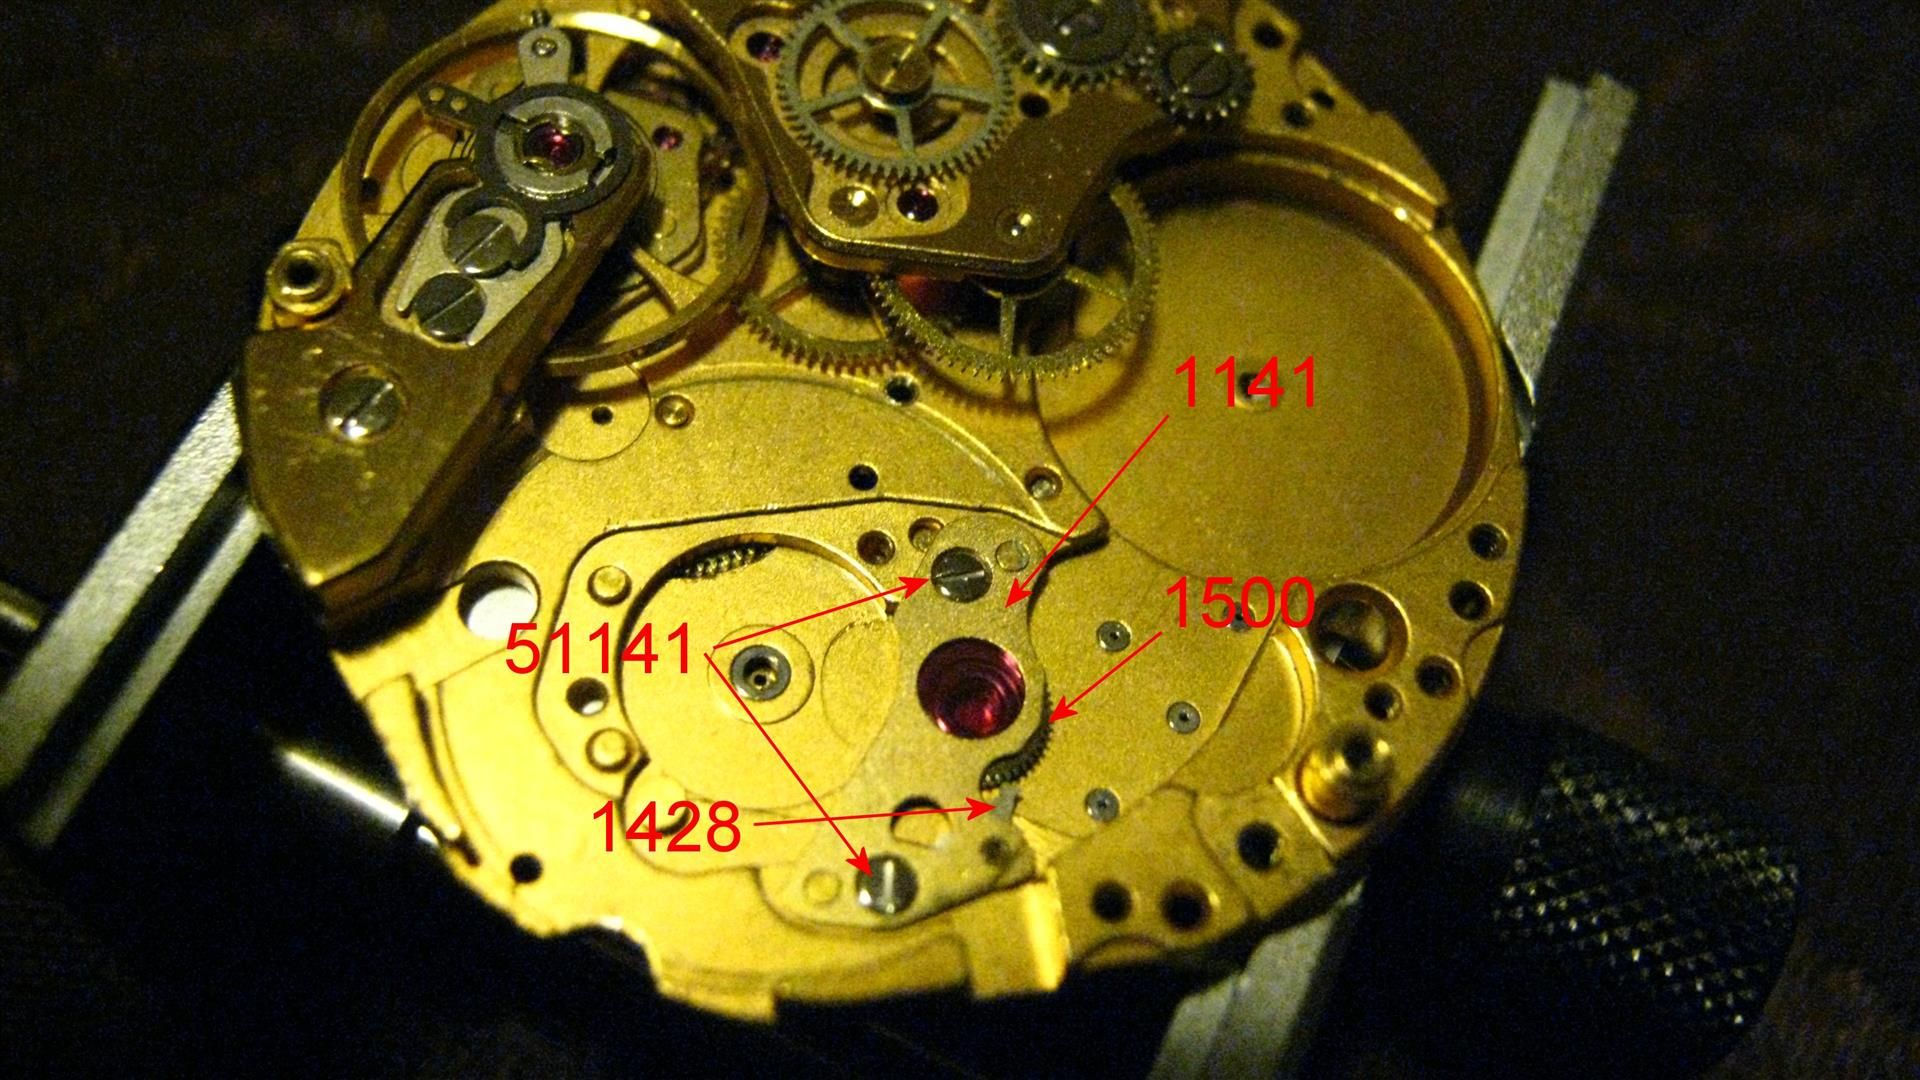
: Now it's the time for removing the 1141 lower bridge for automatic
: device, the 1500 wig-wag pinion and the delicate 1428 stop click
: (the one which allow that the mainspring doesn't unwind when
: recharged by the microrotor), obviously unscrewing the 51141
: screws:
:
: 
:
: 
: Then remove the 417 intermediate ratchet wheel and its screw 5417:
:
: 
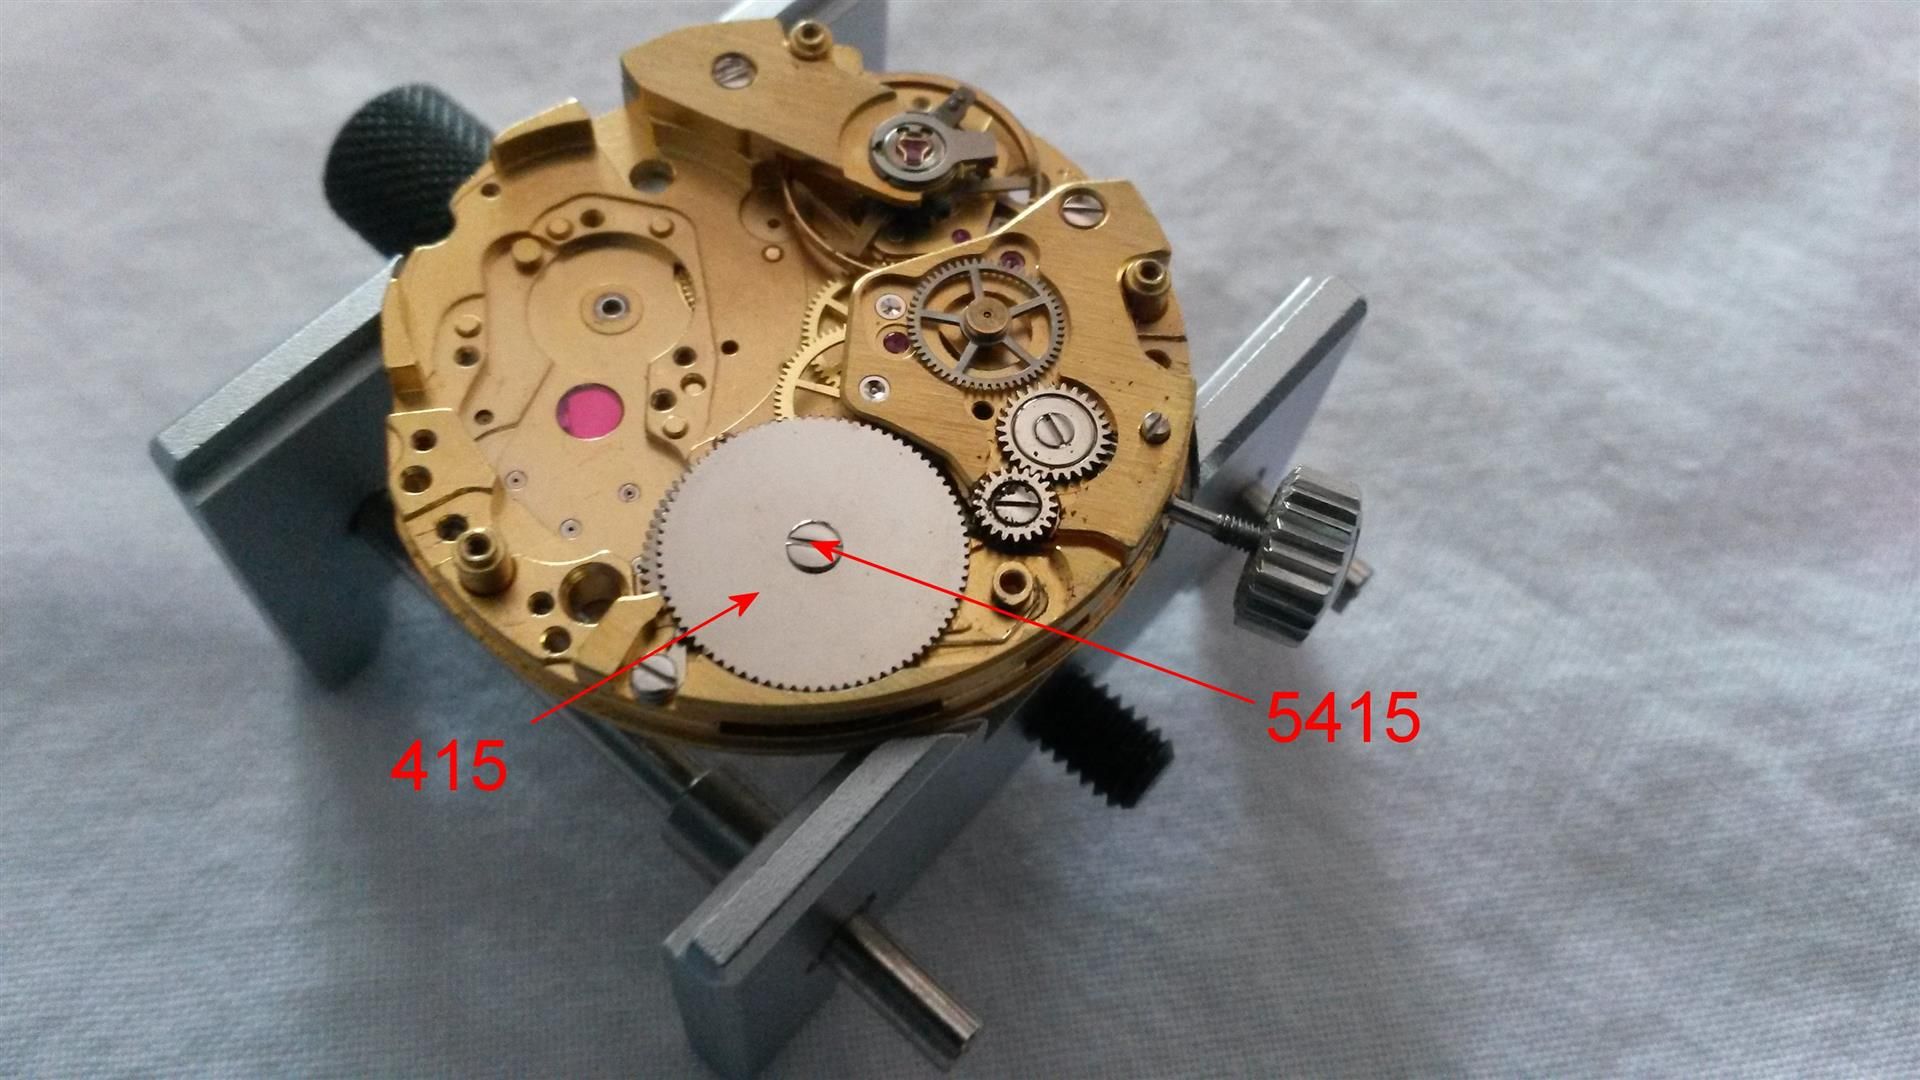
: Now remove the 415 ratchet wheel (after having unwinded the
: mainspring opening gently the 425 click) and its screw 5415:
:
: 
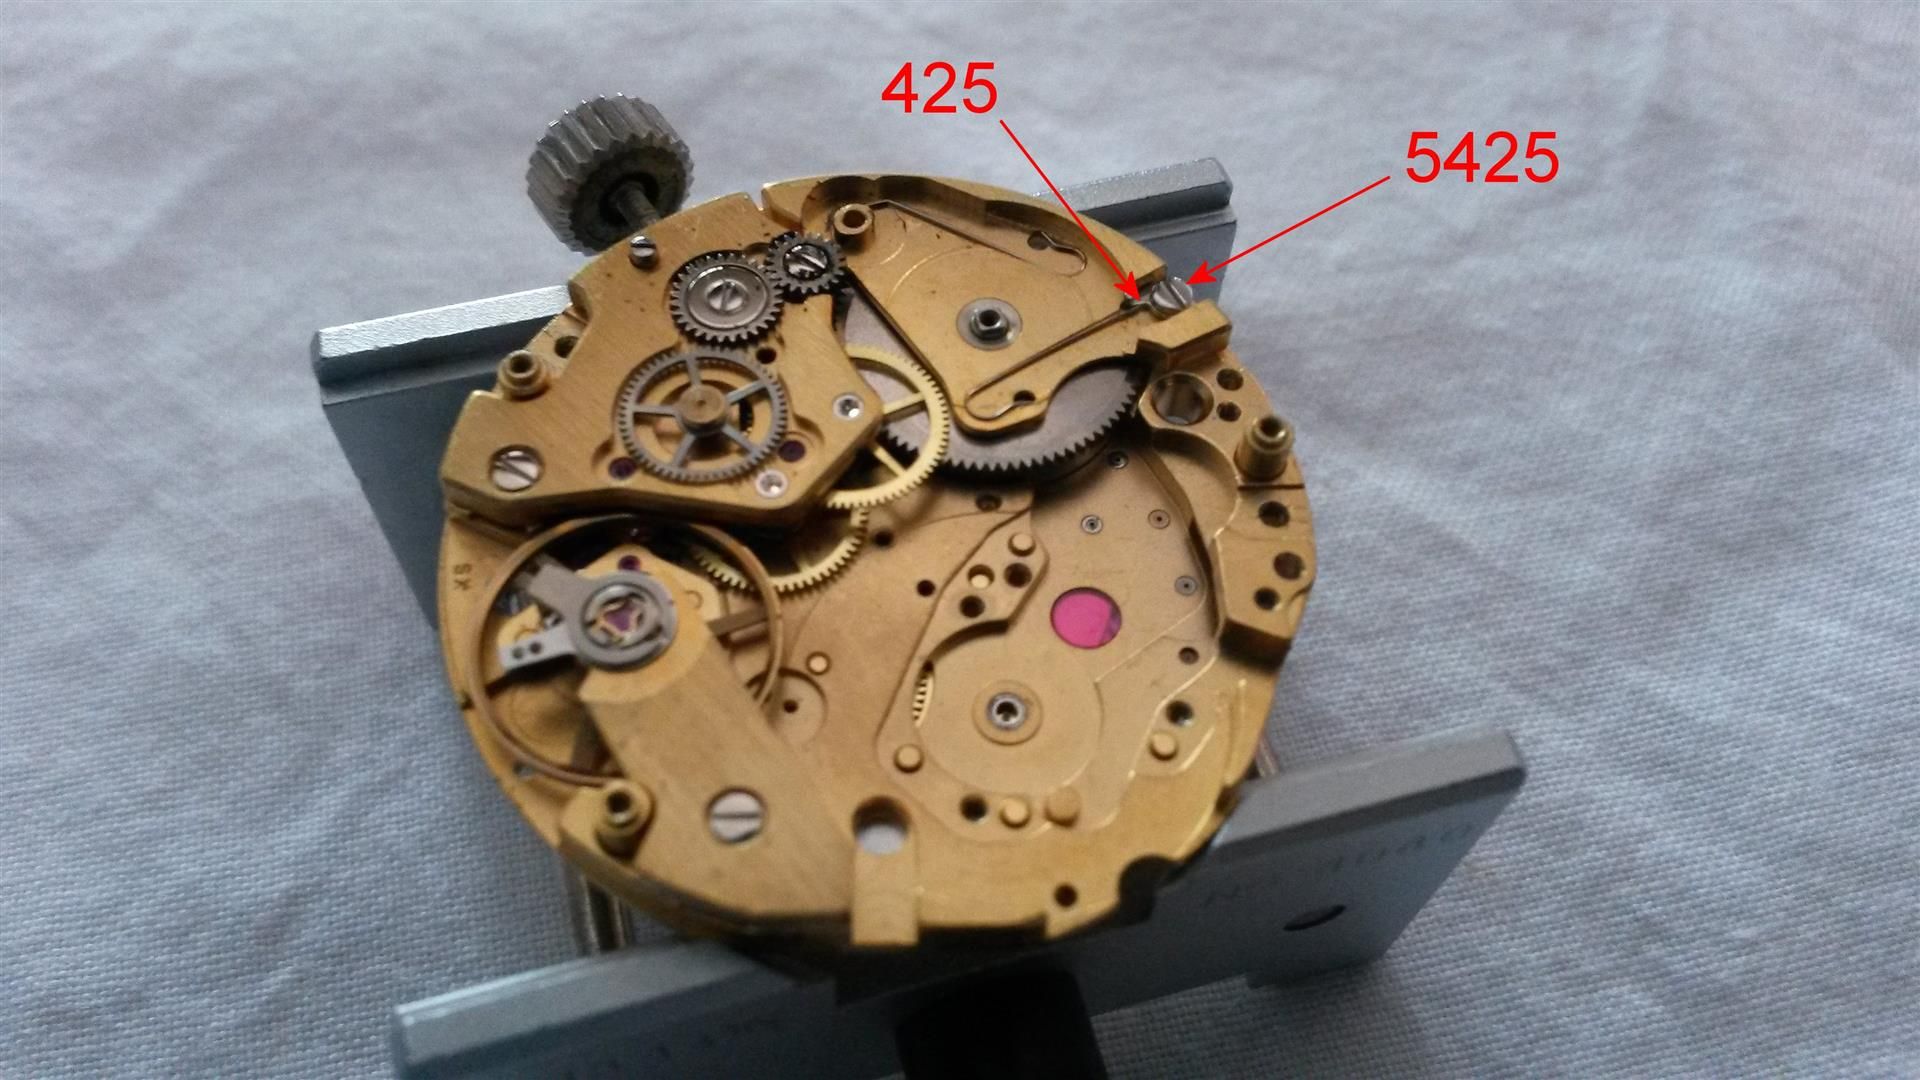
: Now remove the 425 click and its screw 5425:
:
: 
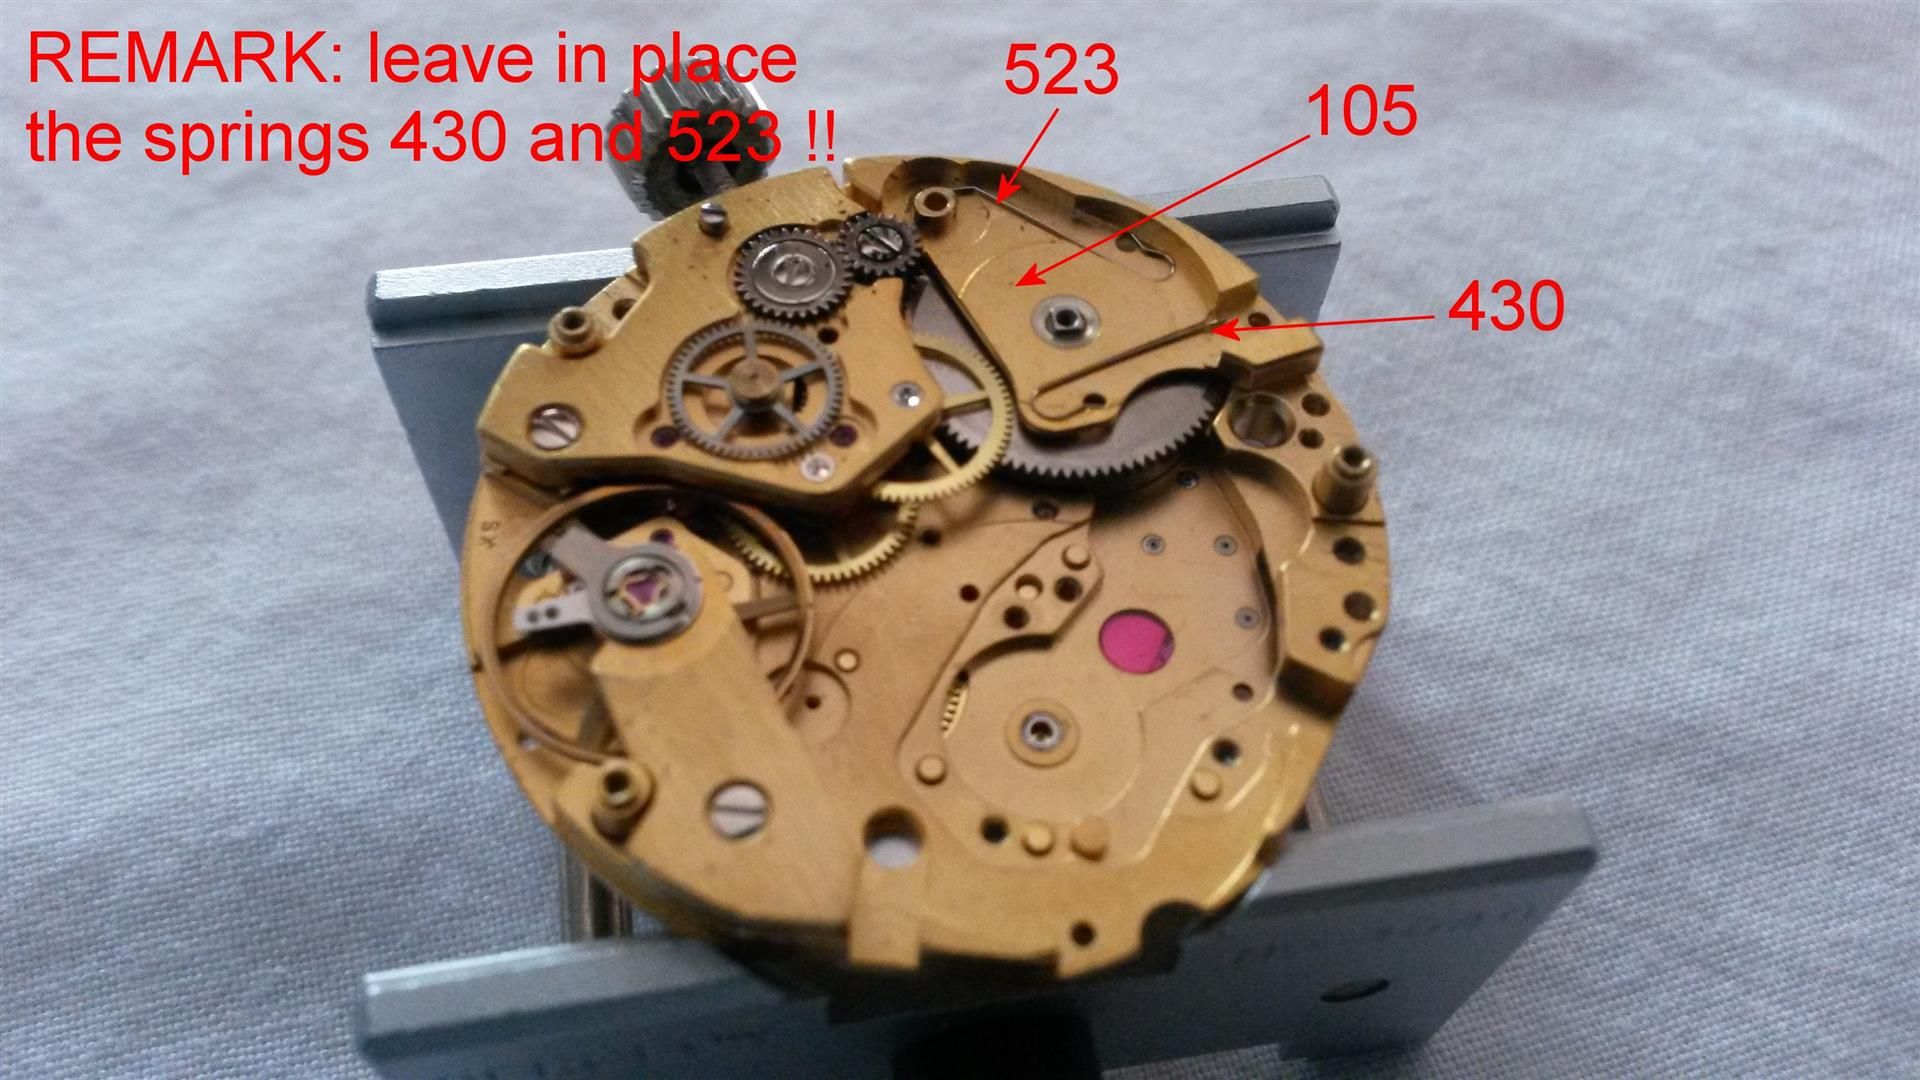
: Remove the 105 barrel bridge BUT leave in place the two springs 430
: (click spring) and 523 (setting wheel spring), otherwise they
: will squeeze into the hyperspace (and you will have a serious
: problem :-) ):
:
: 
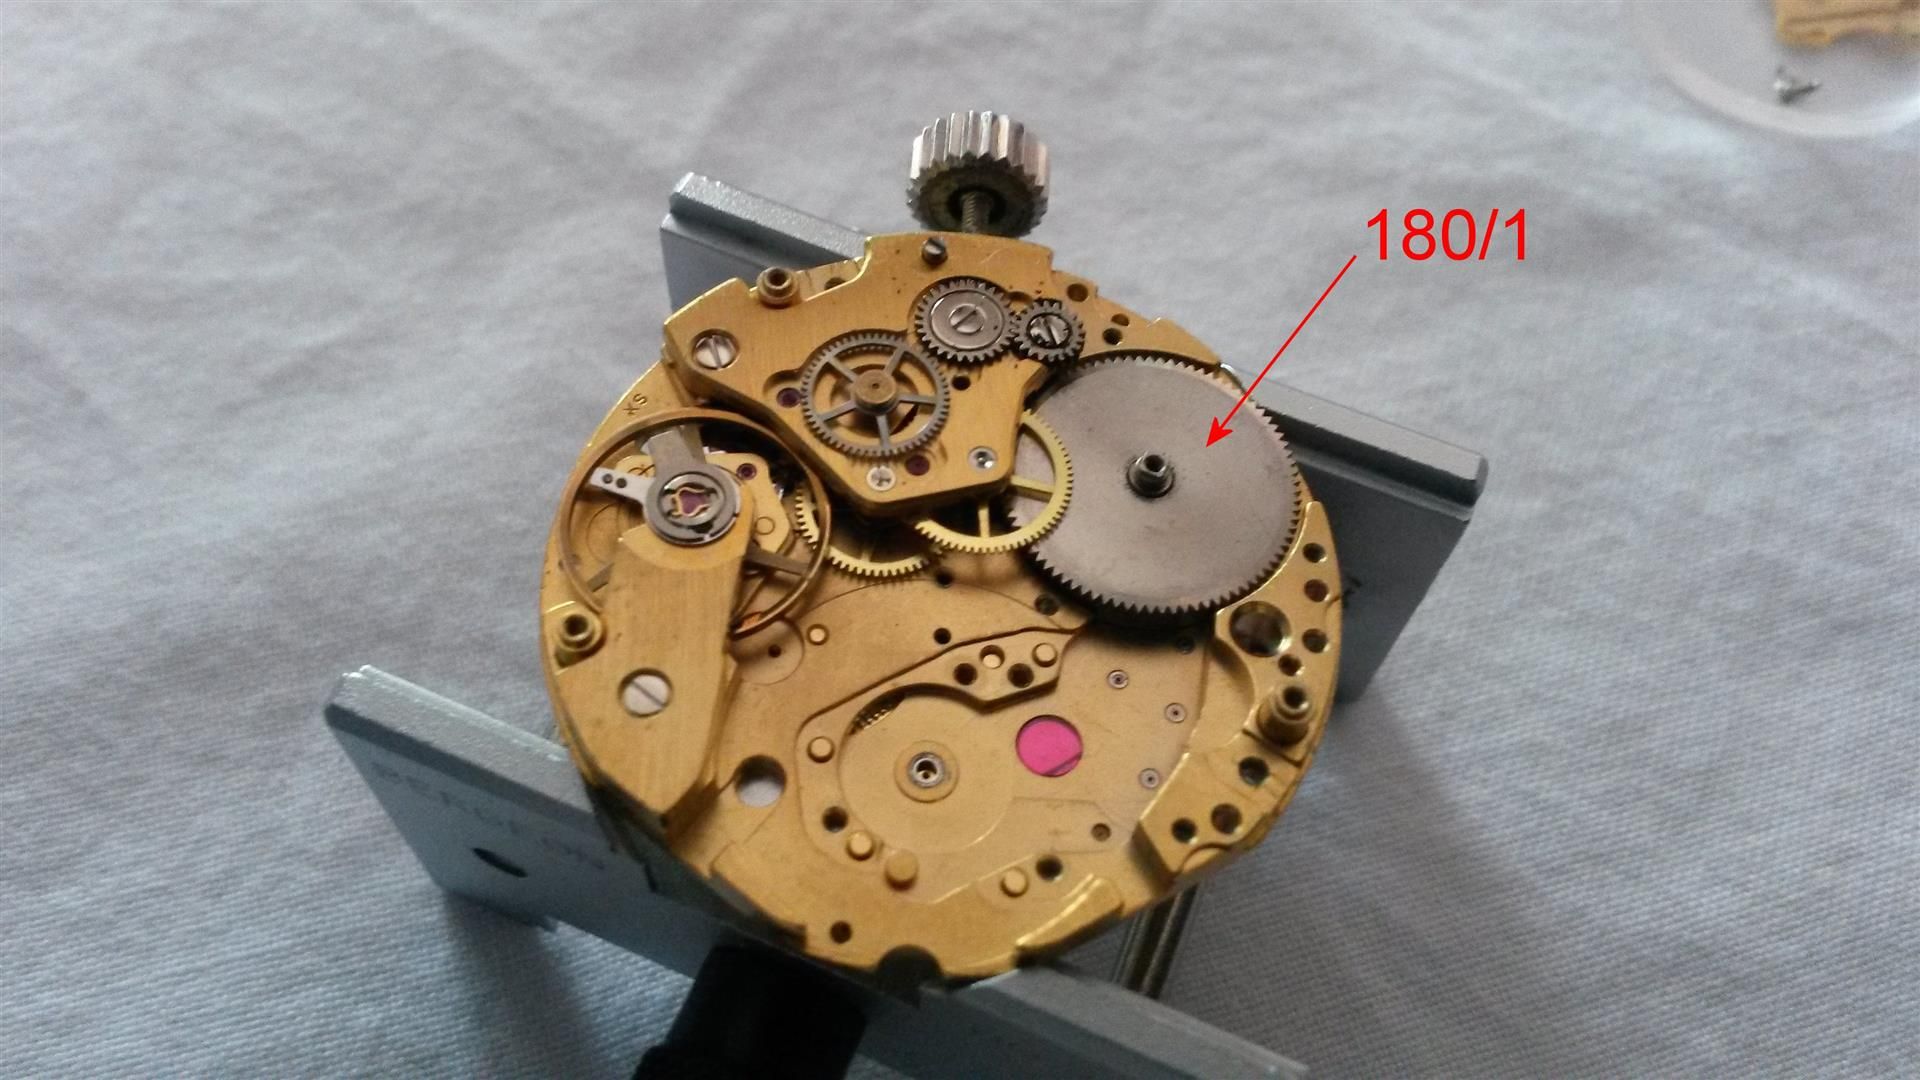
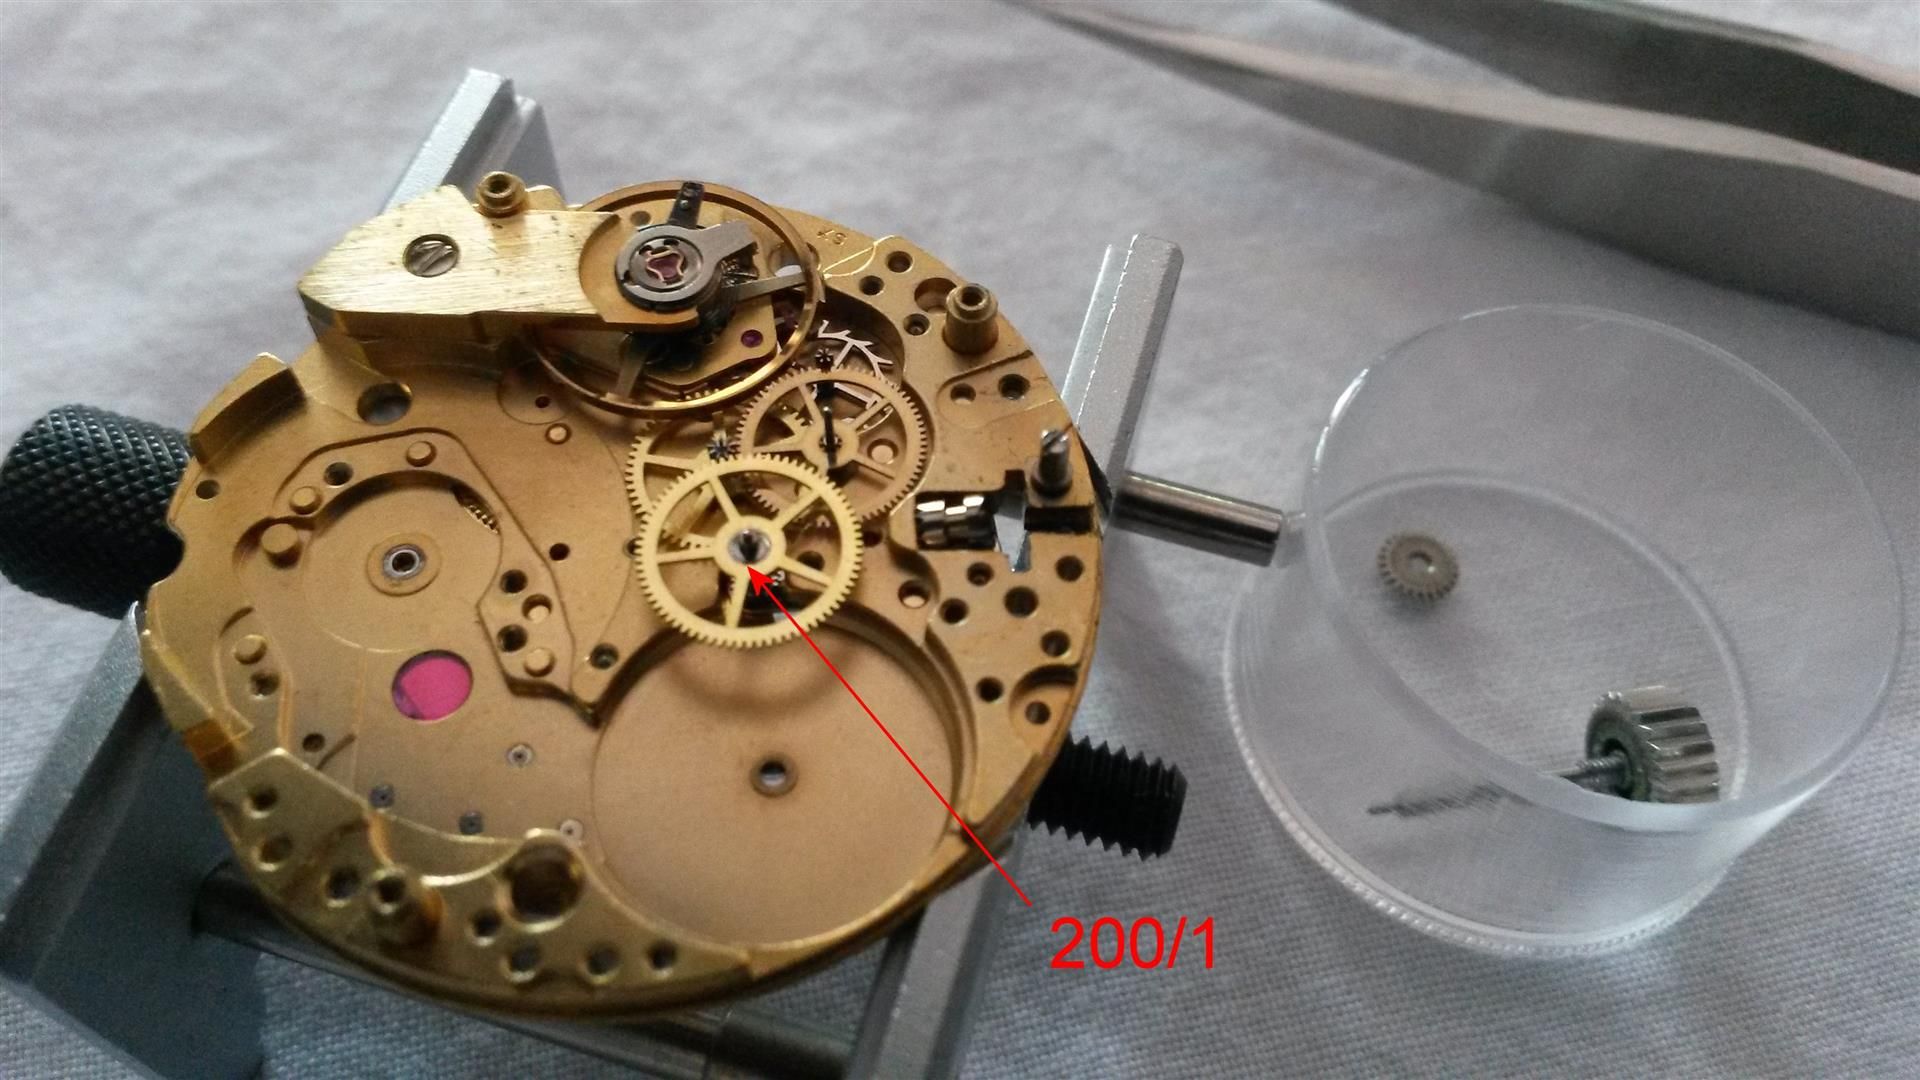
: Remove the 180/1 mainspring's barrel pulling it up at the opposite
: side respect the 200/1 large driving wheel:
:
: 
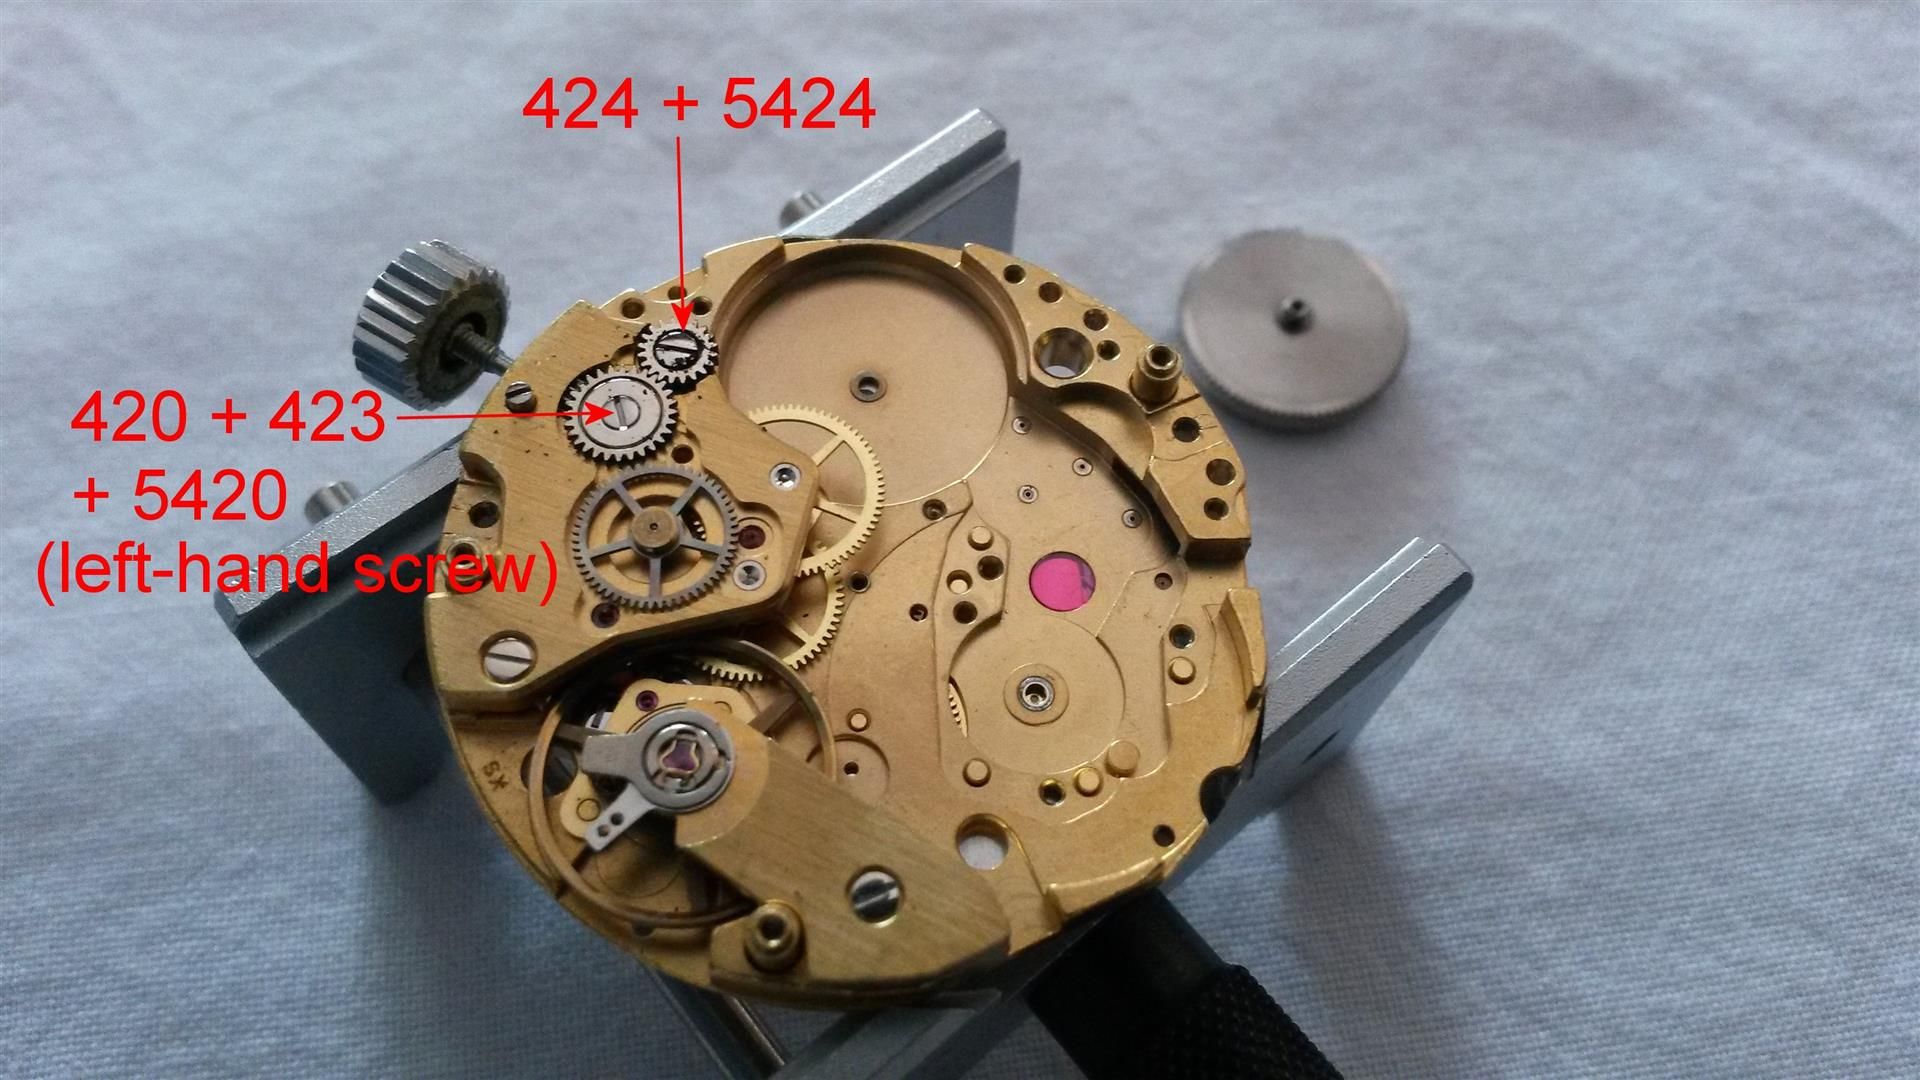
: Remove the 424 intermediate crown wheel and its screw 5424, then
: the 420 (core) + 423 wheel taking care that its 5420 screw is a
: LEFT-HANDED screw (you must "normally screw" to
: unscrew it):
:
: 
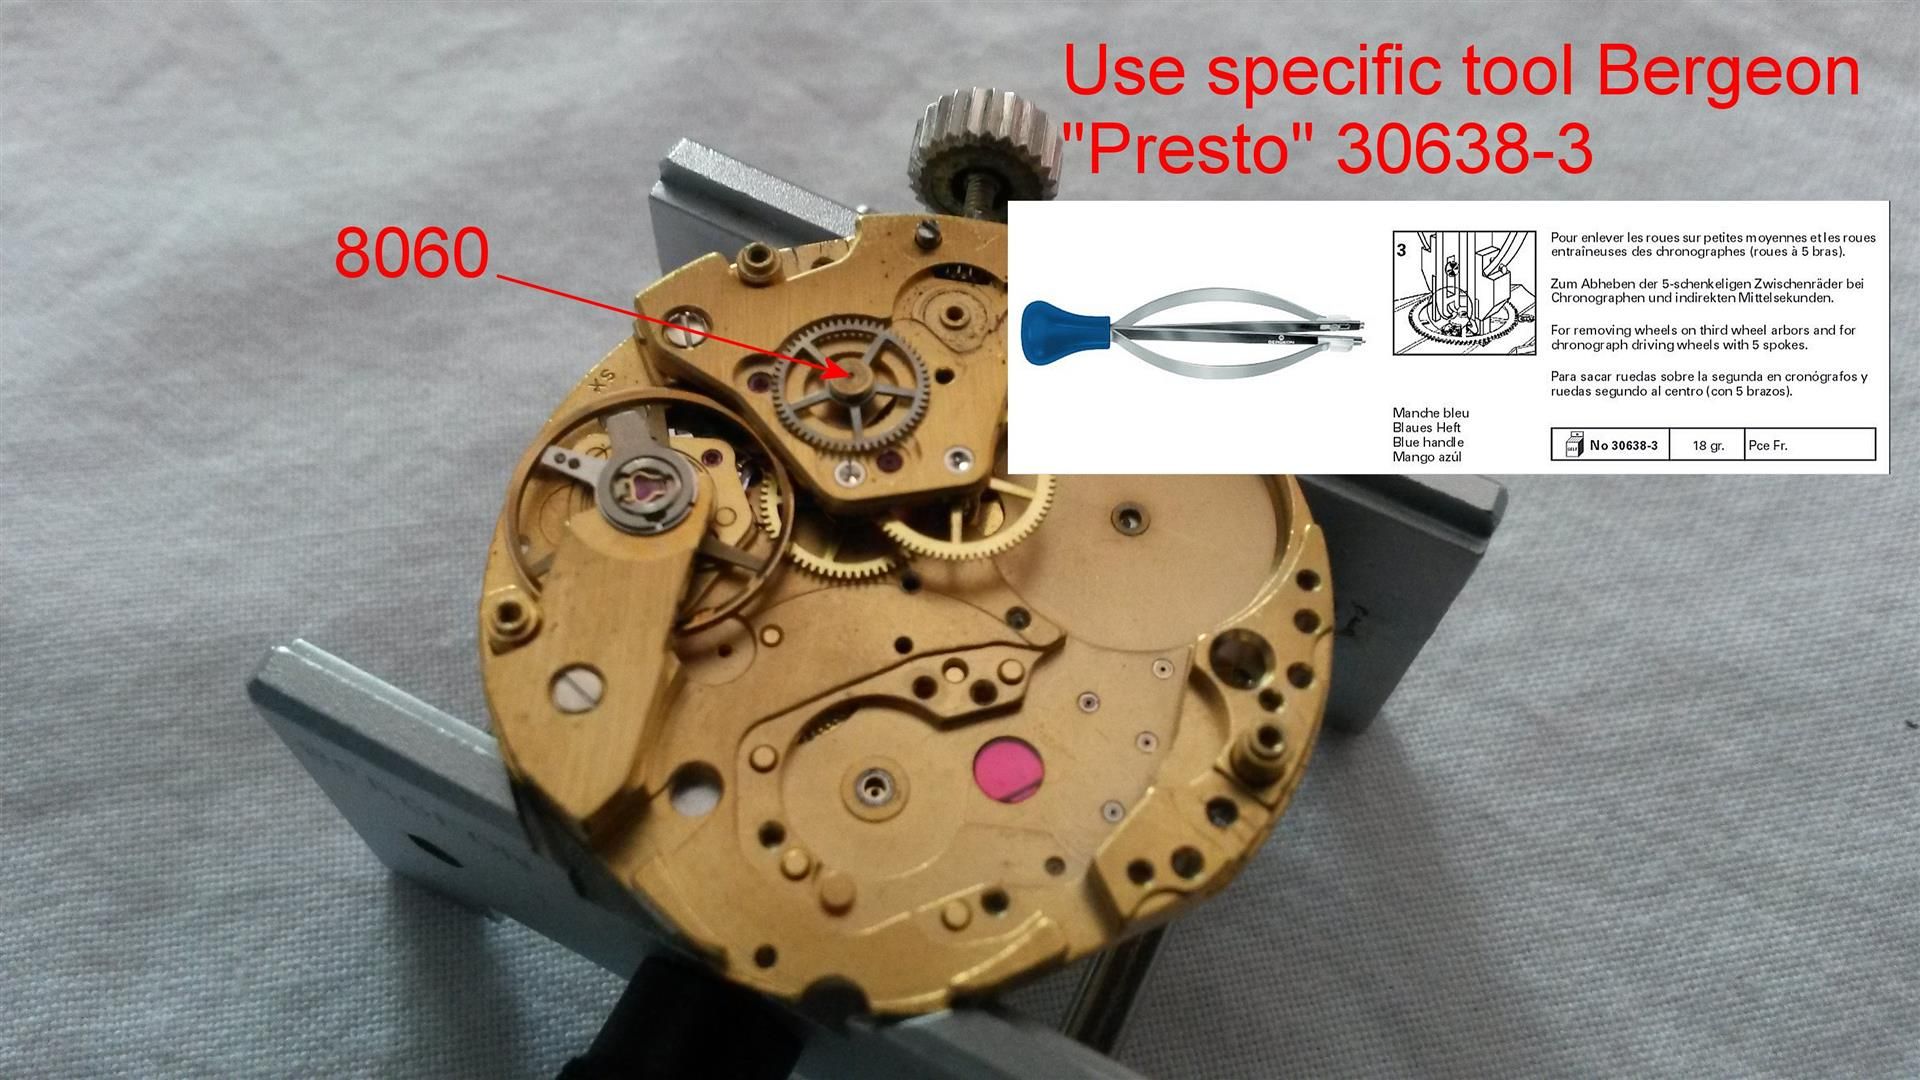
: remove the 8060 driving wheel using the apposite Bergeon tool:
:
: 
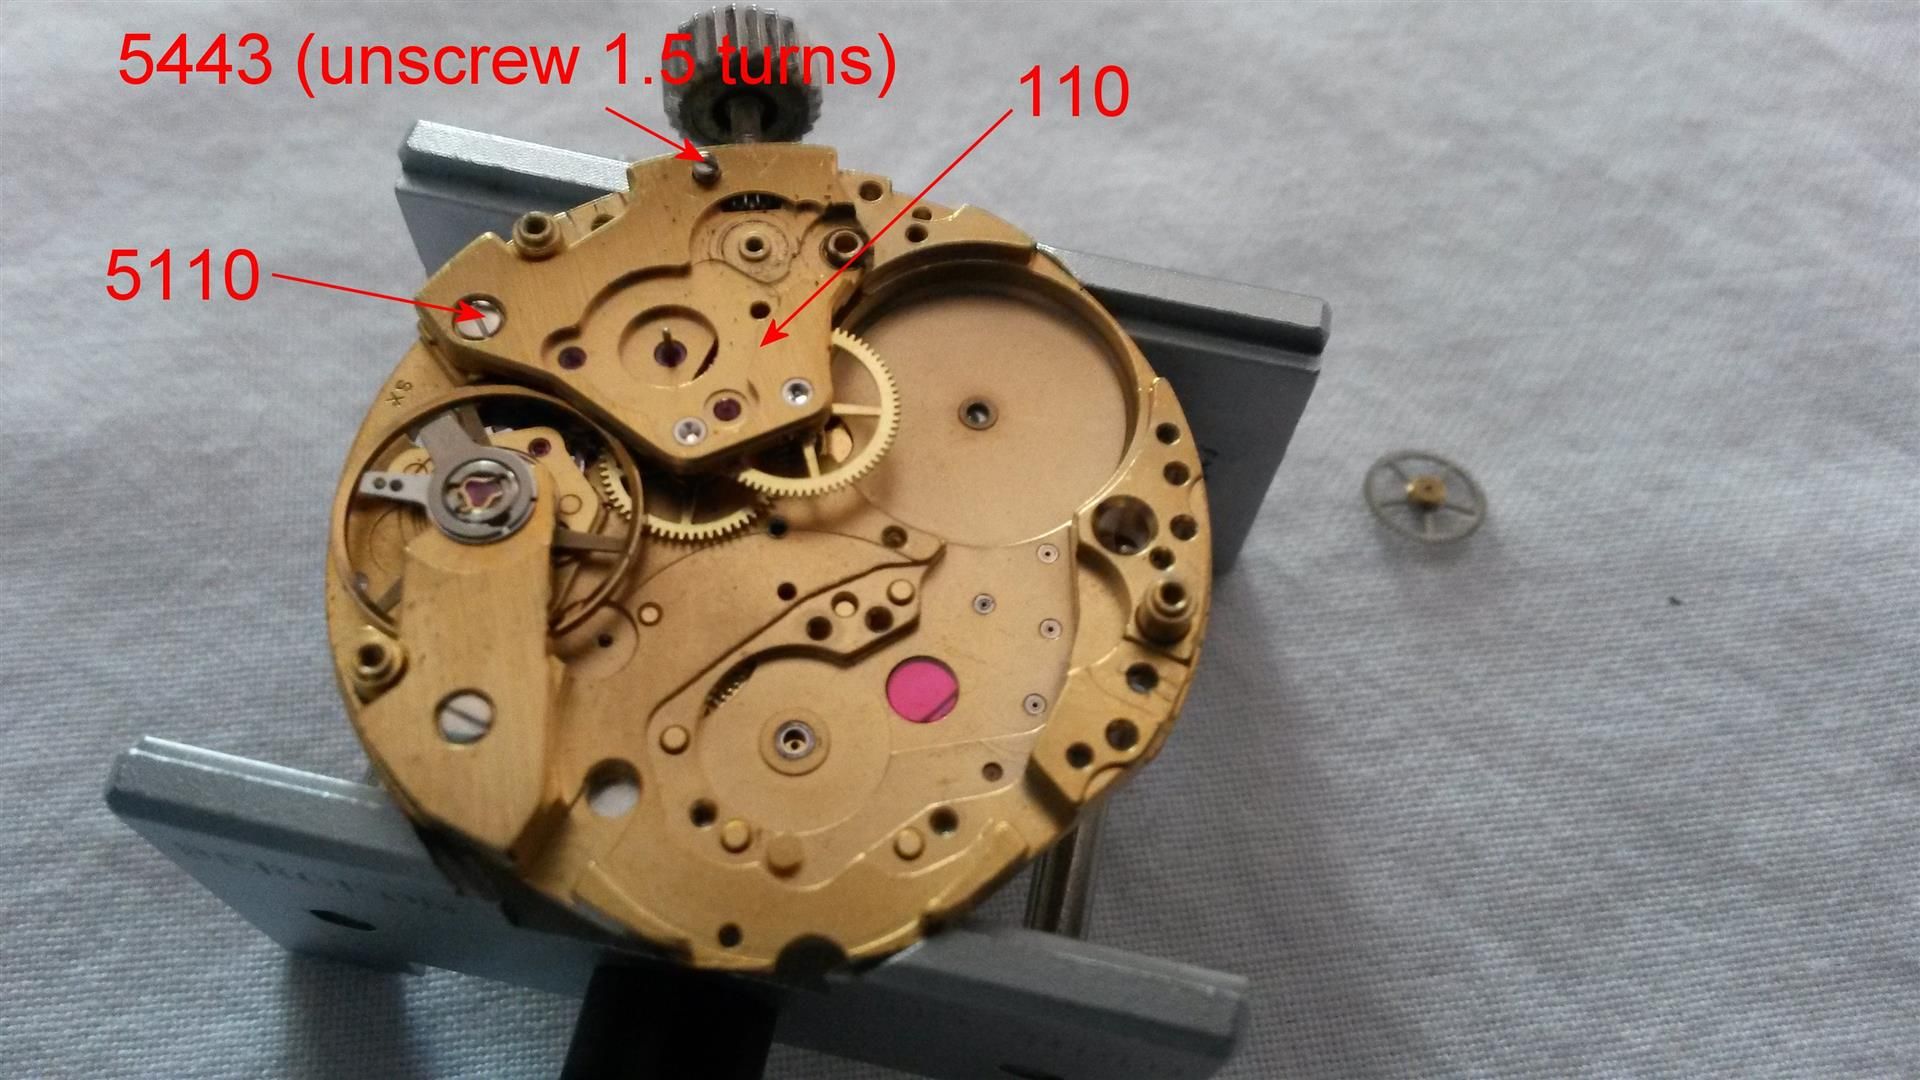
: now the 110 train wheel bridge and its screw 5110 (if, after
: uncasing the movement, you put again the stem w crown you must
: re-open its screw 5443 by 1.5 turns and pulling out the stem):
:
: 
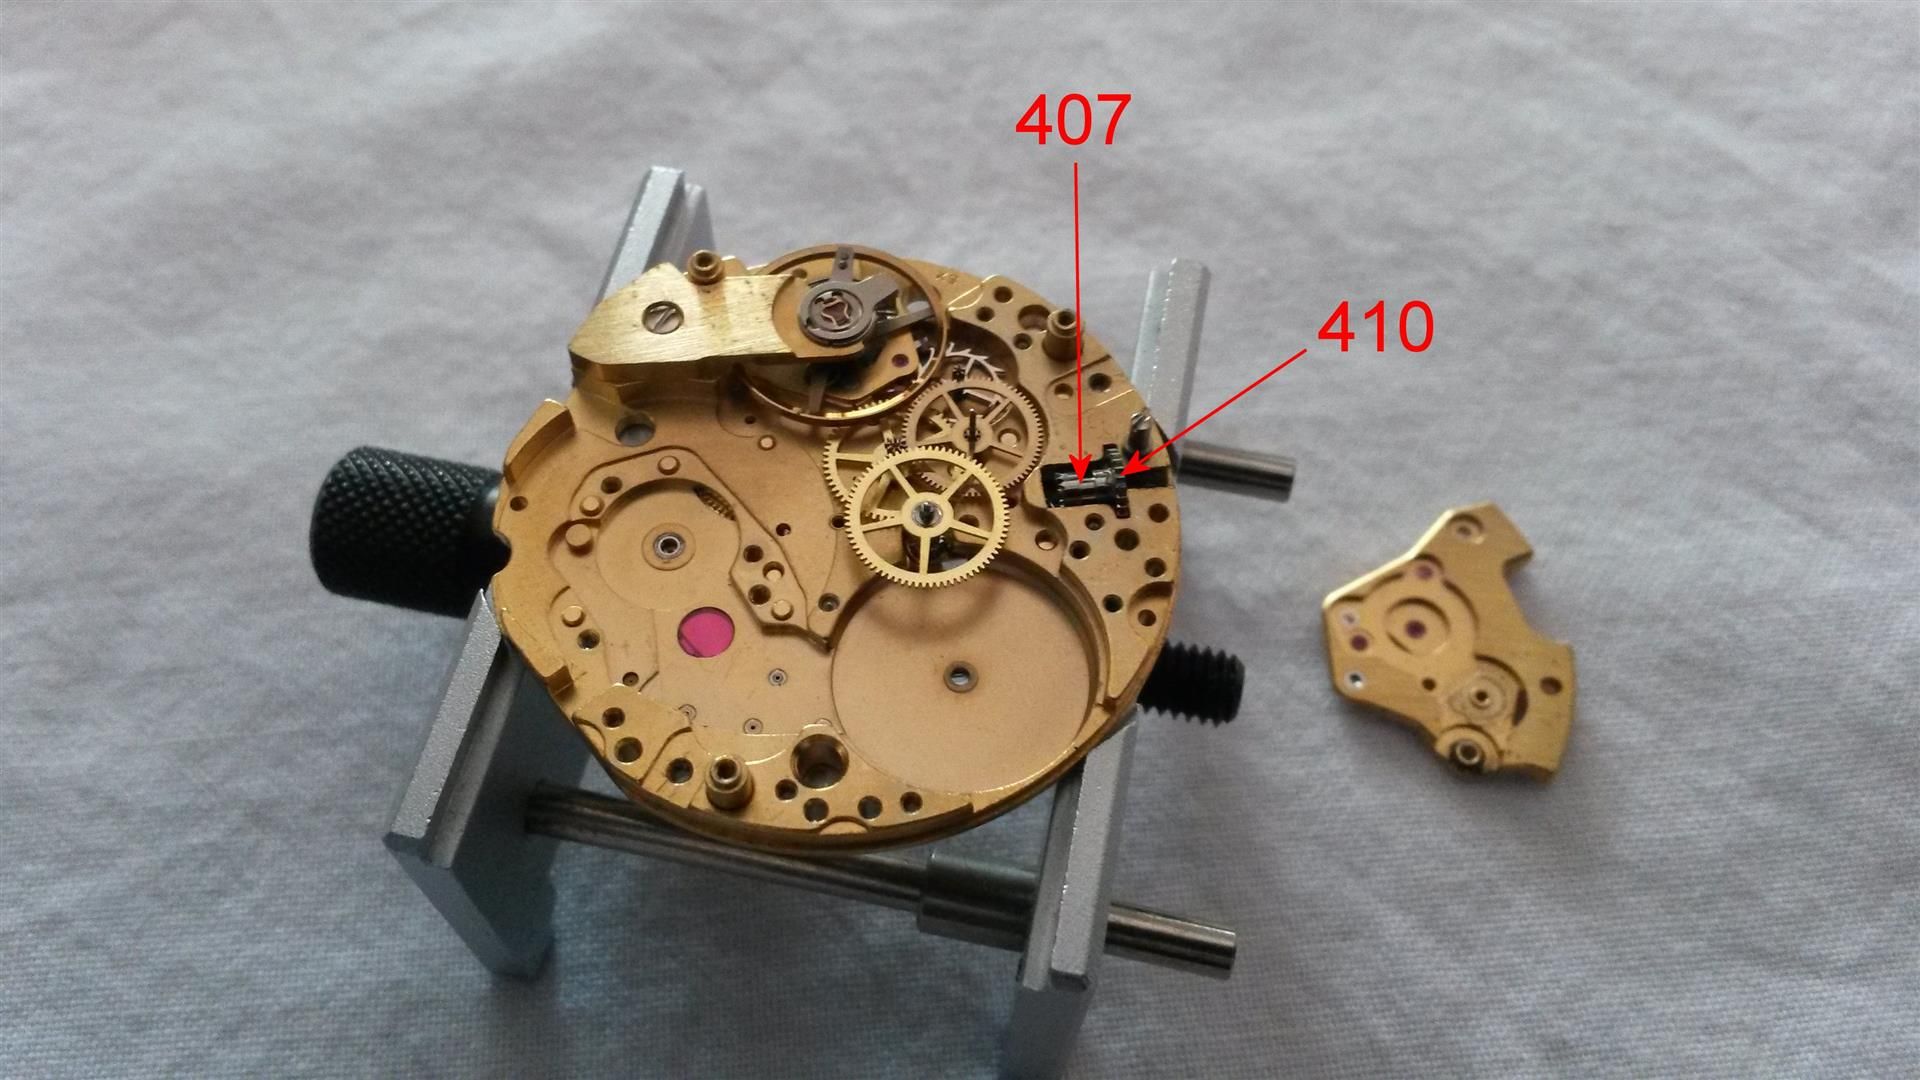
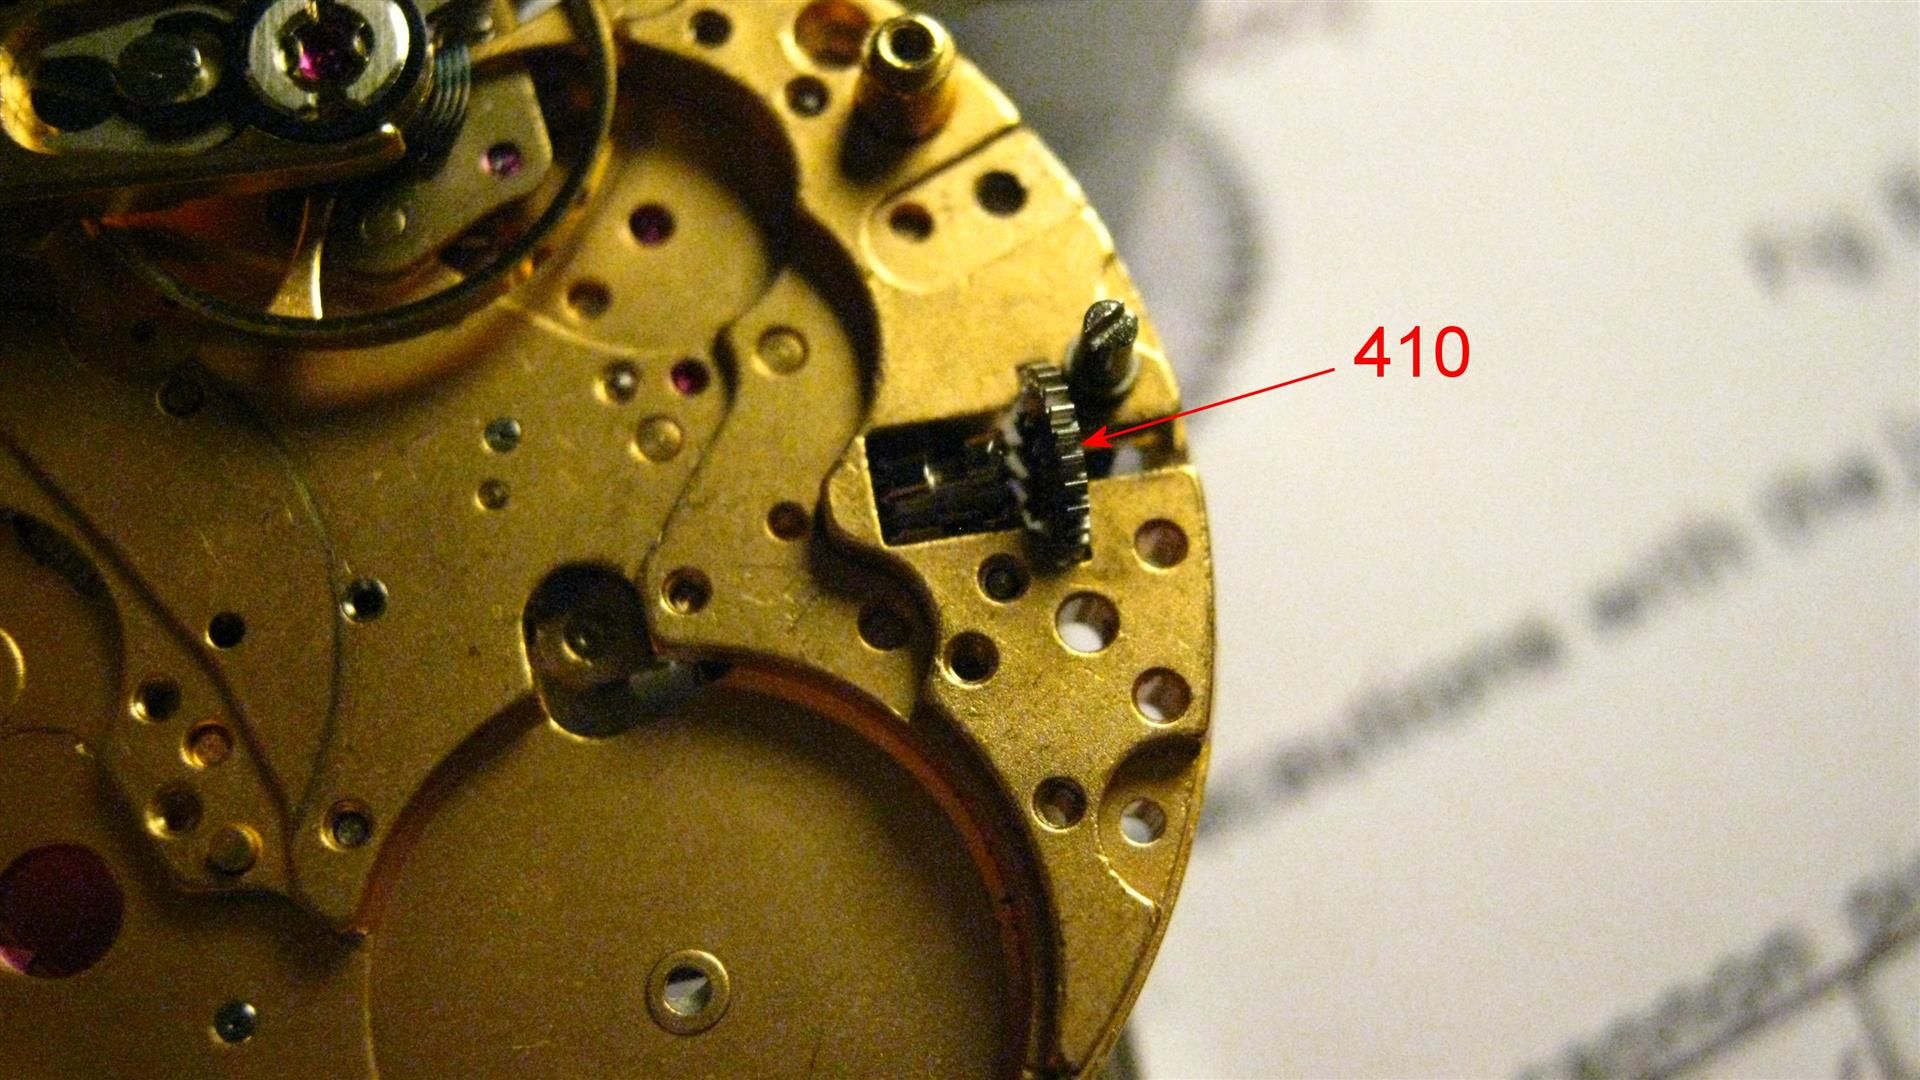
: now the 407 clutch wheel and 410 winding pinion:
:
: 
:
: 
:
: 
: now the 200/1 large driving wheel with cannon pinion:
:
: 
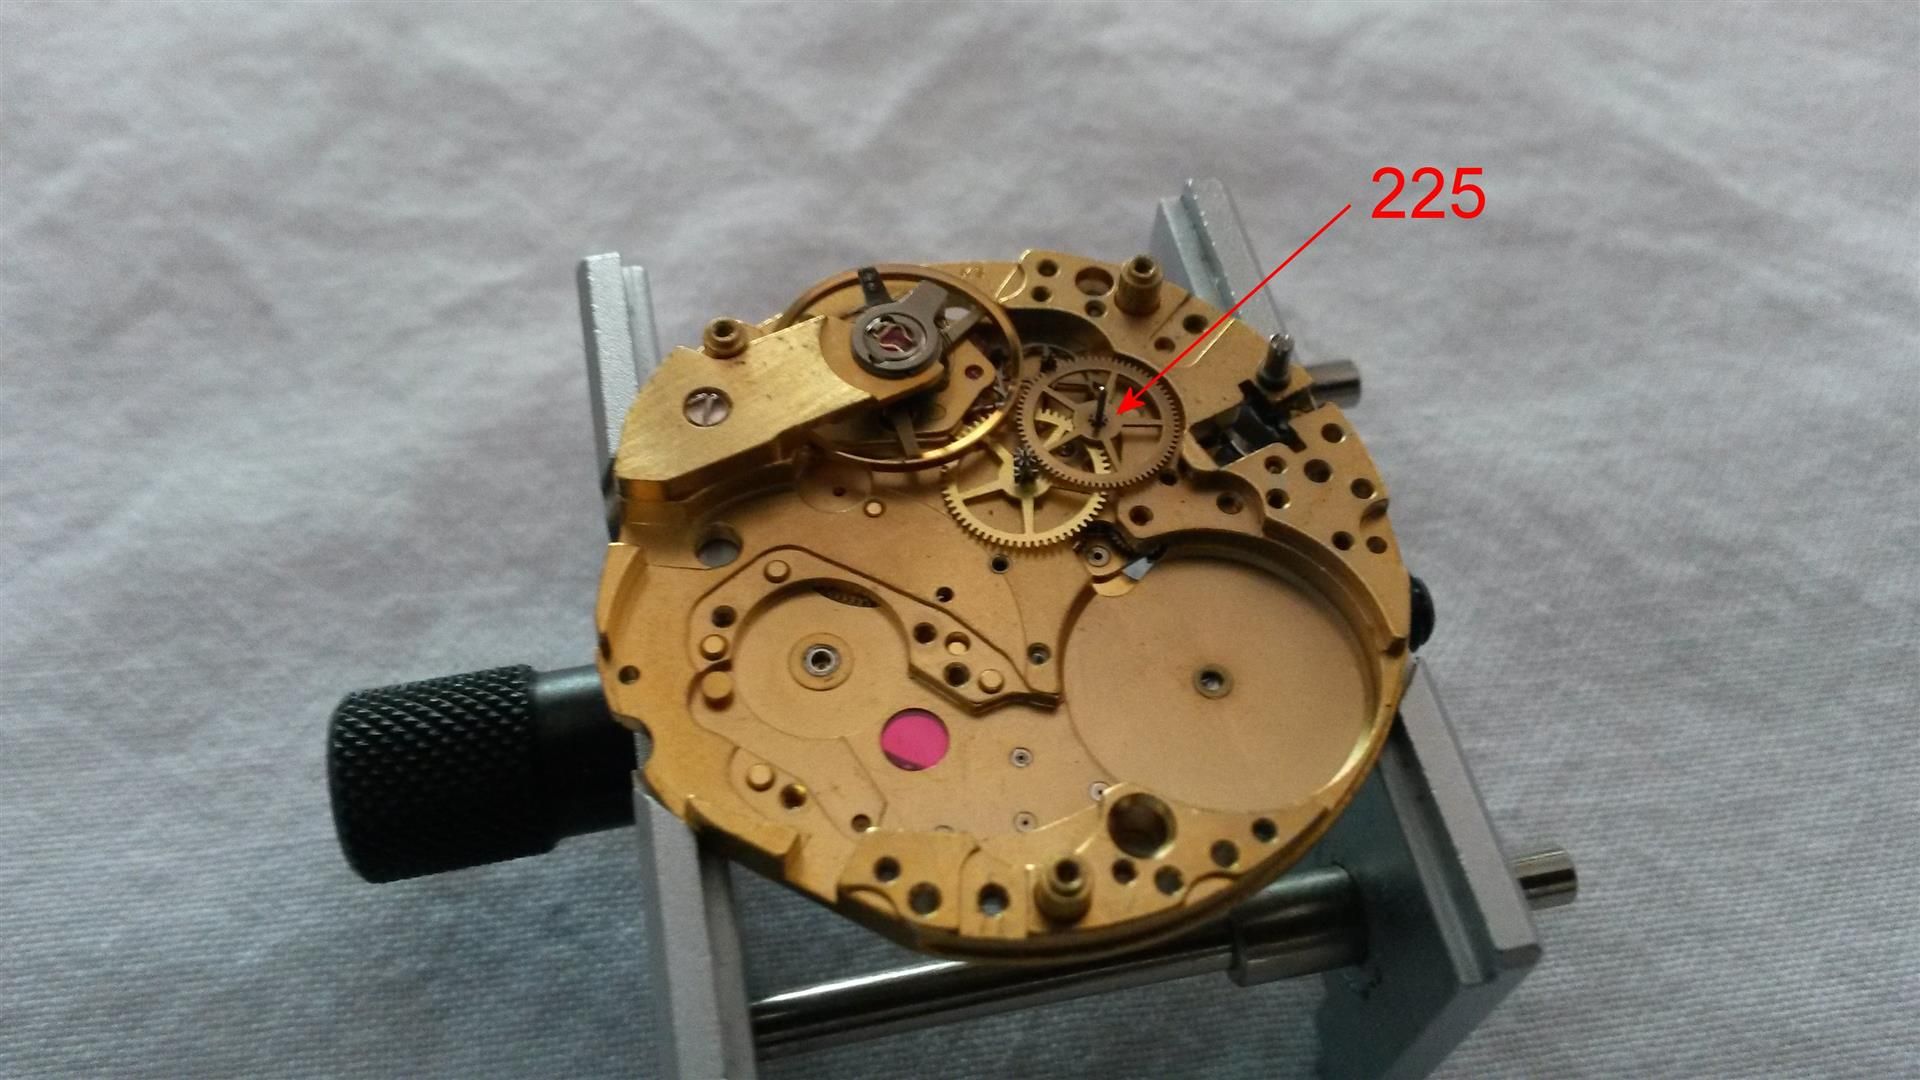
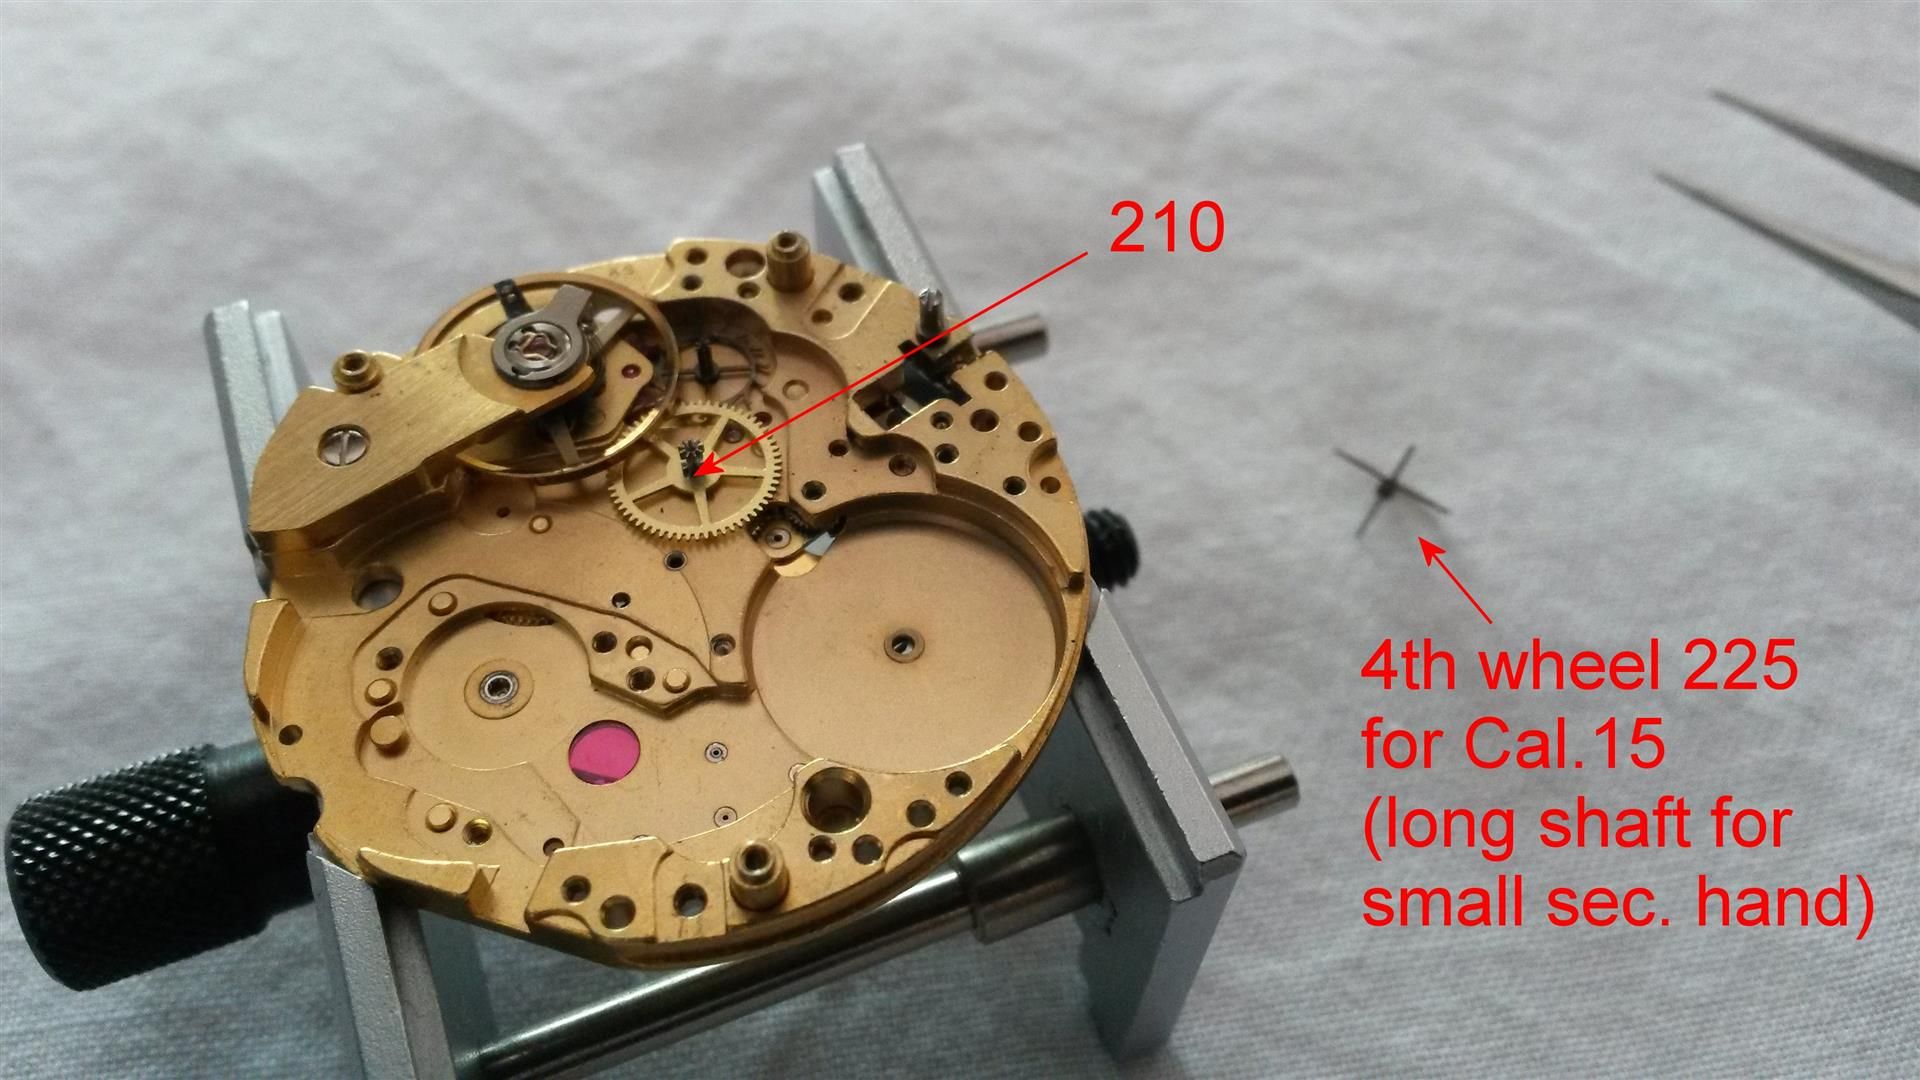
: the 225 fourth wheel (in the Cal15 supports the small seconds hand
: at 10 'clock):
:
: 
: the 210 third wheel:
:
: 
: and finally the 705 escape wheel:
:
: 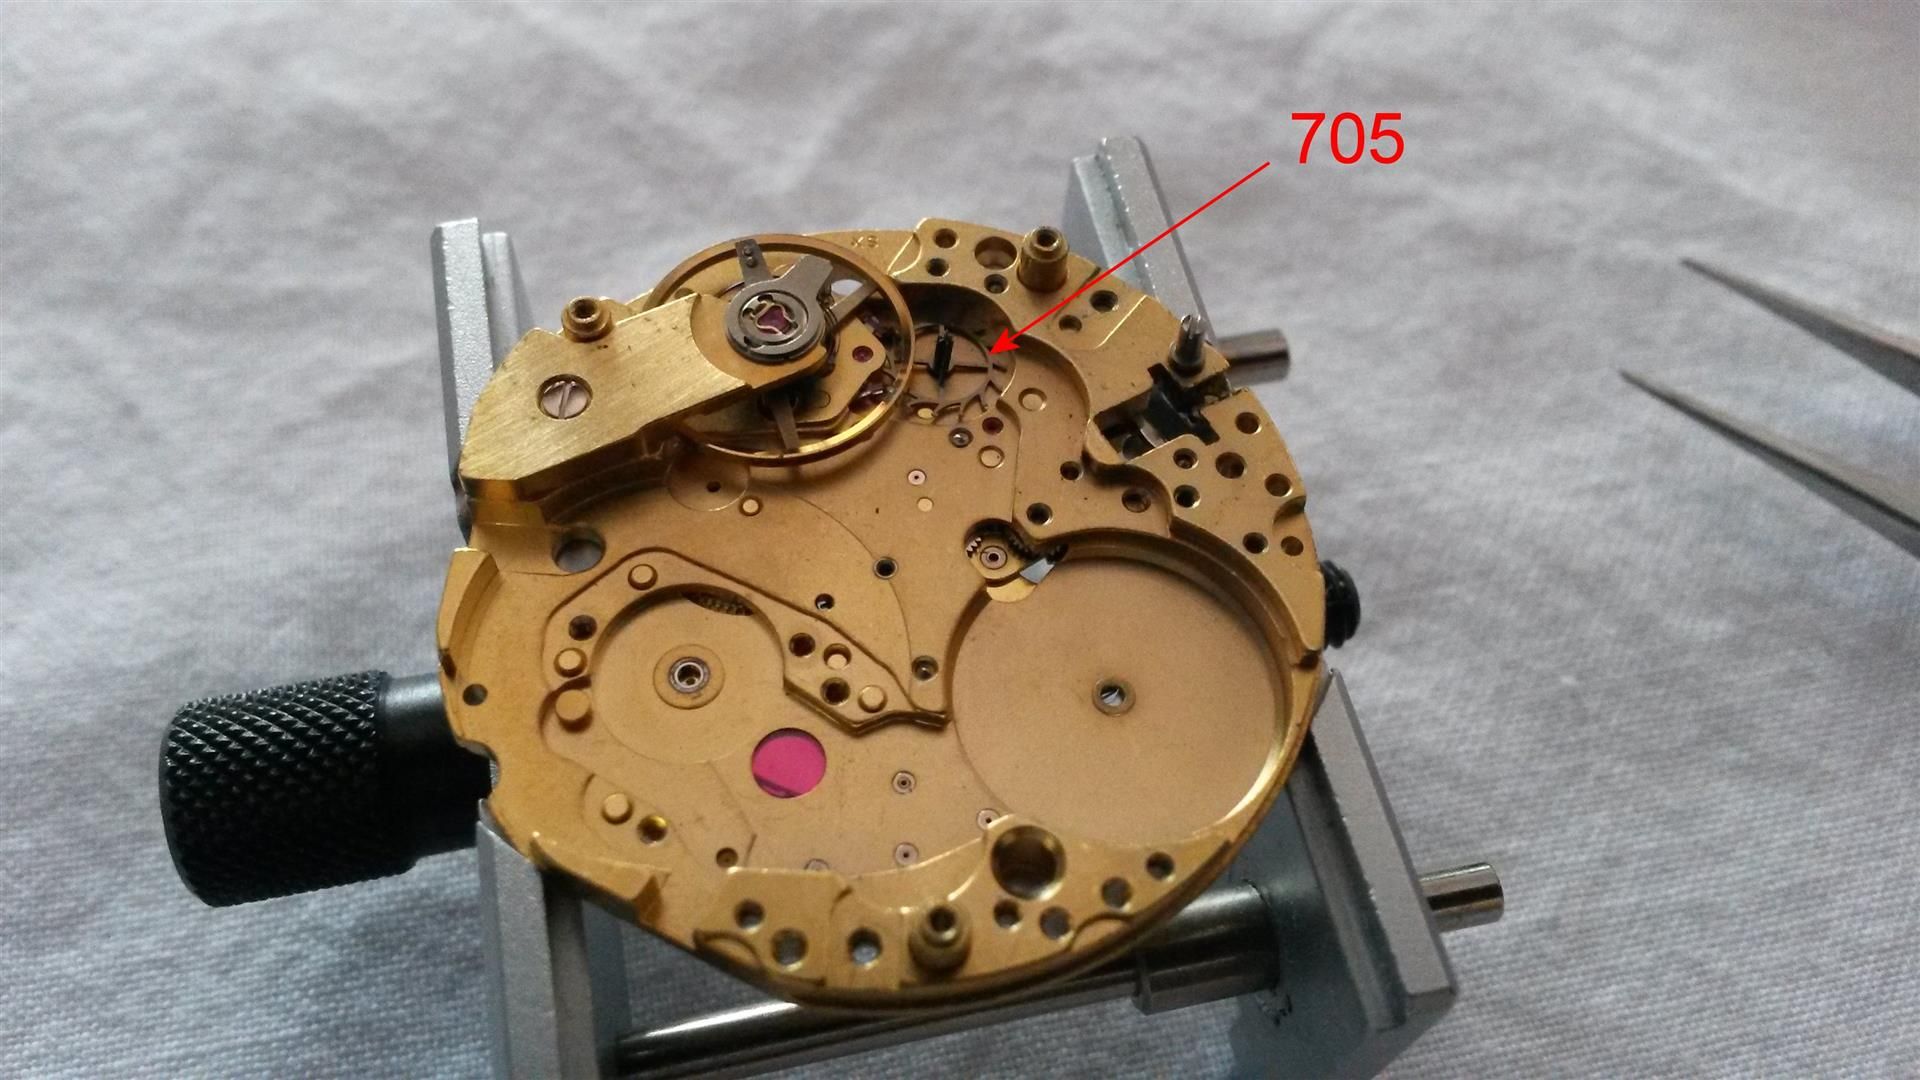
: and you will have the main plate free from any wheel (balance wheel
: apart):
:
: 
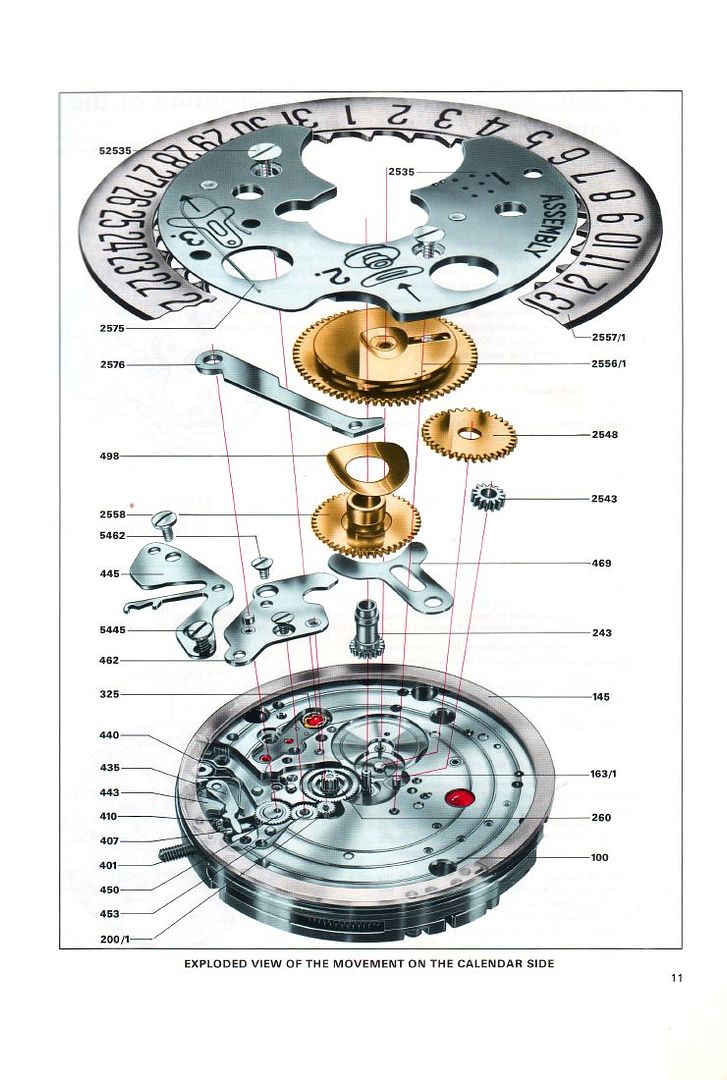
: Turn the movement on the dial side and start disassembling it.
: First unscrew the 52535 ones and pull-up gently the 2535 date
: indicator guard (take care not to damage the date disc):
:
: 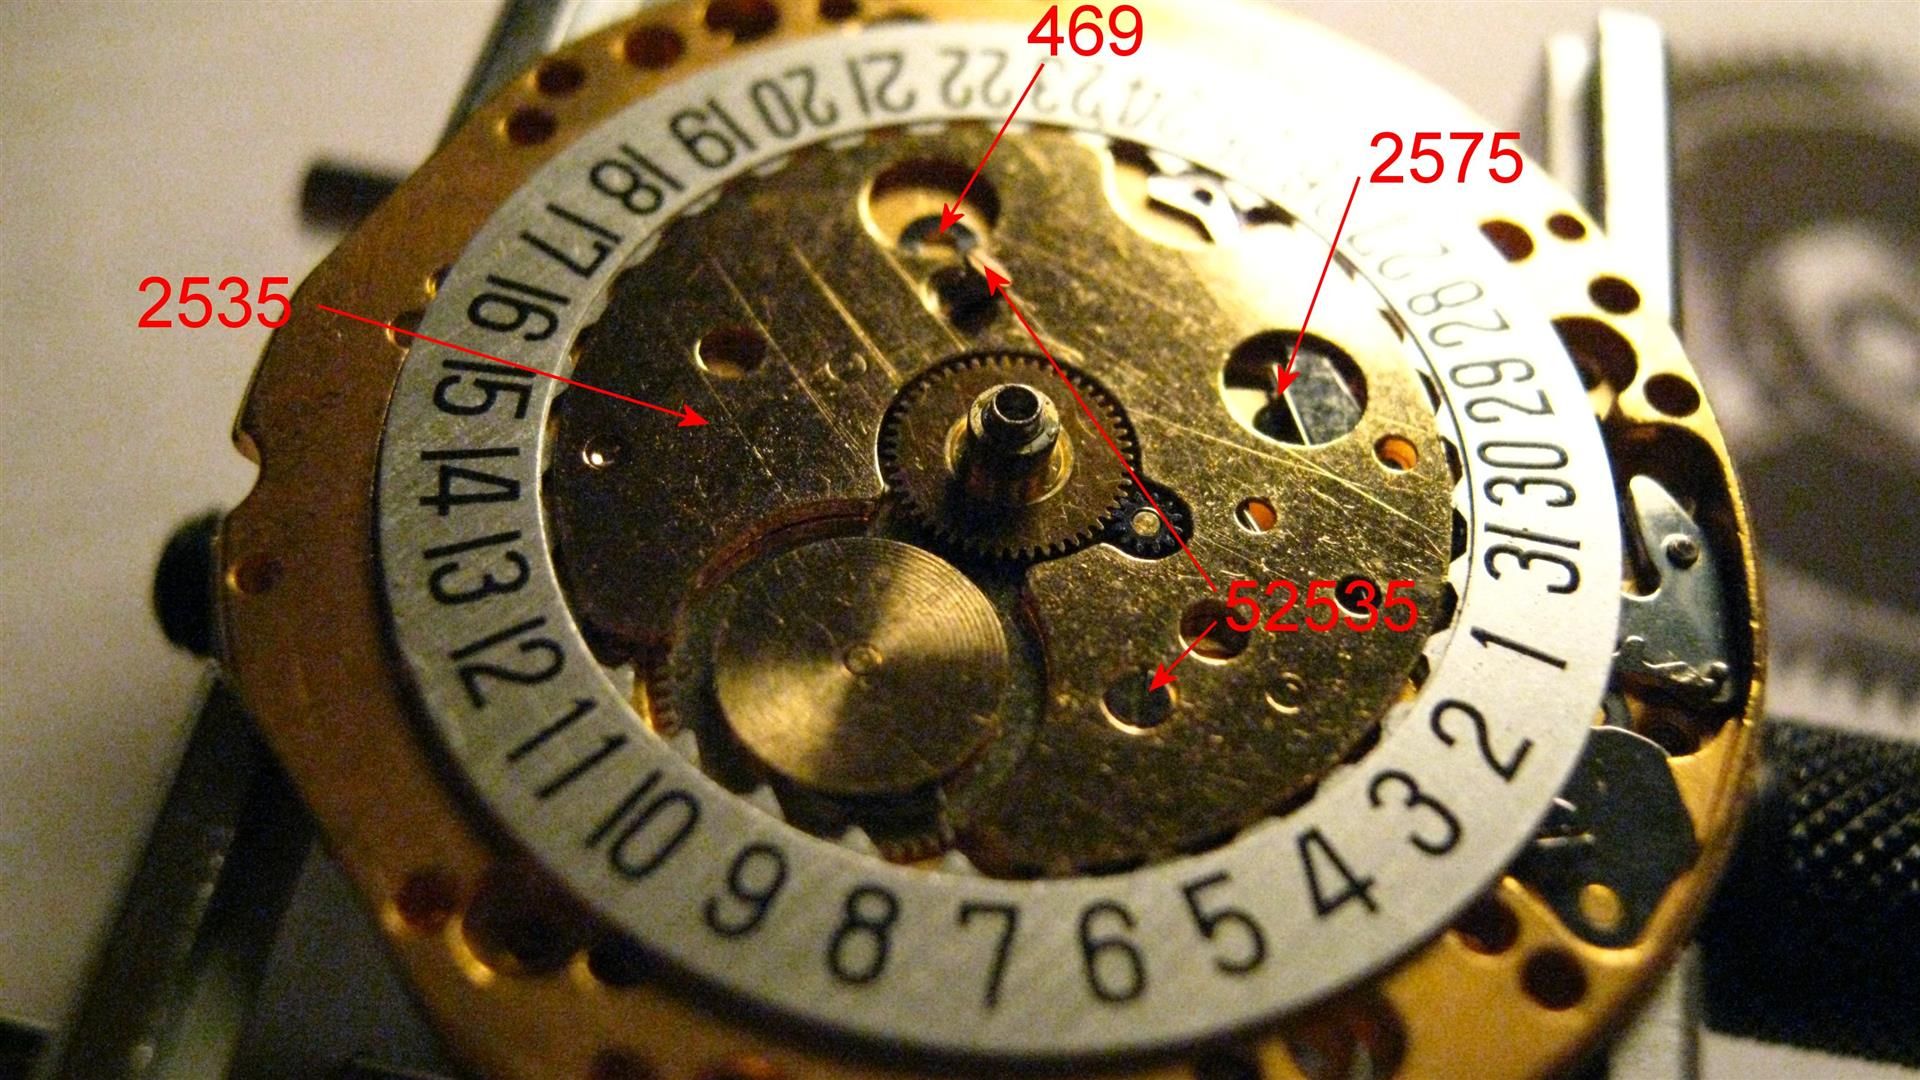
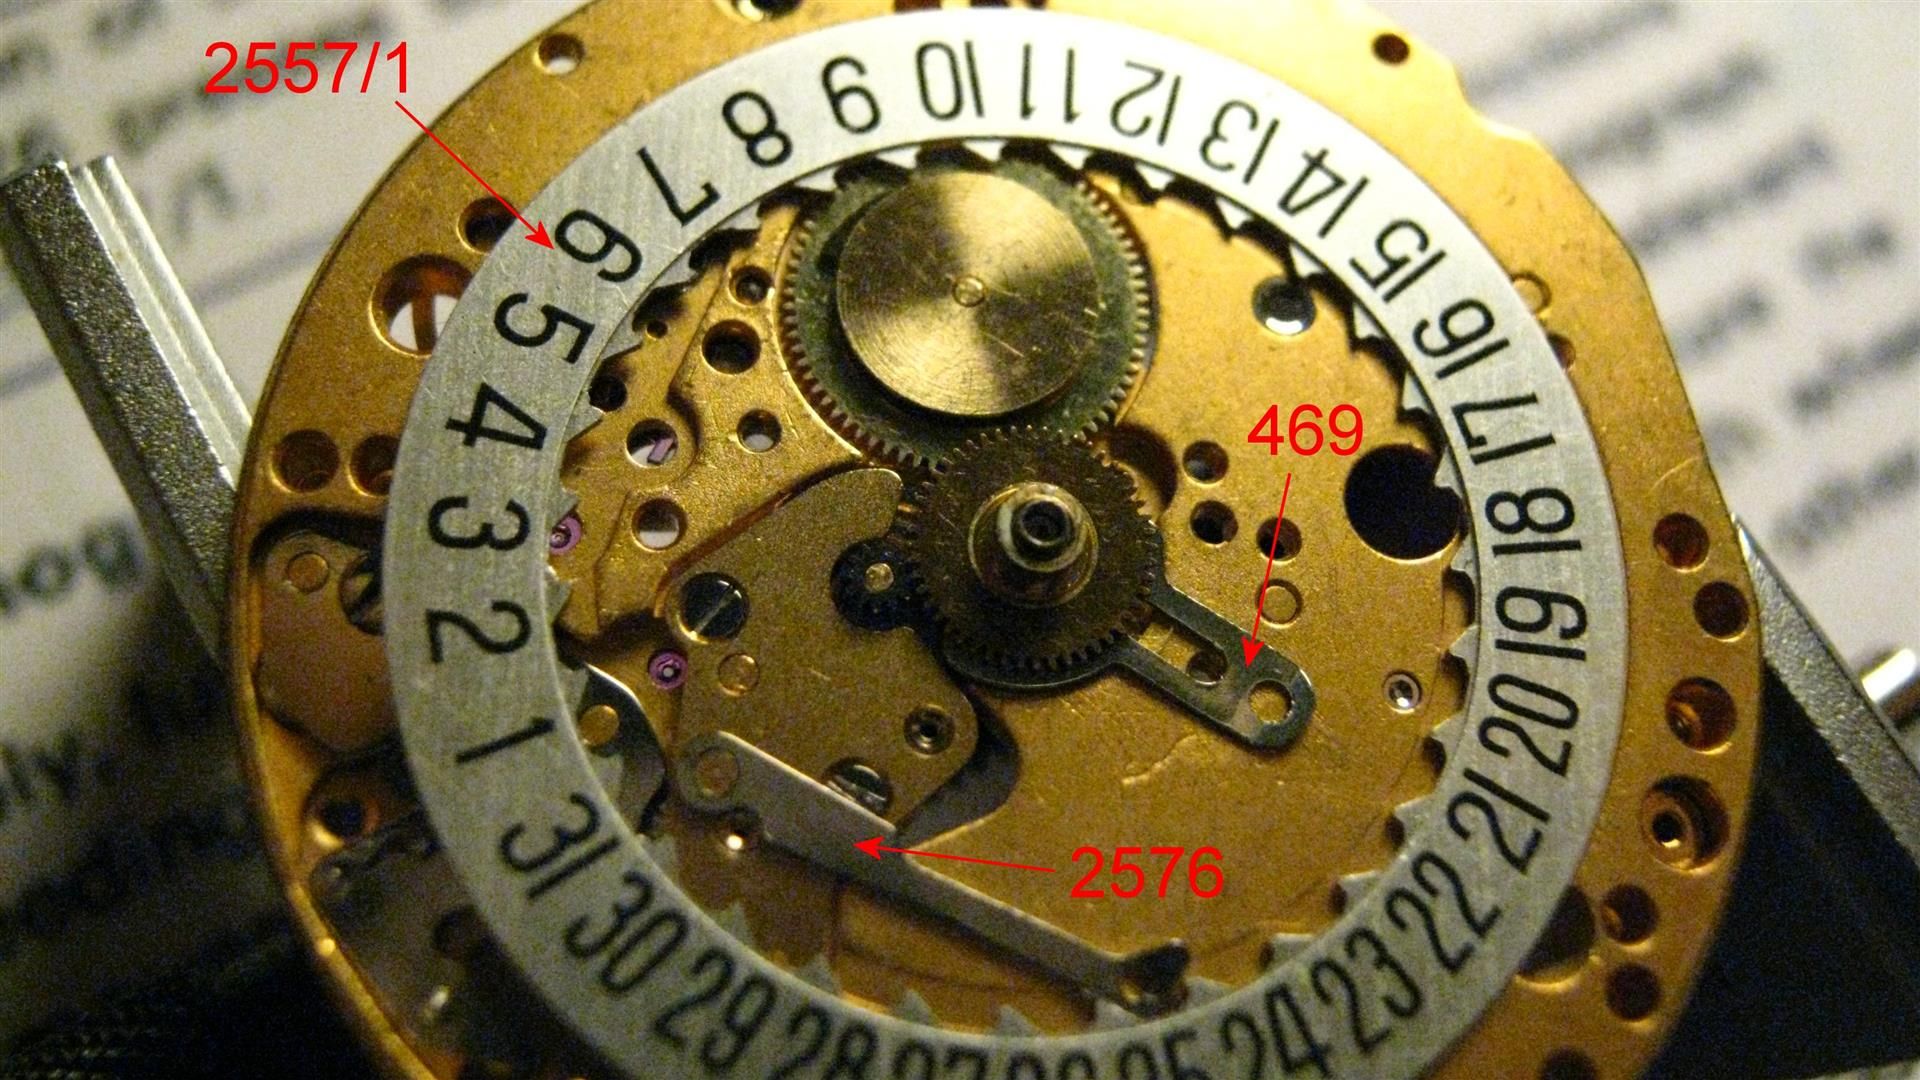
: now remove the 2557/1 date indicator, the 469 hour wheel guard and
: the 2576 date jumper (notice that its 2575 spring will remain
: attached to the 2535 date indicator guard):
:
: 
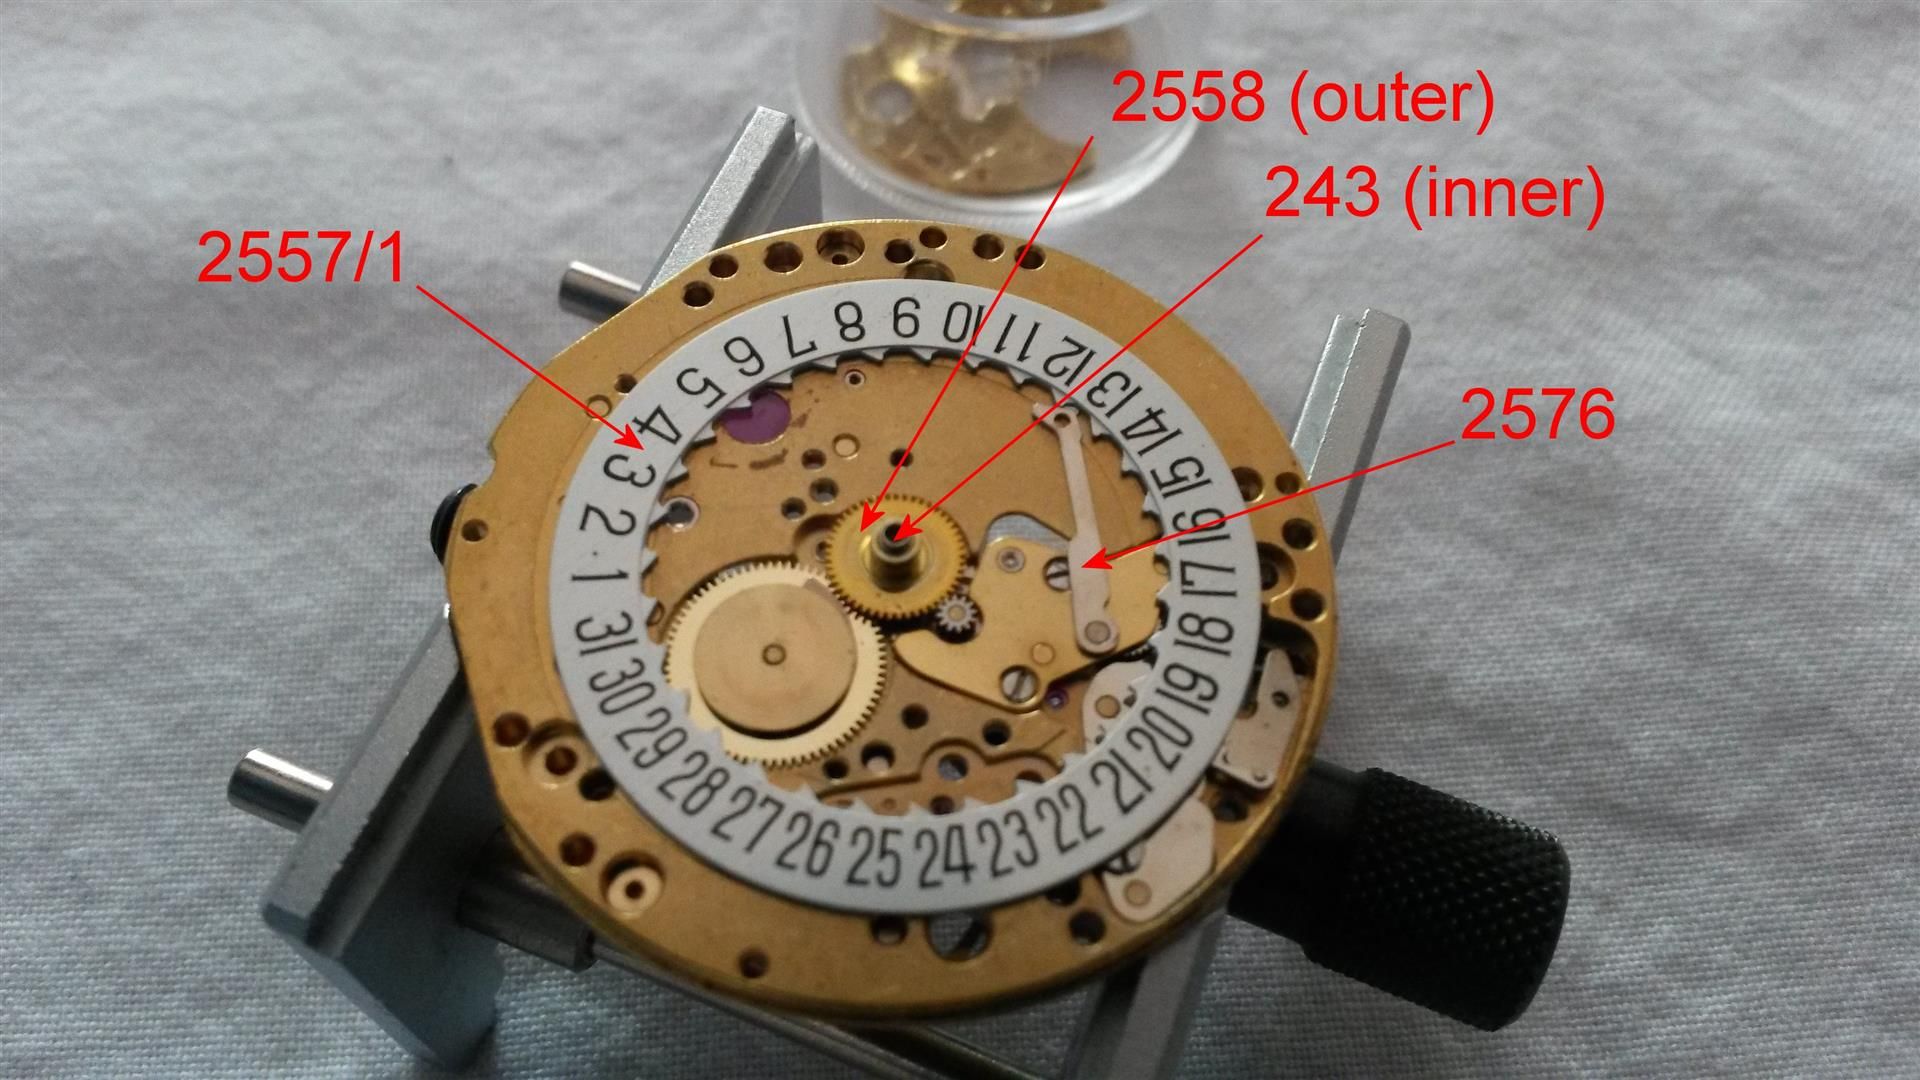
: now pull-up the 2558 double-toothing hour wheel (supports the hour
: hand) and the 243 cannon pinion (supports the minute hand):
:
: 
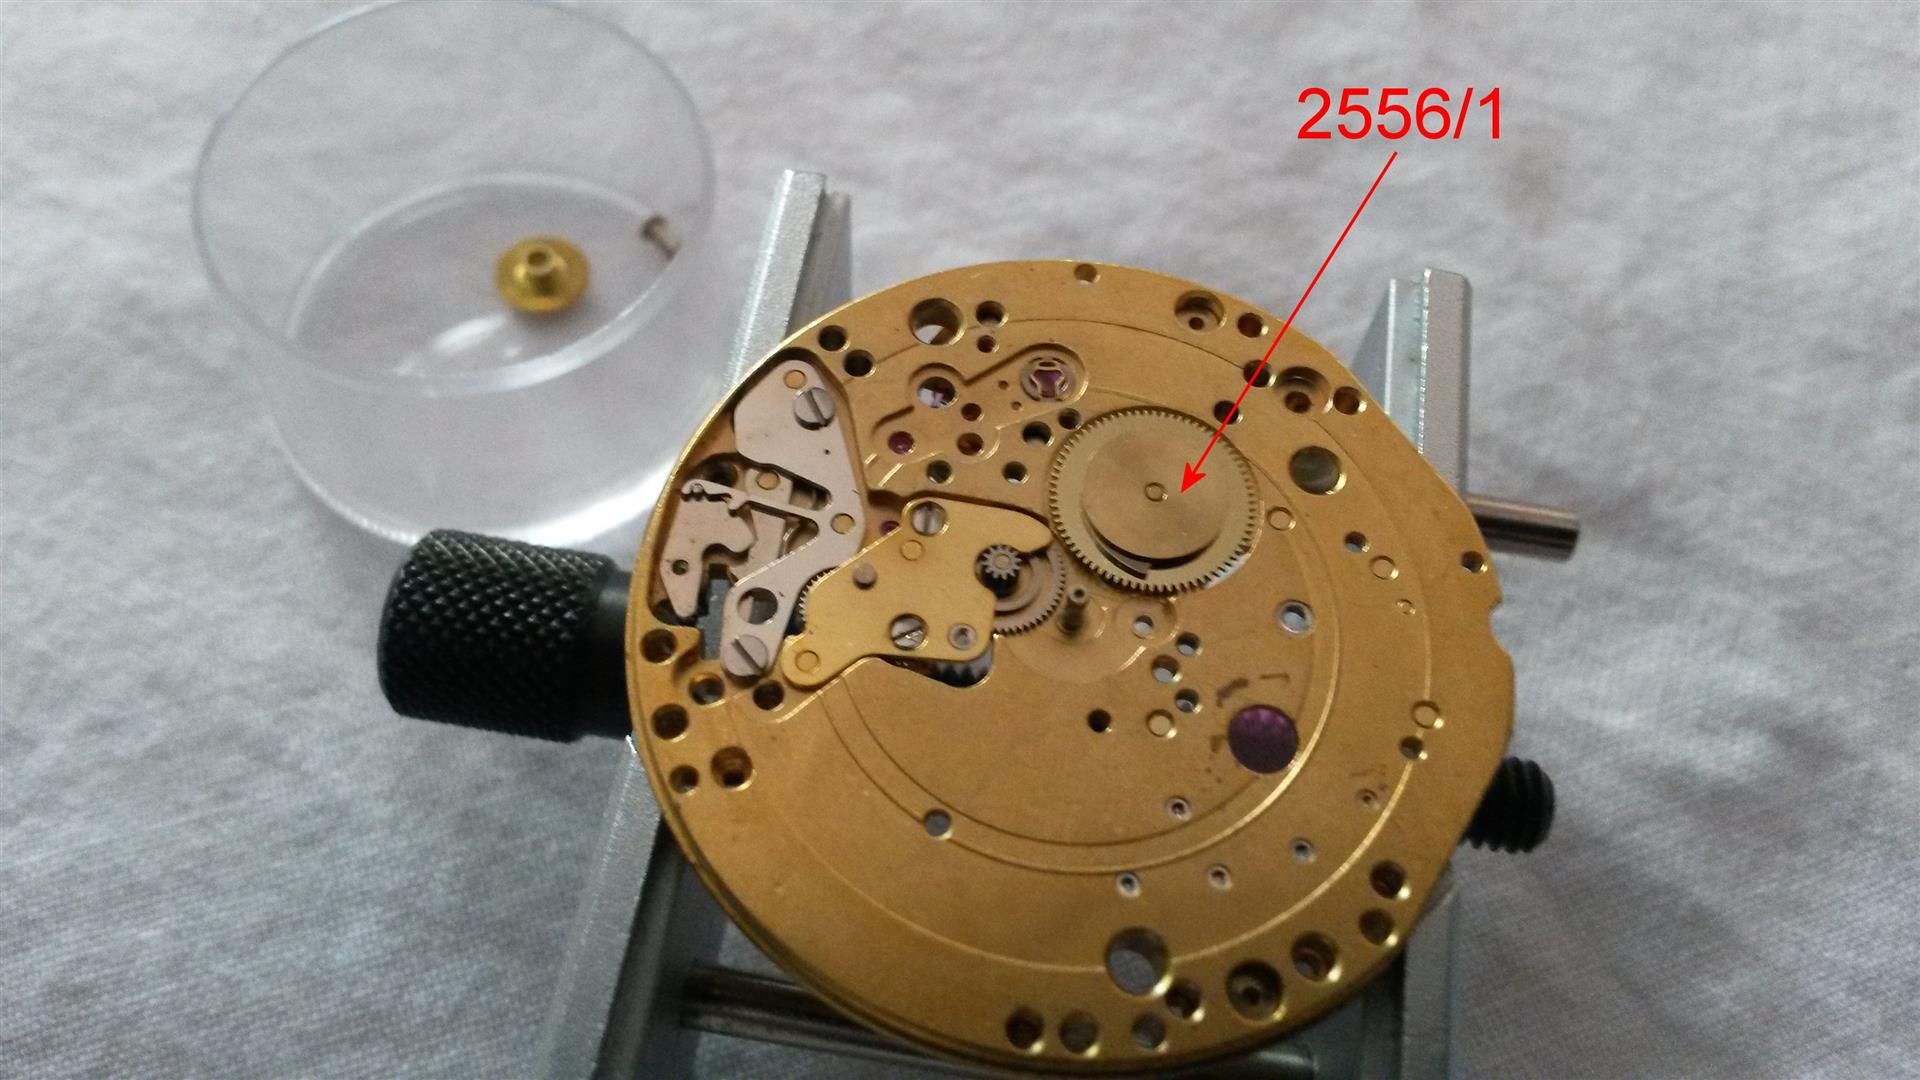
: now the 2556/1 date indicator driving wheel:
:
: 
: remove the 462 minute work cock and its screws 5462:
:
: 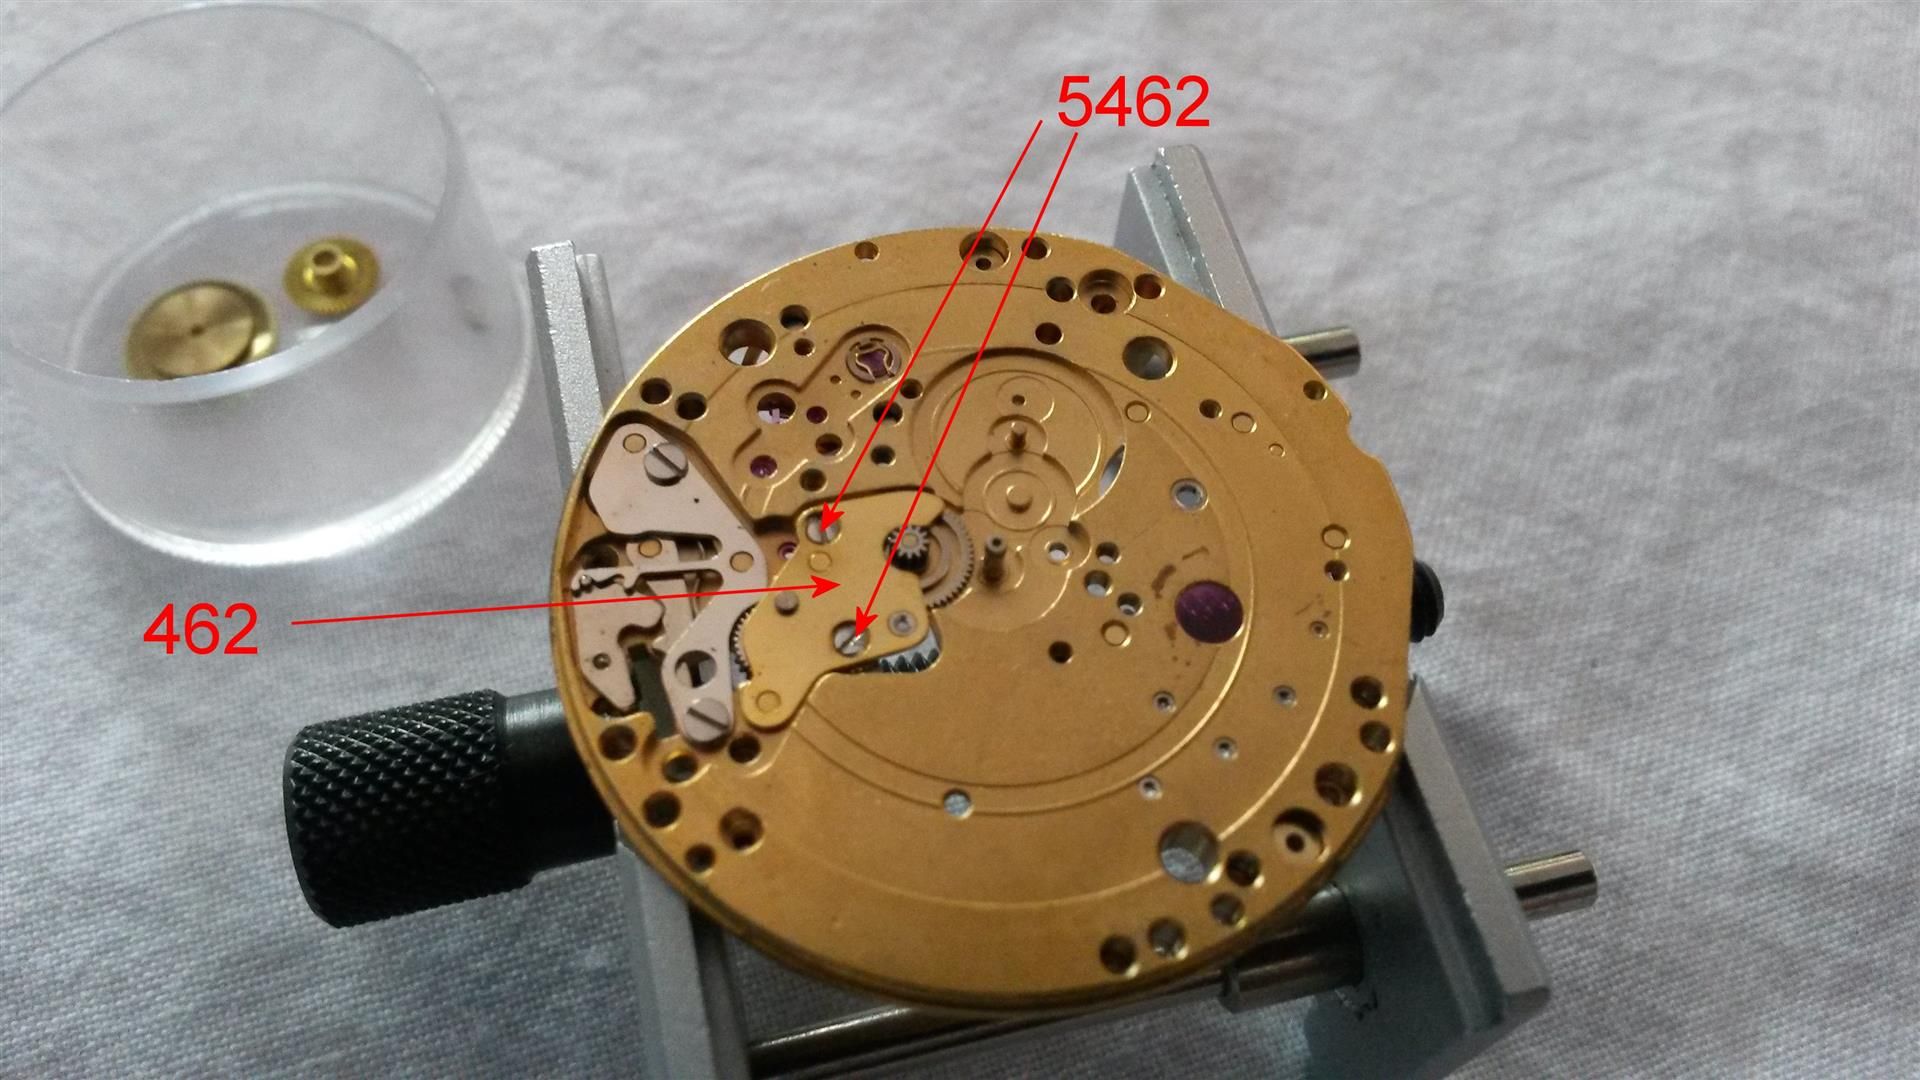
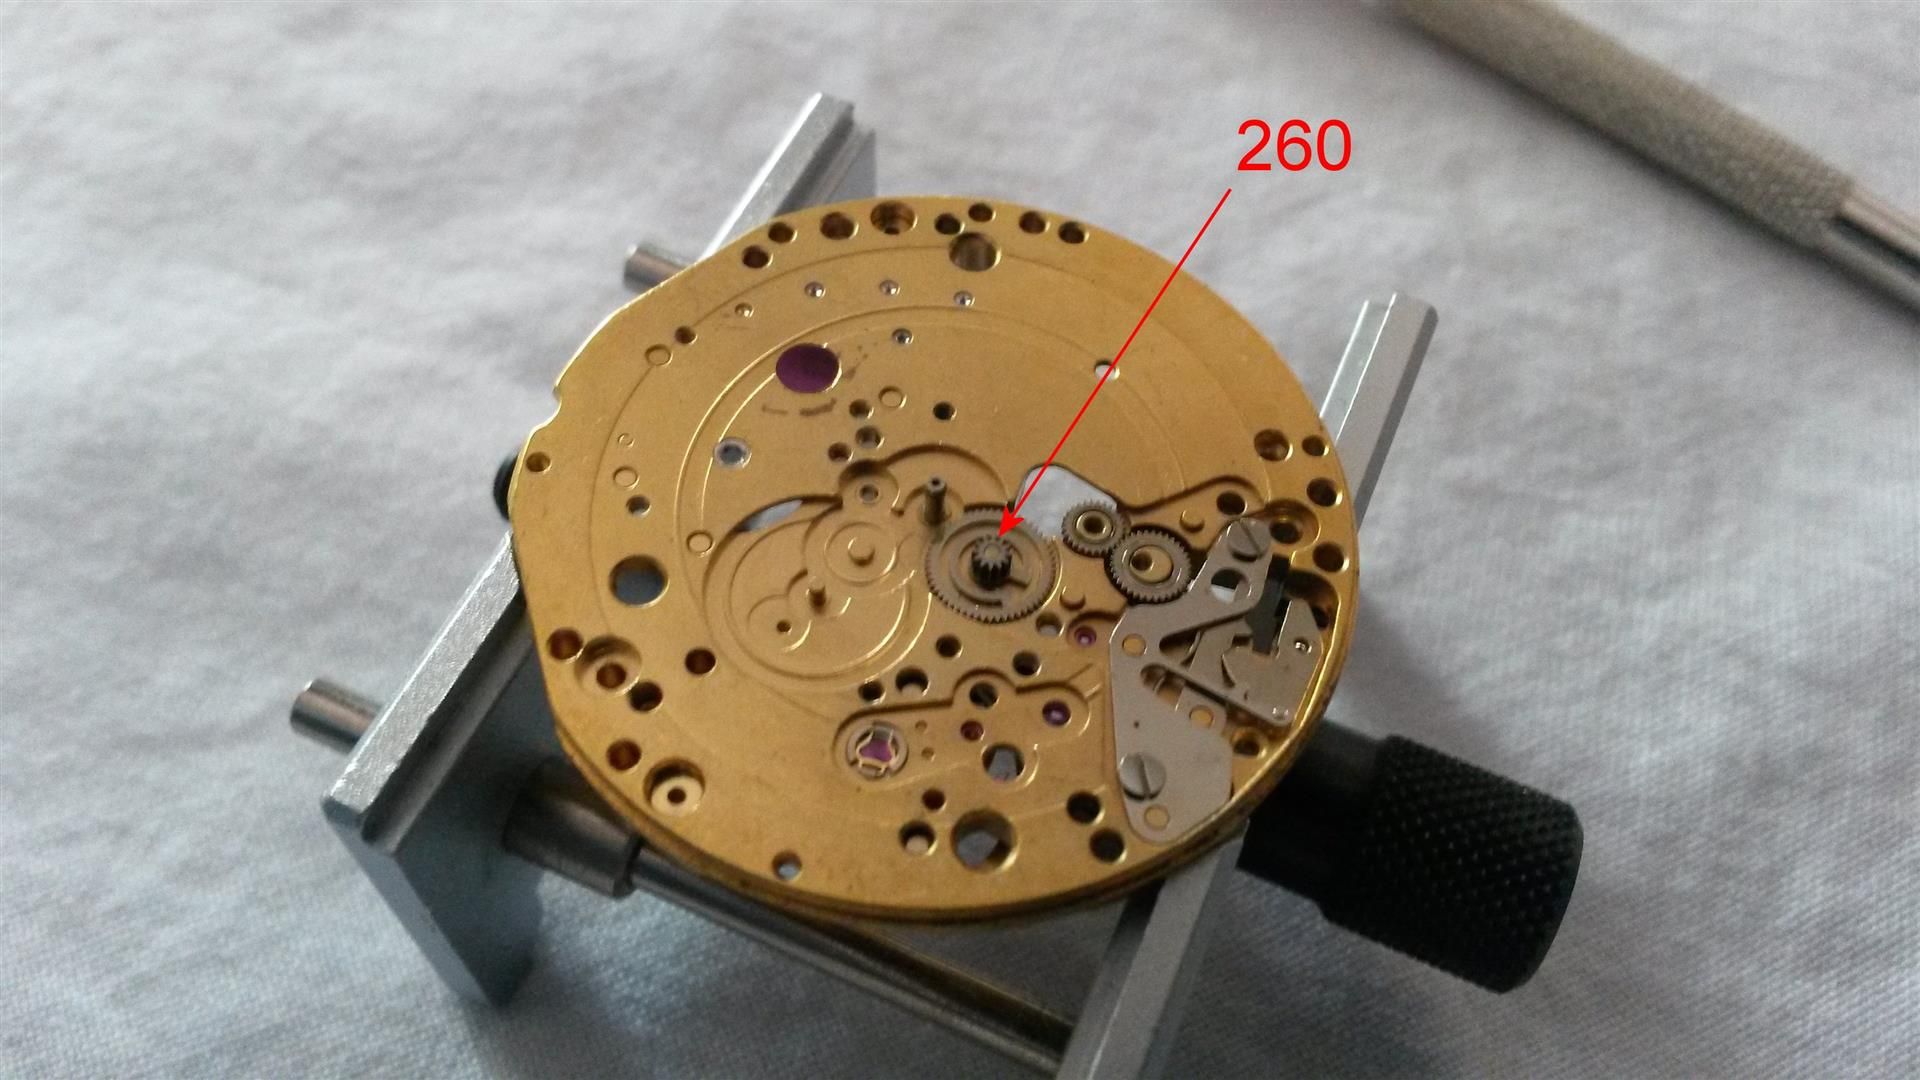
: then the 260 minute wheel:
:
: 
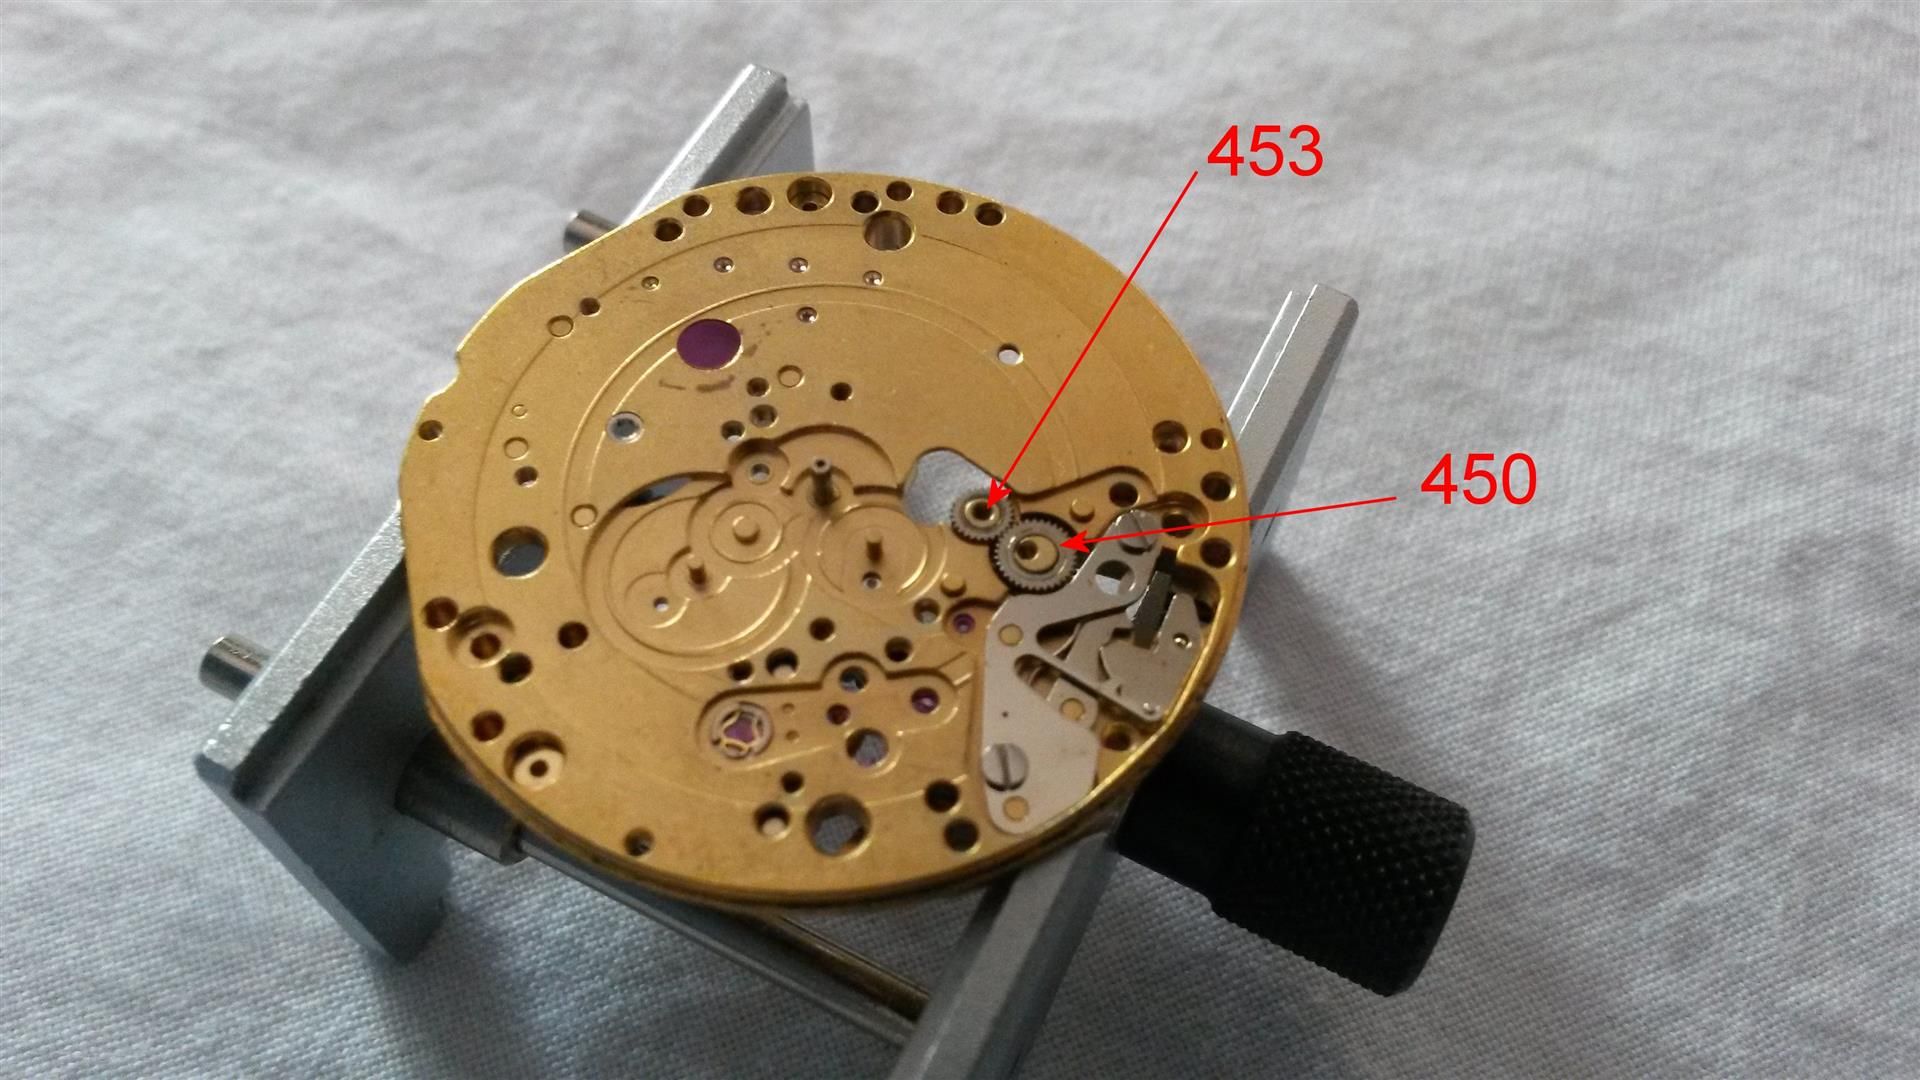
: the 453 additional setting wheel and the 450 double setting wheel:
:
: 
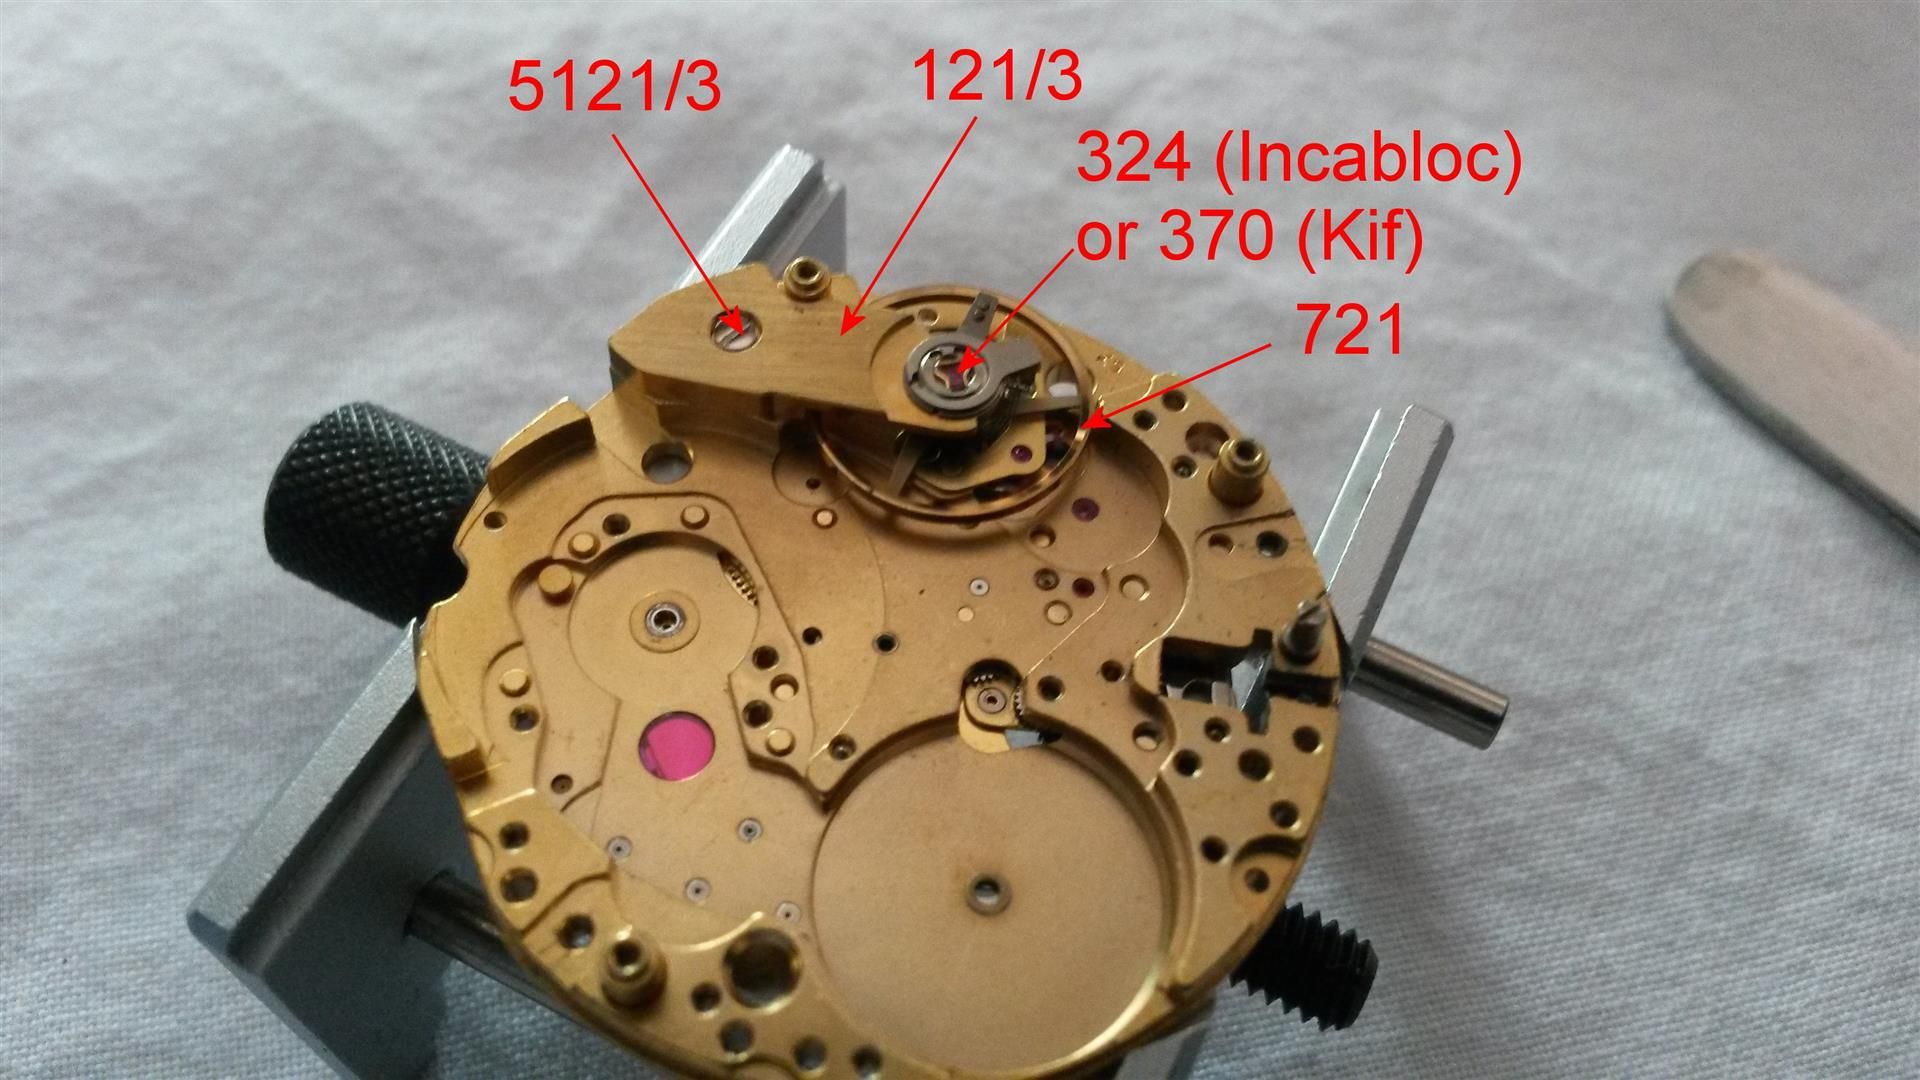
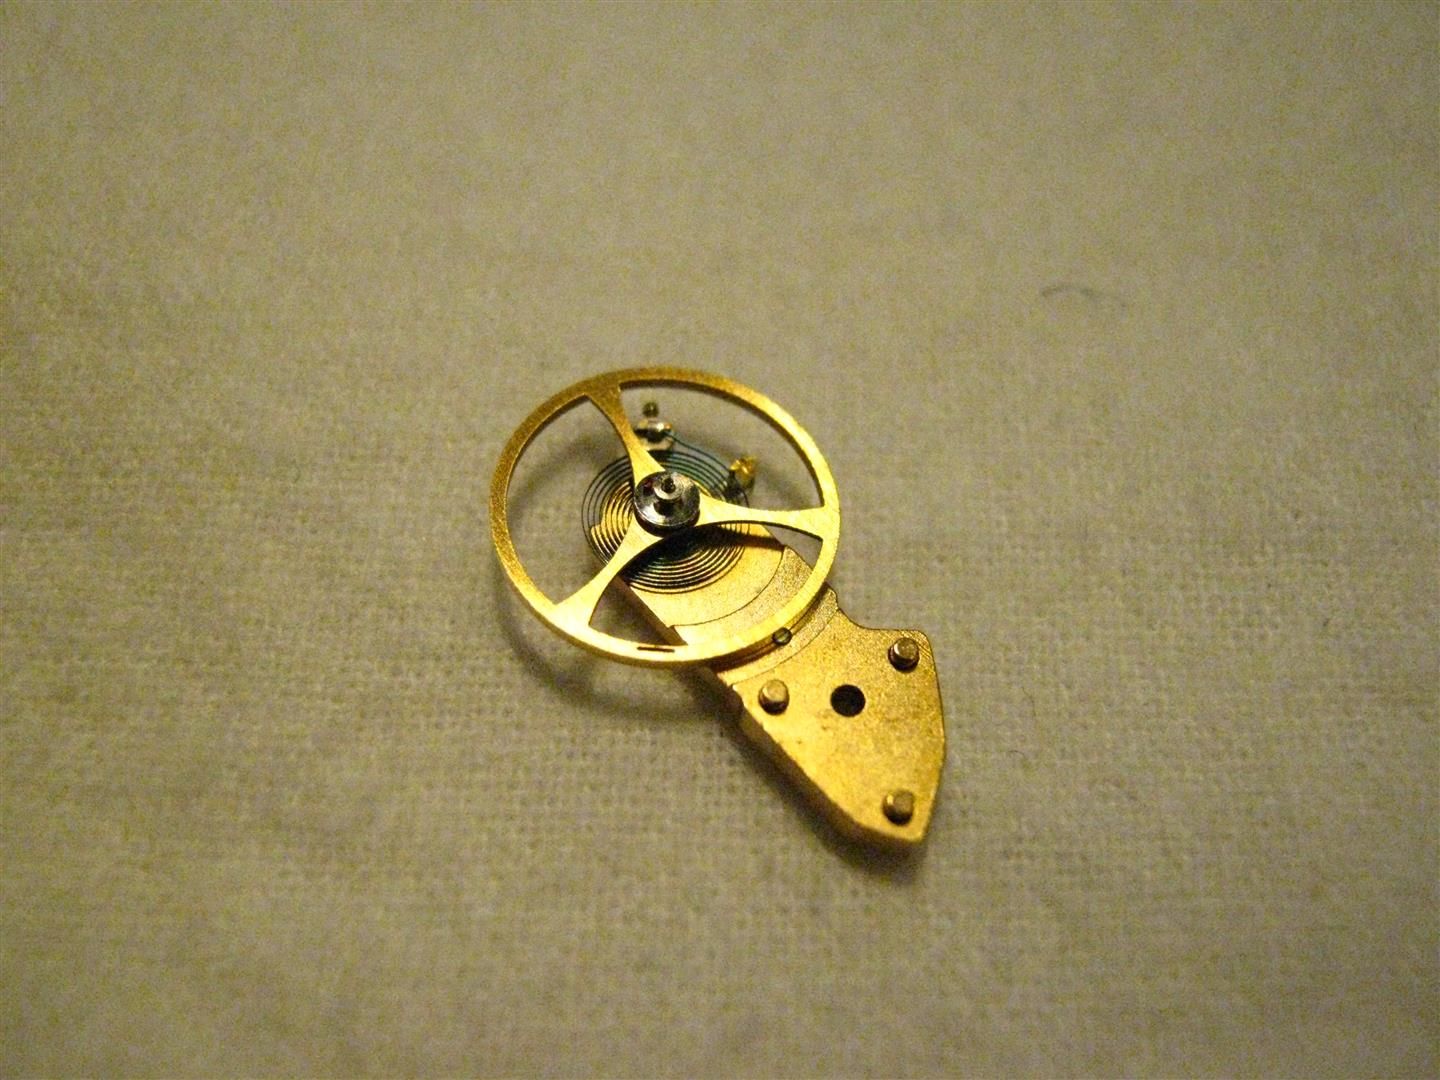
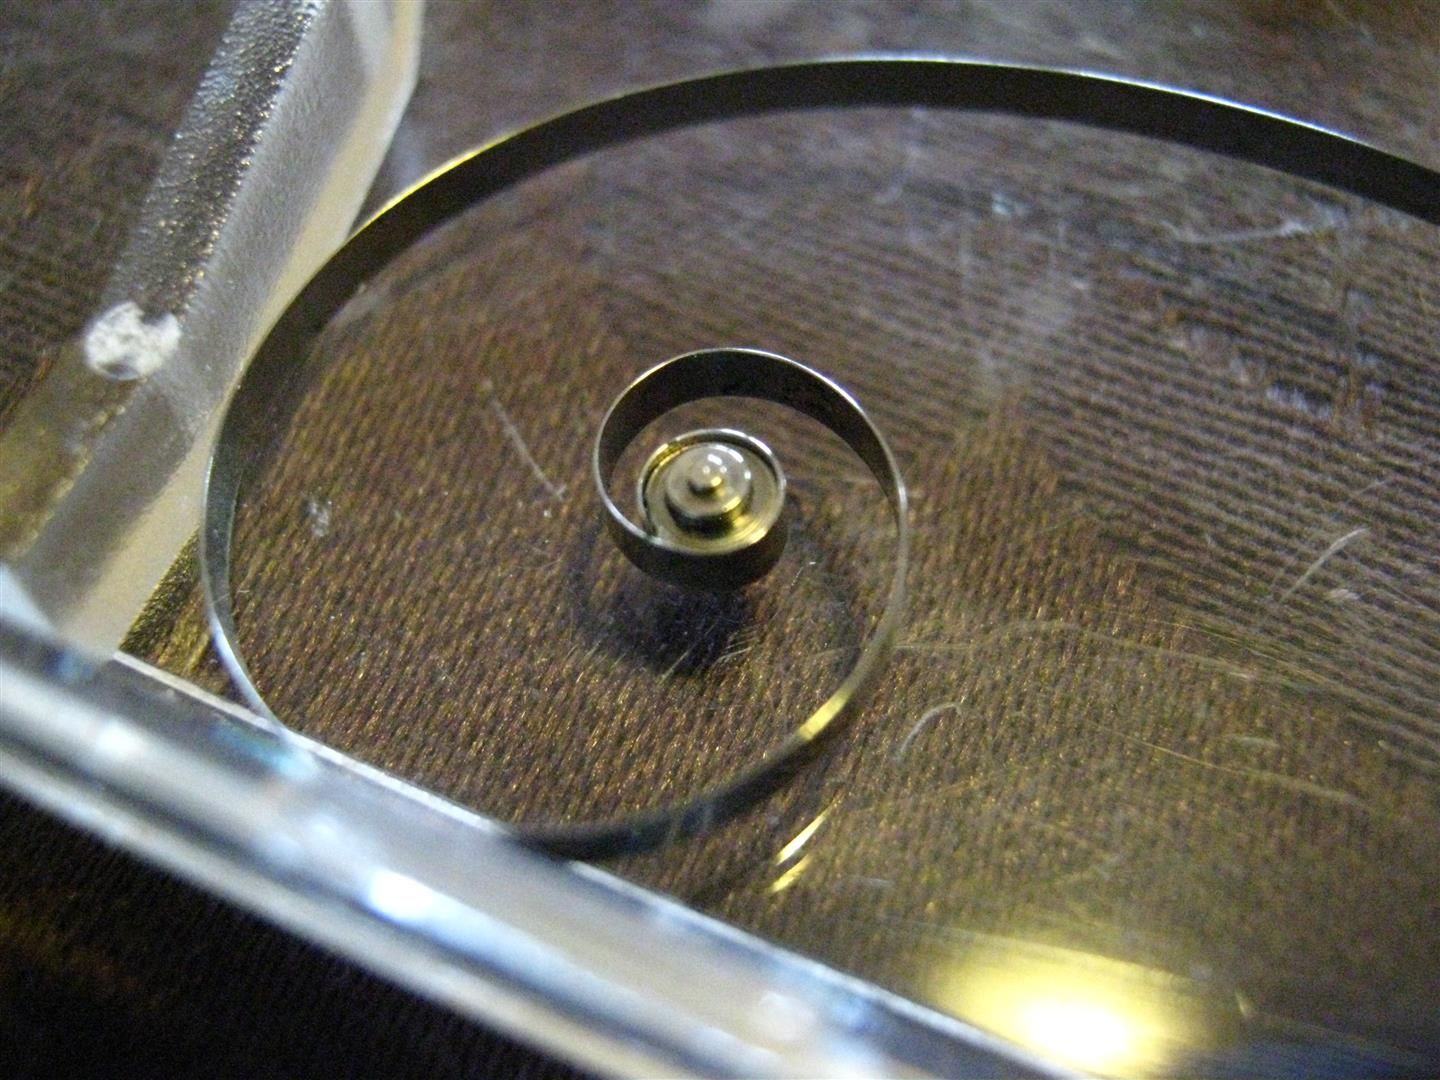
: turn the movement again and let's go with the 721 balance wheel and
: its 121/3 bridge (correct name is balance cock for stud holder
: and shock-protecting device), then open the Incabloc (for
: Cal11/12/14) or Kif (for cal15) golden spring (lyra shaped) and
: remove the 324 Incabloc upper jewel or 370 Kif upper jewel
: (first time I did I lost it sqeezing out from the pliers, then
: understood that a small ball of Rodico with a toothpicker can
: help a lot :-) ):
:
: 
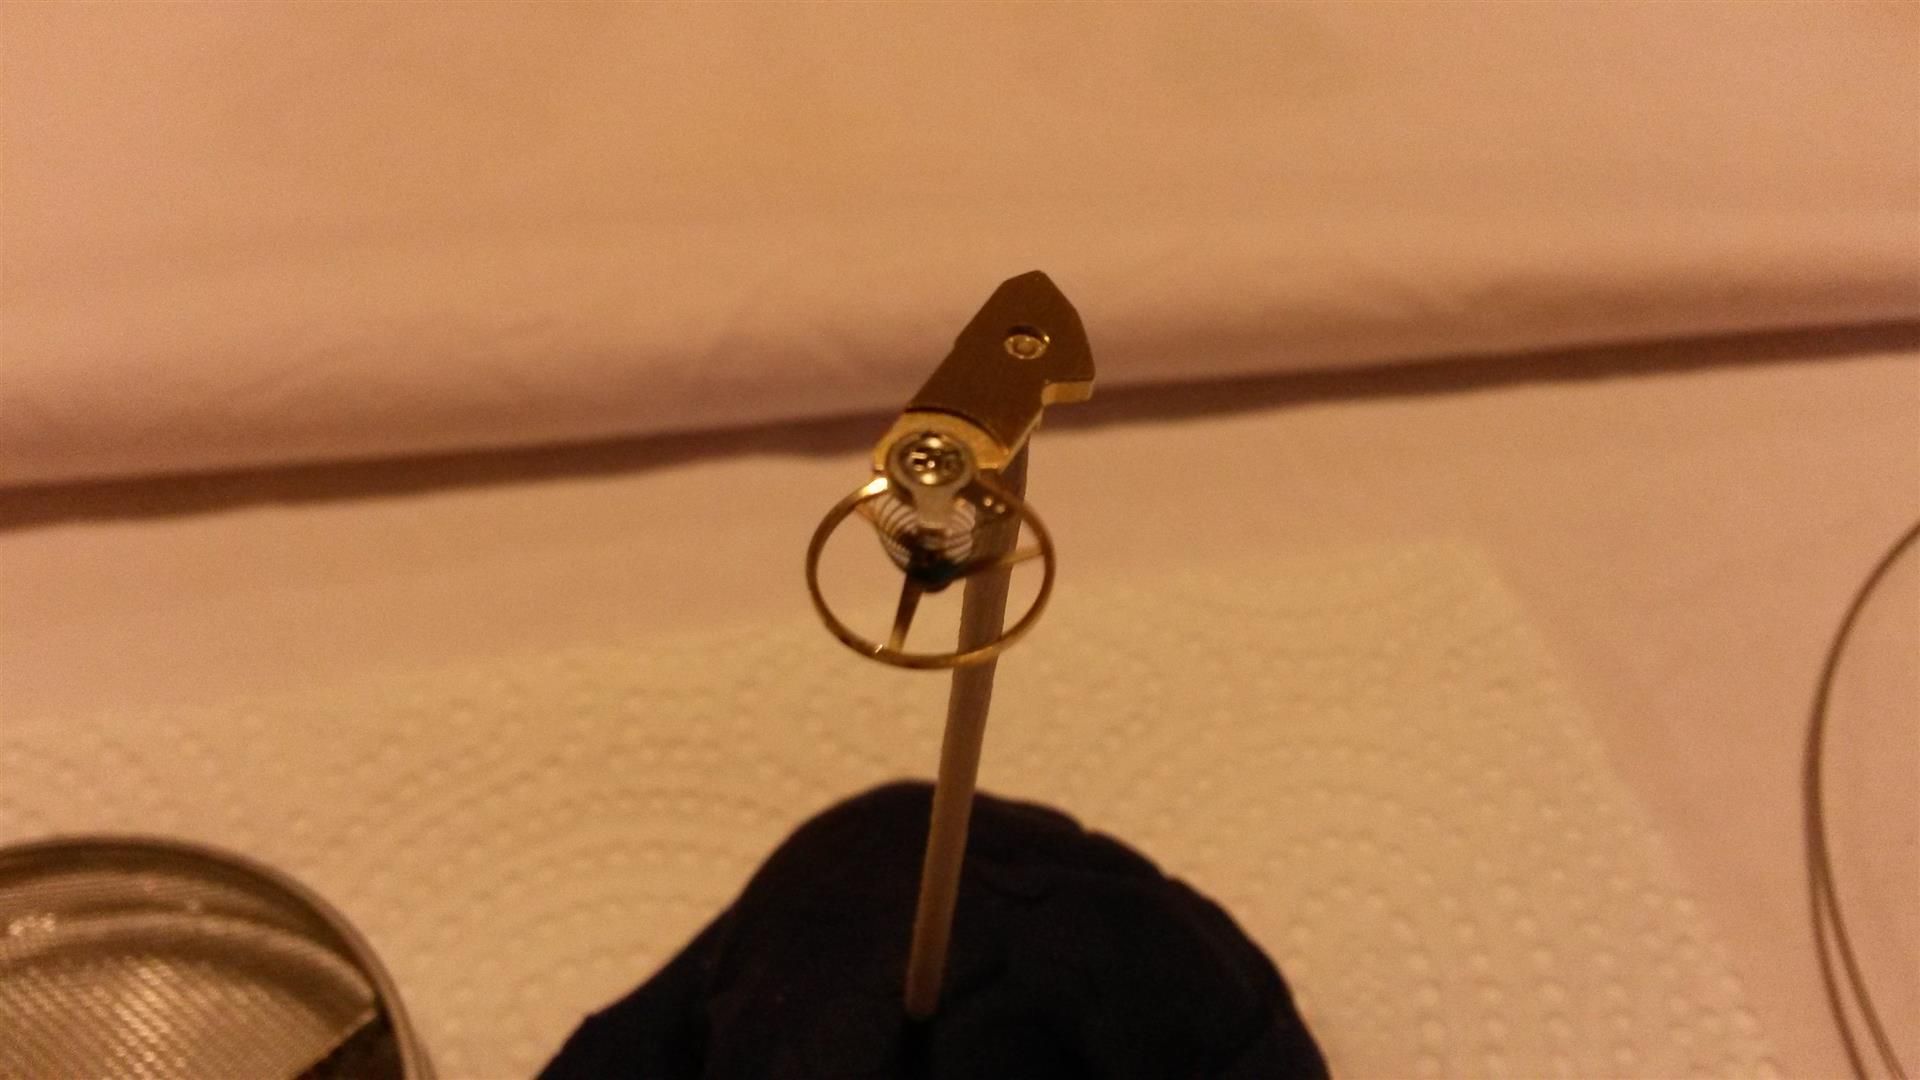
: close the Incabloc (or Kif) spring to avoid losing it and handle
: the balance wheel with care, its hairspring is the more delicate
: part of the watch:
:
: 
:
: 
:
: 
: make the same thing on the dial side removing the 325 Incabloc
: lower jewel from its case (or 371 for cal15):
:
: 
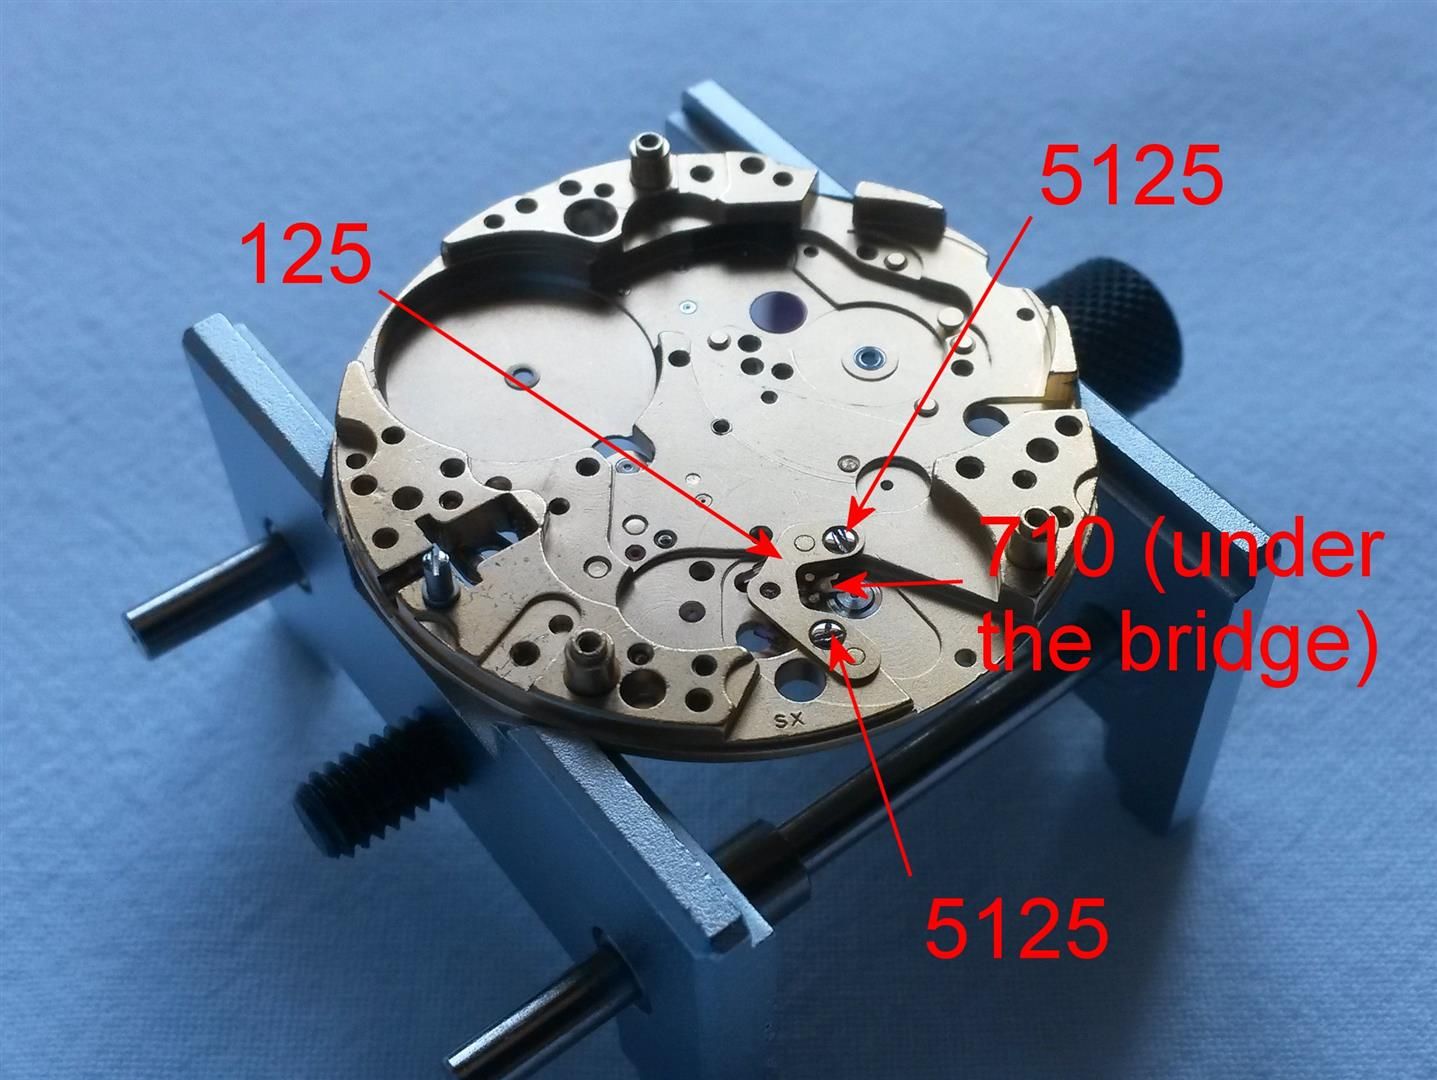
: then the 125 pallet cock (unscrew the two 5125 ones) and the 710
: pallet fork:
:
: 
: if you need to service the mainspring (highly recommended) you must
: open the barrel pushing it on a hard surface, take care that the
: mainspring will squeeze out so do it gently:
:
: 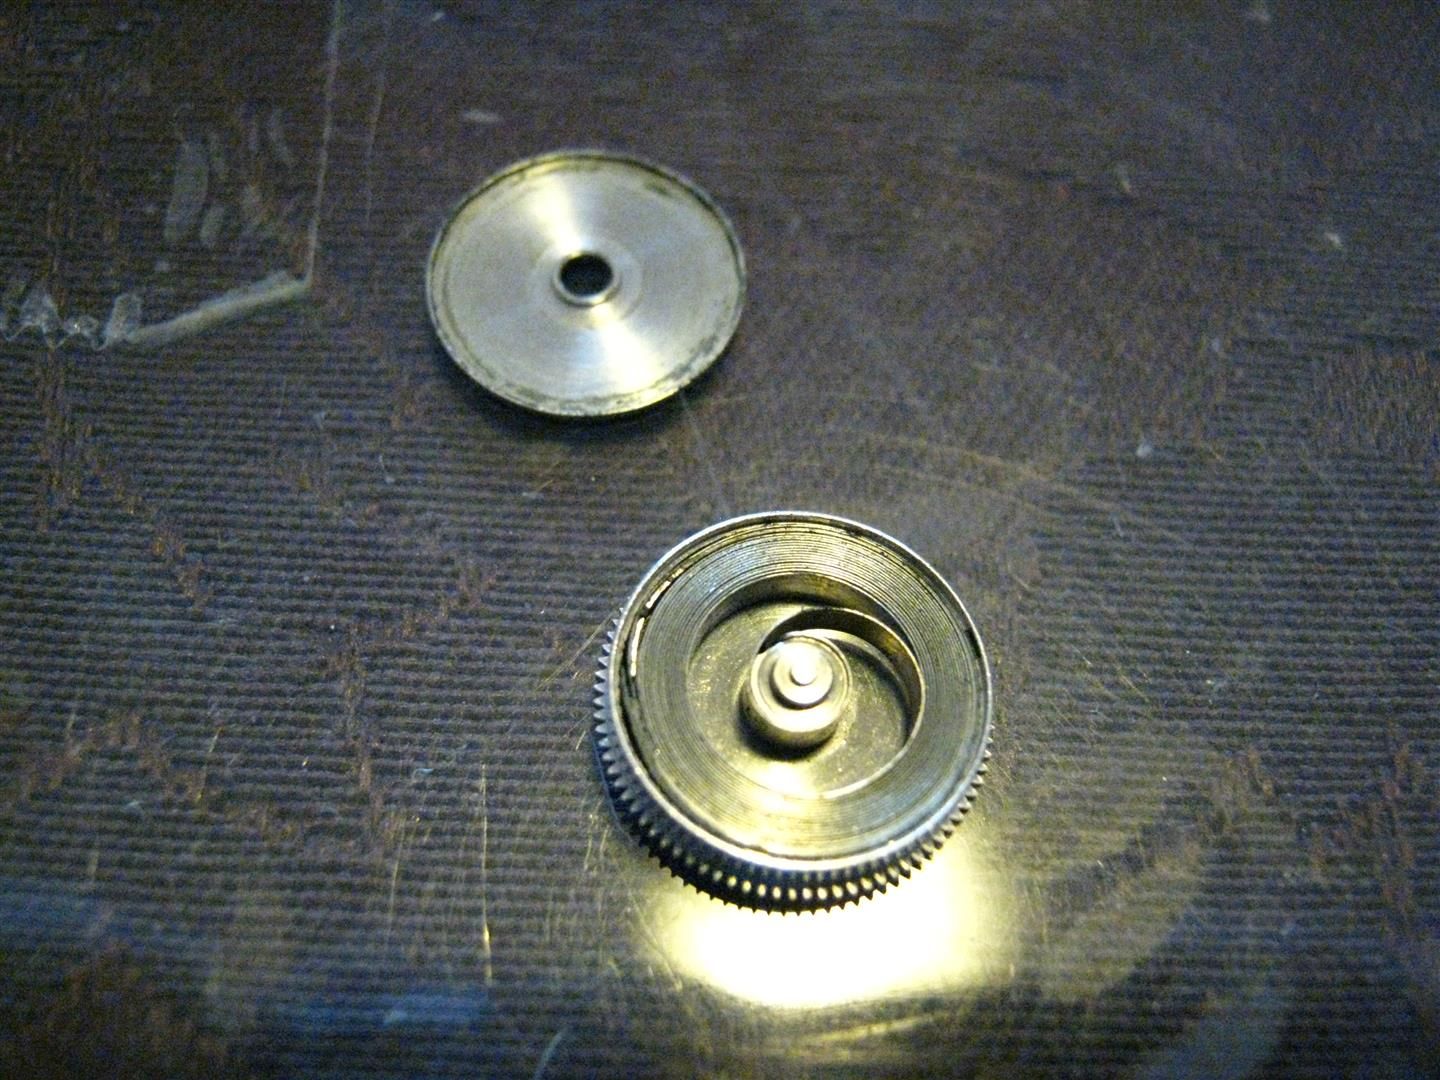
: then remove the 195 barrel arbor:
:
: 
: and you will have the mainspring ready to wash and putting back
: again using the specific Bergeon tool (mainspring winder):
:
: 
: this is my Monza completely disassembled, ready to wash and to be
: oiled and reassembled (but this is another long story):
:
: 
: Before leaving you all I want to thank the person (pro watchmaker)
: who helped me a lot every time I found a problem or had an
: undocumented step to do: you know who you are, and without your
: help I would never did it by myself, so thank you from the deep
: of my heart ;-)
: Hope you will have enjoyed if you arrived until here.
: Cheers.
: Gianluca
| Chronocentric and zOwie site design and contents (c) Copyright 1998-2005, Derek Ziglar; Copyright 2005-2008, Jeffrey M. Stein. All rights reserved. Use of this web site constitutes acceptance of the terms of use. | CONTACT | TERMS OF USE | TRANSLATE |